存档

‘Articles’ 分类的存档

Find out which process/application is using which TCP/UDP port on Windows

2011年1月20日 3 条评论

During the process of analyzing a network problem with a network analyzer tool or a protocol sniffer, especially when we find a suspicious worm or backdoor activity, we get only useful information like MAC addresses, IP addresses and also the port number in transport layer. The analyzer may not even know which application layer protocol is used, even it tells, we still need to figure out which application or process is using this application layer protocol. Is there any method that we can find out the original application or process using that TCP or UDP port? If you are conducting an on-site analysis, Capsa can easily help find out which process is using what port.
Let’s see how.

Find out Port Number

For example, I spot in Capsa Free the following TCP connection suspicious, which constantly communicates to IP: xx.xx.0.183, on port 8000. So I’m going to look up the process name using this port.
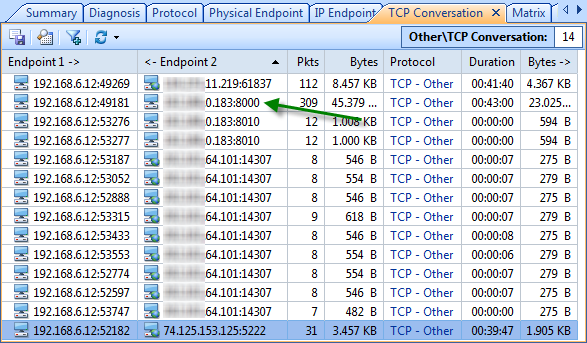
find_port

Find Process ID (PID)

At once I evoke Command Prompt, and entered the following string and hit enter.

netstat –aon | findstr :8000

Explanation:

-a: list all active connections and their ports. –o: show process IDs. –n: display the port numbers numerically.

| findstr :8000: display only the items with string :8000 (findstr means find string). Don’t forget the pipe symbol | at the beginning.

Let’s see what we get.

find_pid

We can read in this case 3968 is the PID, and the source IP address and the target address is the same as the first figure.

Find Process/Application

Next we’ll switch to another tool Process Explorer (a free tool that you can get from: http://technet.microsoft.com/en-us/sysinternals/bb896653) immediately. And we can easily find out the process or application of this PID: 3968.
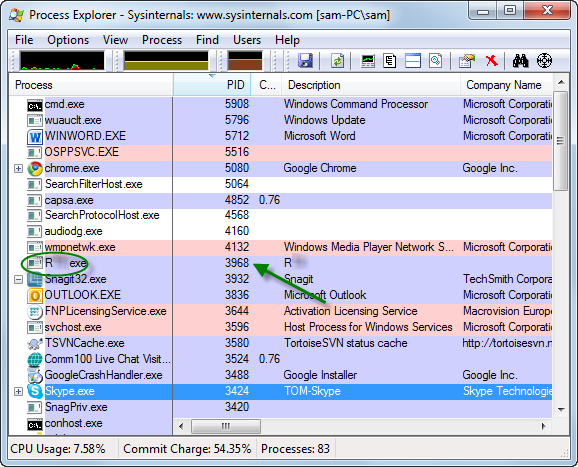
process_explorer

I’m sure it’s an instant messenger used internal in my office and it’s safe. You can also try to find this PID in Windows Task Manager if you don’t have Process Explorer installed.

However task Manager will not provide as much information as Process Explorer. And command prompt is quite handy for geeks.

tasklist | findstr 3968

This command will list only the task items with string 3968. Please refer to previous command if you not sure about | findstr parameter.

Kill Process/Application

So next, you may want to kill a process when you find it’s malicious and want to end it at once? If you are with Process Explorer, you just right-click on a process item and choose Kill Process (Press Del button for short) to kill that process (you can do the same in Task Manager). Again, you may run the following in Command Prompt:

taskkill /F /PID 3968

Explanation:

/F means force to kill the process. And I suppose you understand PID so far.

Now we successfully detect and target the suspicious process with the specific port number, no matter UDP or TCP. And of course this procedure is reversible, you can find out the port number from the process’s PID.
IT in 2011: Four Trends that will Change Priorities

2011年1月17日 没有评论

It’s always a challenge for IT departments to anticipate how corporate technical demands will evolve, especially when IT budgets have been as tight as a drum for two years.

How do you “do more with less” and prepare for an explosion in bandwidth demand, a need to upgrade both software and hardware, and employees asking that work data be available on their personal smartphones?
The post-recession enterprise IT environment is only going to get more chaotic, but opportunities abound for the savvy IT manager, according to a new report from Technisource, a technology staffing and services company with clients ranging from the mid-market to global Fortune 500 companies.

The pressure to have “efficient operations and visibility into every aspect of the organization despite strict budget constraints has been the genesis of strategic trends that are re-shaping IT priorities, whether you are supporting an online retail portal, a university, or a high-tech manufacturing operation,” writes report authors Andrew Speer, Chad Holmes and Dick Mitchell.

Here are four trends Technisource says will play a key role in defining your organization’s priorities for the next year or more.

1. You’re Gonna Need More Bandwidth

It’s almost a guarantee that organizations of all sizes will increase bandwidth in 2011 and 2012 to support growing multimedia within the corporate network. The main technologies driving this need are video conferencing and tele-presence, VoIP and distributed storage networks.

The smart IT manager will stay ahead of the bandwidth curve by assessing WAN and LAN environments frequently and looking for ways to save money.
“Regularly review WAN options, with special emphasis on emerging access technologies that offer better deals on bandwidth and flexible provisioning plans,” the Technisource report states.

“On the LAN side, pay attention to your cabling plant as well as your switch and router fleet to ensure that there are no hidden bottlenecks to impede the inevitable upgrades you’ll be making.”

2. Prepare for More Mobility and User-Owned Devices

Mobile business apps are no longer a luxury, but a necessity at every level of the organization. Advances in Wi-Fi and other wireless technologies can put much of the corporate network in a worker’s pocket. Handheld devices are now commonly used to access corporate e-mail and sales reports, and track supply chain inventory in real time.

Looking ahead, Technisource predicts companies will establish their own internal “apps stores” that give employees password-protected access to software tools and other corporate resources.

IT departments should also prepare to use mobility asset management software to remotely configure and upgrade mobile apps and secure lost or stolen mobile devices by remotely wiping them clean of sensitive data. Finally, network and security admins must prepare for the inevitable: corporate users requesting to use their personal iPhones, Droids and other consumer-friendly smartphones for work purposes.

3. Ascending to the Cloud, One Careful Step at a Time

Companies are slowly but surely moving to some sort of cloud computing model. According to Gartner Group research, 8% of U.S. corporations had implemented a cloud service at the end of 2010, and Gartner expects that number to jump to over 50% by the end of 2012.

A cloud model offers obvious benefits: cheaper pay-as-you-go delivery methods, less operational complexity and fewer, if any, servers to manage.
But a cloud migration is complex, particularly at the enterprise level where data security is paramount.

“You’ll need to develop heightened level of data security for the cloud computing environment, where some, or all, of your critical data resides outside the traditional corporate firewall,” the Technisource report states, adding that cloud-based apps are also not as flexible, providing users with only a simplified menu of configuration and control options.

“Expect some snags when integrating several applications from different vendors into the seamless cloud platform of your dreams,” the report states.
As for return on investment guidance: Technisource writes that initial cloud ROI gain is in the first two years due to a decrease in infrastructure costs, but fee structures should be reviewed in the third year to make sure you’re getting the best deal.

4. The Windows 7 Upgrade Catch-Up

For most businesses, the Great Recession put a hold on any non-essential technology upgrades. But the standard four-year refresh cycles are timing out and hardware and software are getting long in the tooth, to the point where user productivity is sapped and security is at risk.

While users with old PCs obviously need newer and faster hardware, the main driver for upgrades in 2011 is to migrate from Windows XP to Windows 7-capable PCs.
“In 2009 only 7% of businesses had adopted Windows 7, or planned to do so over the next 12 months,” the Technisource report states, “but this has skyrocketed to 46 % in 2010.”

But migrating a large installed base of Windows XP machines to Windows 7 is an IT resource drain and a complicated process that includes re-loading user data, applications, drivers, preferences and settings.

By Shane O’Neill from arnnet.com.au

Using Capsa for WiFi to Secure Your Wireless Network

2010年12月30日 3 条评论

By ZhaoRui Meng — CCIE Security

Wireless technology is one of the most fast-growing network technologies. It has been spreading rapidly around the company, campus, public area etc. Unfortunately, many implementations are being done without attention to issues of security and authentication. As a result, many wireless networks are set up so that anyone with mobile equipment can access, even from outside the building. Anyone with the proper equipment can also spy on traffic. The problem with WLAN users is that very few understand how their data is sent through the air, much less comprehend the associated risks.

Recently a study discovered that 40 – 50% of the wireless users aren’t implementing any form of protection. Some wireless networks are encrypted with WEP key, which is significantly less secure than WPA. To prove my point, I randomly scanned wireless networks around my office building and found out 7 WLANs were encrypted by WEP keys, one network unencrypted among 15 SSID received. It takes no more than 10 minutes to crack a WEP password by BT3. WPA has helped to increase the security available to wireless network. But a good dictionary may brute forcing a WPA password when the pre-defined key is weak.

Due to the broadcasting nature of radio propagation at typical Wi-Fi frequencies, anyone on the street or in the neighborhood will have chance to access to it. A whole subculture has sprung up of people going around, scanning for open wireless nodes, and publicizing them to people who want free wireless access. Capsa for WiFi helps network administrators manage access control by monitoring access IP addresses and security. Capsa for WiFi can detect all access IP addresses as well as peer hosts activities, to monitor network activities and identify network penetration and scanning anomalies. More specifically, any wireless engineers can use Capsa for WiFi to lock down network intruders, monitor clients’ online activities, and spot malware like worms, ARP attacks, Trojan horses etc. To deploy Capsa for WiFi is as simple as to connect your Caspa for WiFi equipped station with a common wireless card to your AP and enable traffic capturing on the fly. You can realize wireless network management without setting up port mirroring.

How to save monitored email contents with Capsa 7.3

2010年11月4日 没有评论

Colasoft just released a major upgrade of Capsa Network Analyzer a few days ago and we notice that the Security Analysis Profile is the most important new feature in Capsa 7.3 which helps users to locate and troubleshoot network issues and attacks like ARP attack, DoS attack and port scanning. Besides that, the feature of email auto-saving that users appreciated in previous versions had some adjustments. So, this article is aims to teach you how to save monitored email contents.

In Capsa Network Analyzer 7.3, if you need to save a copy of the monitored email to your hard disk, you should do the following:

Step 1. Enable Log Output

a. Go to the Start Page and click the Set Data Storage link on the right panel.
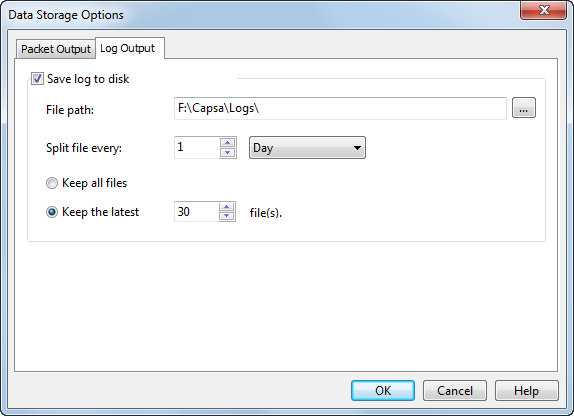
b. You see the Data Storage Options dialog box, highlight the Log Output tab and then check the Save log to disk checkbox.
c. Finish the settings of choosing file folder and setting up the rules to save logs in different files.

log_output

Step 2. Enable Email Copy

a. Double-click the analysis profile you want to use and enable the Email analysis module. Probably you’ll use Full Analysis or Email Analysis because they initially enabled the Email analysis module. This step is very important and if you don’t enable Email analysis module, Capsa will not analyze and capture any email.
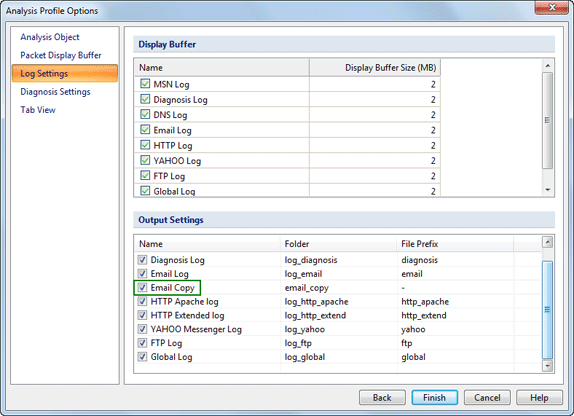
b. Click Next and click Log Settings. You will focus on the Output Settings and make sure the Email Copy item is checked.
log_output_settings

Set up as the instructions above, Capsa will save all captured inbound and outbound email contents to your hard disk. Why did you make these adjustments, you may ask? This is because users of the earlier versions might be toggled among different analysis profiles and they often forget to enable log output on different profiles. That means in previous versions, every analysis profile has a switch of email auto-saving. Therefore this time we can see the switch is made globally. Once you enabled log output, the logs will be saved to your hard disk no matter which analysis profile you choose.

It’s also notable that this time Capsa is able to output logs in multiple files as the rules you set. For example, you can set to save logs to a separate file every 10 minutes. It makes it easy for you to find useful logs in time-split small files rather than in a big log file.

I’m sure you already know how to save emails with Capsa 7.3 after reading through this article.

Review: Capsa Free Gives You the Skinny on Your Network–For Free

2010年9月13日 2 条评论

Ian Harac, PC World, Sept 13th, 2010

When a program has a “free” edition, very often, it is just a demo without a time limit, offering only enough functionality to get you to buy the “real” version. Capsa 7 Free is not such a program; it’s a full-featured network traffic monitoring and reporting tool. The features you get for free, without a time limit or unceasing nags, are exceptional.

205151-capsafree-large_350
This high level overview is just the start of Capsa Free; you can drill down very deep to learn more about your network.

Capsa Free provides an ongoing look at everything that passes through a selected network adapter. (This is one of the few limitations of the Free version vs. the Professional and Enterprise versions; you can analyze only one adapter at a time. For most home or small business users, this will not be an issue.) It breaks the data down by protocol and IP address, the latter of which is very interesting from a home user perspective–a days’ casual surfing, captured and analyzed by Capsa, revealed I contacted computers in over a hundred different nations. You can also set it to store packets, with a variety of options for how many to store and how long to keep them. Later, you can rummage through them with Capsa, if you know what you’re looking for (or just want to peek under the hood and understand more about what happens between when you type an address in your browser and when you see a picture of a cat appear on your screen.)

For network administrators in small businesses, Capsa 7 Free is a potent tool with many analysis and testing abilities. With it, you can see what’s happening on your network, whether you want to monitor usage or determine if a connectivity problem really is on your end, You can hand-code packets and then send them to an adapter, in order to see what happens. The ability to set alarms if particular traffic patterns occur can help you see an attack coming and head it off, and there are tutorials on-line to help you do just that.

Capsa Free is a tool for professionals and enthusiasts. A casual home user will not find much use in Capsa Free, though, being free, it doesn’t hurt to check it out. Using it requires either a good knowledge of internet protocols and low level functionality, or a strong desire to learn such things. If most or all of your traffic routes through a single network adapter, you may never see a need to upgrade to the Professional edition, which starts at $549.00.

Colasoft Now is Providing Free Network Analyzer Software

2010年8月5日 没有评论

August 5, 2010.

Colasoft, an innovative provider of all-in-one and easy-to-use network analyzer software, today announces the release of a free network analyzer software-Capsa Free, which is fully functional with no expiry days. The intuitive, simple graphic network analyzer designed for personal and small business use is now totally free to the public. While Wireshark is regarded as the pioneer of the free network analyzer, Capsa is considered as the great combination of Wireshark and Polit, strong capturing ability plus powerful analyzing and reporting abilities. Seems unbelievable? Without any doubt, another great free network analyzer is born.

“Capsa Free is a great combination of powerful network monitoring, in-depth packet decoding, reliable network diagnosing, real-time alerting and thorough reporting ability, it provides you innovative solutions to numerous network problems”, said Roy, Luo, CEO of Colasoft, “as network security is becoming more and more important, by releasing the free but full functional network analyzer, we are hoping to offer a great chance for small business and networking geeks to learn more about network analysis techniques. We believe there will be more and more network analyst, just like “doctor in networking, more and more people are going to use an easy-to-use and powerful network management software. Capsa Free aims to fulfill our goal of largely promoting the popularization of network analysis techniques and make the maximize value of enterprise network.”

Capsa Network Analyzer Free Edition Highlights:

• Your own dashboard, important parameters in one place and in graphs
• Record network Profile, set your analysis objective and perform customized analysis.
• Powerful customizable alarm, customize dozens of alarm trigger combinations.
• Identify and analyze more than 300 network protocols, create and customize protocols, analyze unique protocol traffic.
• Intuitive TCP timing sequence chart.
• Accurate MSN & Yahoo Messenger monitoring statistics.
• Email monitor and auto-saving Email content.
• Enhanced, Customizable Reports.
Capsa Free runs under Windows XP/2003/Vista/7. Download it here.

Finding out who is downloading in the Network

2010年7月30日 1 条评论

There comes the moment when the local network becomes very slow and they are suspicious of downloading in their network. To ensure the normal use of bandwidth, they need to find out who’s downloading in the network quickly and stop them to make sure everyone can work with efficiency. But many just don’t know how where to get started.

With Capsa Network Analyzer, you can find out the downloading computers within five minutes. Capsa captures all the traffics in the network, going-in and coming-out, and analyzes them to provide you enough statistics of the traffic. To find out who is downloading, we always start from looking into traffic volume of each machine.
Why should we start from traffic volume? That’s because when the downloading is digesting your bandwidth greedily, they will always generate greater traffic volume, not packets but bytes number.

Step1. Run Capsa, using Full Analysis with no filter, and capture traffic for three minutes.
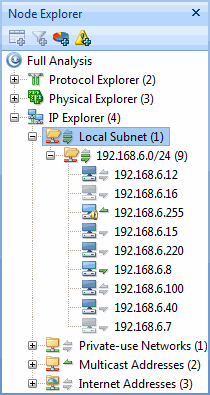
Step2. Highlight IP Explorer -> Local Subnet in Node Explorer window.
node-explorer

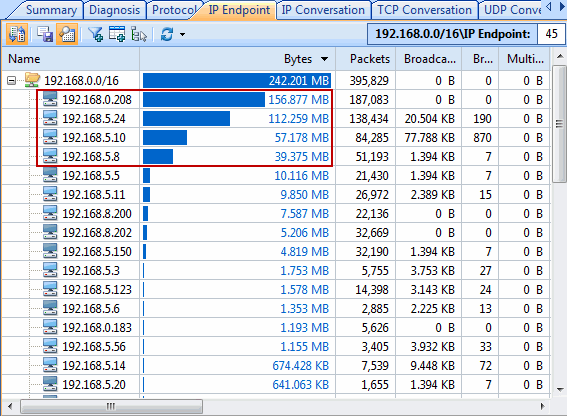
Step3. Open the IP Endpoint tab in the Main View.Click Bytes column header to rearrange the list in DESC order.
ip-endpoint
The IP addresses with the longest bars on the top of the list are the suspects. But we need to eliminate the ones we trust. Then, we locate the machines with their IP addresses and warn them to stop downloading right away. It takes no more than five minutes and really it’s simple, right?

This article focuses on normal downloading, while there is another kind of downloading, Bit Torrent, out there. If you are interested about finding out Bit Torrent downloading in your network, please refer to here.

ITWire: Review – Colasoft Capsa network analyser

2010年7月25日 没有评论

by David M Williams
July 26, 2010

If you run any type of network infrastructure there will come a time you need a low-level packet sniffer to work out just what is going on. Colasoft’s Capsa product challenges the myth these tools must be hard to use.
start_page
Have you ever had users ask why is the network so slow? Chances are high any IT professional will have looked into network related faults but found it difficult to get a handle on just what is going on because Ethernet is so, well, ethereal.

Here is where a network analyzer comes in handy. It will sniff the raw packets of data flying about as they happen and give you meaningful information to make intelligent determinations.

Previously I have talked about the tremendous open source product WireShark but WireShark isn’t for everyone. For one, the Windows port requires GTK+ and Glib to be installed which some Windows administrators aren’t keen to do. For another, although it is less arcane and cryptic than a command-line tool like tcpdump it’s still not user-friendly enough for many.

Here is where Colasoft’s Capsa product comes in. As you might guess, it is a deep low-level network protocol analyzer and its purpose is to give you the low-down on just what is happening on your network.

Where it stands out from the competition is its brilliant ease of use. Capsa adopts the same ribbon style interface as seen in Microsoft Office 2007 and it is a snap to navigate between tabs and check out the options and power available.

When it comes to network analysis so much is going on that it’s a must to separate out the chatter from the data that matters. Capsa makes it a cinch to hone in on what you want with easy to use filters and rules.

Capsa also has a concept of projects, meaning you can set global filters and rules to always apply but also make specific filters and rules for individual projects, letting you switch between these as needed.

Capsa displays intuitive options and is a genuine pleasure to use. I do not believe I’ve seen a more straightforward or elegant network analysis tool with the majority requiring expert knowledge to get any meaningful results.

Capsa is a commercial product so it does carry a price tag beginning at $US 549 for one license without maintenance but if your job requires you to troubleshoot network faults then the software will pay for itself.
As well as the commercial support Colasoft provide an extensive and helpful FAQ. A free trail of Capsa is avaliable here.

How to detect an email worm with Capsa network analyzer 7?

2010年7月22日 没有评论

In networking, an email worm is a computer worm which can copy itself to the shared folder in system. And it will keep sending infected emails to stochastic email addresses. In this way, it spreads fast via SMTP mail servers. An email worm can send lots of infected emails in a very short time and it will never stop unless it’s removed. It will cause a large traffic and make the system go slowly. Sometimes it even makes the mail server crash. This article aims to teach you how to detect an email worm with Capsa network analyzer 7.

About Capsa 7

Capsa 7 is the flagship product of Colasoft. It is based on the second-generation Colasoft Packet Analysis Engine (CSPAE), which substantially improved the data processing speed and guaranteed the analysis performance in large traffic networks. Some unique features and ideas are introduced to Capsa 7, like Network Profile, this function allows user to set and save network profiles for different environments (departments, clients), making their analysis more customized, accurate and efficient. Another prominent feature is Analysis Profile which provides flexible, extensible and effective analysis performance based on user’s analysis objectives.

Step 1 of detecting an email worm with Capsa network analyzer 7: Diagnosis tab

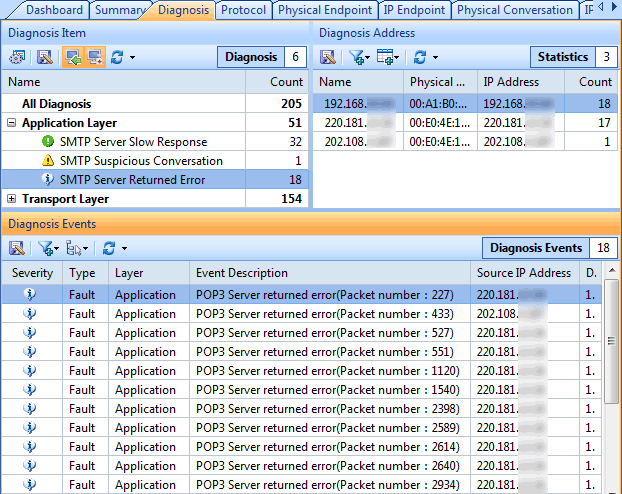
In the Diagnosis tab we can see all the network issues automatically detected by Capsa network analyzer 7 , also some causes and solutions are suggested.
diagnosis-tab

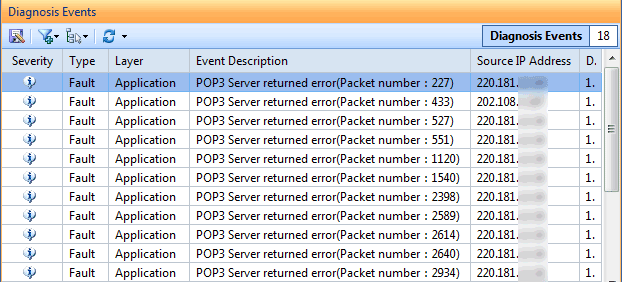
If there is a host infected with an email worm, we should be able to see SMTP events in the application layer like this:
diagnosis-events

Step 2 of detecting an email worm with Capsa network analyzer 7: Locate the source IP

Possibly the source IP is the host infected with an email worm as it is sending too many emails in a short period of time with SMTP. So let’s locate the source IP in the Node Explorer window with the Locate shortcut in the right-click menu.

Step 3 of detecting an email worm with Capsa network analyzer 7: Log tab

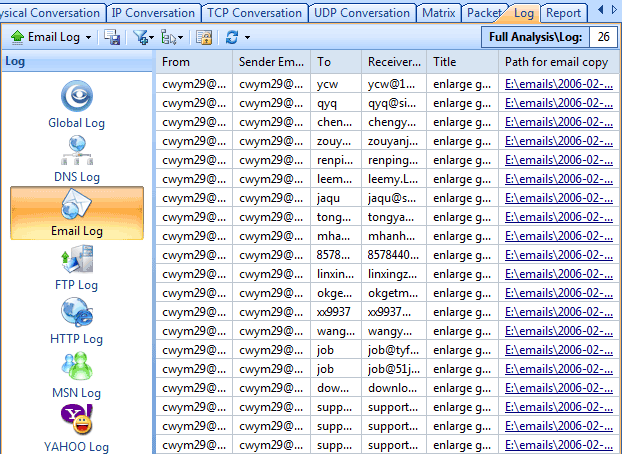
Check if the host is sending emails to a large number of recipients in a very short period of time. If so, we can determine the host is infected with an email worm and should be handled immediately. We should be able to see logs in the tab like this:
log-tab

No doubt the final step is to isolate the host and kill the email worm with some AV software.So, I’m sure you already got how to detect an email worm with Capsa network analyzer 7. A free trail of Capsa network analyzer 7 is avaliable at http://www.colasoft.com/.

How to monitor network traffic in windows 7 with Capsa network analyzer?

2010年7月13日 1 条评论

Network traffic is data in a network. In computer networks, the data is encapsulated in packets. So network traffic monitoring is to capture all the packets going down the network. Sometimes, it will be very useful to check your network activity. When Windows 7 network is very slow, internet browsing is very slow, connection problems and high network activity occurs when you do nothing, you will find this really helpful. The purpose of this article is to help you understand how to monitor network traffic in windows 7 with Capsa network analyzer.

About Capsa Network Analyzer

Capsa is an easy-to-use Ethernet packet sniffer (network analyzer or network sniffer) for network traffic monitoring and troubleshooting purposes. It performs real-time packet capturing, 24/7 network monitoring, reliable network forensics, advanced protocol analyzing, in-depth packet decoding, and automatic expert diagnosing. By giving you insights into all of your network’s operations, Capsa makes it easy to isolate and solve network problems, identify network bottleneck and bandwidth use, and detect network vulnerabilities.

Solution 1. Monitor network traffic in the Dashboard tab of Capsa network analyzer

If we want to have a graphical view of the statistics or get a trend chart of the network traffic, then we can use the graphs in the Dashboard tab. It provides a great many of statistic graphs from global network to a specific node. You are able to as well create almost any kind of graph based on any MAC address, IP address and protocol, etc. With these graphs, you can easily find out anomalies of the network and get useful statistics.
dashboard-tab

Solution 2. Monitor network traffic in the Summary tab of Capsa network analyzer

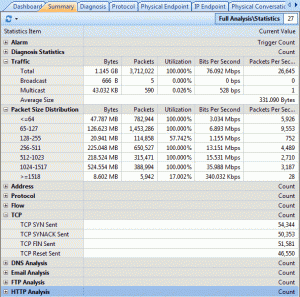
The Summary tab provides general information of the entire network or the selected node in the Node Explorer window. In the Summary tab we can get a quick view of the total traffic, real-time traffic, broadcast traffic, multicast traffic and so on. When we switch among the node in the Node Explorer window, corresponding traffic information will be provided.
summary-tab

Solution 3. Monitor network traffic in the Physical Endpoint and IP Endpoint tabs of Capsa network analyzer

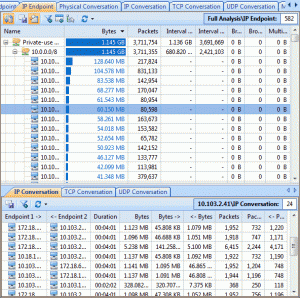
In these two endpoint tabs (Physical Endpoint and IP Endpoint), we can monitor network traffic information of each physical address node and IP address node, both local and remote. With their easy sorting feature we can easily find out the nodes with abnormal traffic, such as which hosts are generating or have generated the largest traffic.
ip-endpoint-tab

Solution 4. Monitor network traffic in the Protocol tab of Capsa network analyzer

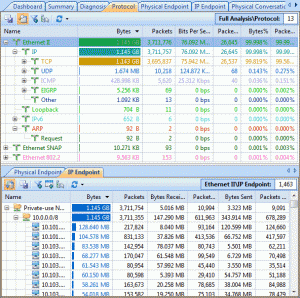
The Protocol tab lists all protocols applied in your network transmission. In the Protocol tab we can monitor network traffic by each protocol. By analyzing the protocols in the network traffic, we can easily understand what applications are consuming the network bandwidth, for example, the HTTP stands for website browsing, and the POP3 stands for email, etc.
protocol-tab

Solution 5. Monitor network traffic in the Matrix tab of Capsa network analyzer

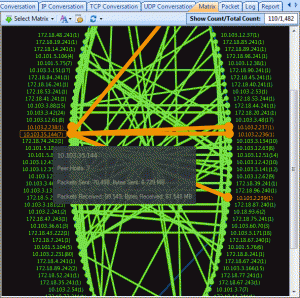
The Matrix tab visualizes all network connections and traffic details in one single graph. The weight of the lines between the nodes indicates the traffic volume and the color indicates the status. As we move the cursor on a specific node, network traffic details of the node will be provided.
matrix-tab

These are the very basic methods of monitoring network traffic in windows 7 with Capsa network analyzer, there are lot of advanced functions available on Capsa Network Analyzer 7 .

Share your experience with this tool and any new findings on this is welcomed.