存档

作者存档

How to detect ARP attacks in windows 7 with Capsa network analyzer?

2010年7月19日 没有评论

ARP attacks also known as ARP spoofing is a technique used to attack an Ethernet wired or wireless network. It is becoming increasingly popular among internet raggers because of its simpleness, fastness, and effectiveness, thus causing severe influence to the internet environment. As more and more people trust windows 7, it is very important to find a network analyzer that supports windows 7. Capsa network analyzer is such a great software that supports windows 7. The purpose of this article is to teach you how to detect ARP attacks in windows 7 with Capsa network analyzer.

The main point of ARP attacks detection is to locate the source of the attack when there is any ARP attack happens to our network. Capsa network analyzer can do it quickly and accurately. First of all, you need to download Capsa network analyzer at its official site and install it correctly. Now let’s see how we can achieve that.

Solution 1 to detect ARP attacks: Diagnosis Tab

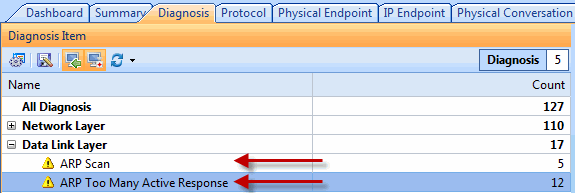
The Diagnosis tab is the most direct and effective place we check the location of ARP attack, and should be our first choice.
diagnosis-tab

Solution 2 to detect ARP attacks: Protocol Tab

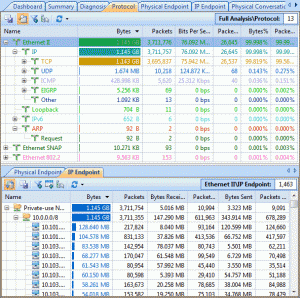
As shown in the following figure, the status of ARP packets are displayed in the Protocol tab, Here we must pay special attention to the value of ARP Request and ARP Response. The ratio of ARP Request and ARP Request should be approximately 1:1 under general condition. If there is a great difference between these two values, there may be ARP attacks in the network.
protocol-tab

Solution 3 to detect ARP attacks: Packet Tab

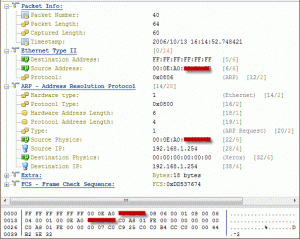
Packet decoding information in the Packet tab can tell us the original information of ARP packets, by decoding ARP packets, we can find out the source and destination of the ARP packets, the function and the reality of these ARP packets.
packet-tab

Solution 4 to detect ARP attacks: Physical Endpoint Tab

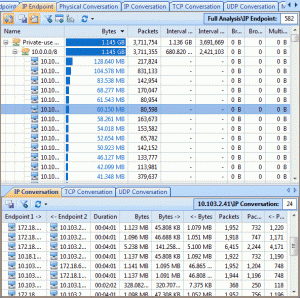
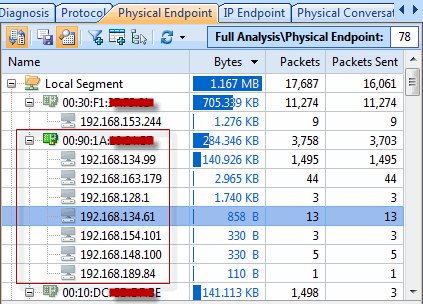
In the Physical Endpoints tab we can view the correlation of MAC address and IP address. Generally speaking, one MAC address shall have only one IP address corresponding to it. If one MAC address has multiple IP addresses to it, the condition may be:

1.the host with the MAC address is the gateway;
2.these IP addresses are bound to the MAC address manually;
3.ARP attack
physical-endpoint-tab

Soluton 5 to detect ARP attacks: Matrix Tab

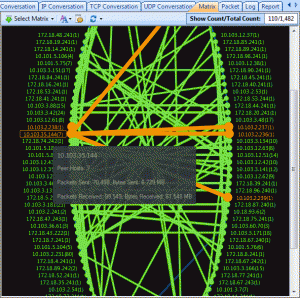
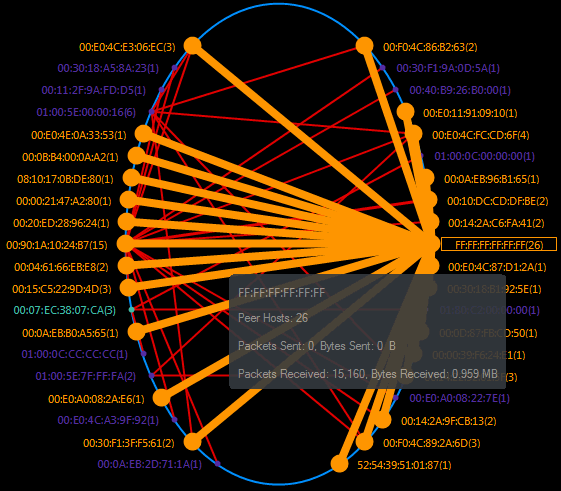
The Matrix tab allows us to see communication information between those hosts in the network, which helps us to fast identify abnormal conditions and locate the attack source.
matrix-tab

From the above 5 solutions on how to detect ARP attack in windows 7 with Capsa network analyzer, it will greatly enhance network administrators’ capability to identify ARP attacks and protect the network from ARP attacks, so as to ensure normal network operation.
How to monitor network traffic in windows 7 with Capsa network analyzer?

2010年7月13日 1 条评论

Network traffic is data in a network. In computer networks, the data is encapsulated in packets. So network traffic monitoring is to capture all the packets going down the network. Sometimes, it will be very useful to check your network activity. When Windows 7 network is very slow, internet browsing is very slow, connection problems and high network activity occurs when you do nothing, you will find this really helpful. The purpose of this article is to help you understand how to monitor network traffic in windows 7 with Capsa network analyzer.

About Capsa Network Analyzer

Capsa is an easy-to-use Ethernet packet sniffer (network analyzer or network sniffer) for network traffic monitoring and troubleshooting purposes. It performs real-time packet capturing, 24/7 network monitoring, reliable network forensics, advanced protocol analyzing, in-depth packet decoding, and automatic expert diagnosing. By giving you insights into all of your network’s operations, Capsa makes it easy to isolate and solve network problems, identify network bottleneck and bandwidth use, and detect network vulnerabilities.

Solution 1. Monitor network traffic in the Dashboard tab of Capsa network analyzer

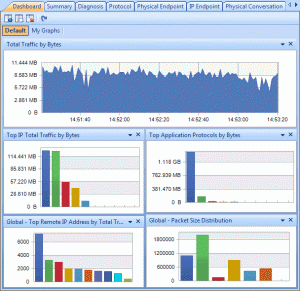
If we want to have a graphical view of the statistics or get a trend chart of the network traffic, then we can use the graphs in the Dashboard tab. It provides a great many of statistic graphs from global network to a specific node. You are able to as well create almost any kind of graph based on any MAC address, IP address and protocol, etc. With these graphs, you can easily find out anomalies of the network and get useful statistics.
dashboard-tab

Solution 2. Monitor network traffic in the Summary tab of Capsa network analyzer

The Summary tab provides general information of the entire network or the selected node in the Node Explorer window. In the Summary tab we can get a quick view of the total traffic, real-time traffic, broadcast traffic, multicast traffic and so on. When we switch among the node in the Node Explorer window, corresponding traffic information will be provided.
summary-tab

Solution 3. Monitor network traffic in the Physical Endpoint and IP Endpoint tabs of Capsa network analyzer

In these two endpoint tabs (Physical Endpoint and IP Endpoint), we can monitor network traffic information of each physical address node and IP address node, both local and remote. With their easy sorting feature we can easily find out the nodes with abnormal traffic, such as which hosts are generating or have generated the largest traffic.
ip-endpoint-tab

Solution 4. Monitor network traffic in the Protocol tab of Capsa network analyzer

The Protocol tab lists all protocols applied in your network transmission. In the Protocol tab we can monitor network traffic by each protocol. By analyzing the protocols in the network traffic, we can easily understand what applications are consuming the network bandwidth, for example, the HTTP stands for website browsing, and the POP3 stands for email, etc.
protocol-tab

Solution 5. Monitor network traffic in the Matrix tab of Capsa network analyzer

The Matrix tab visualizes all network connections and traffic details in one single graph. The weight of the lines between the nodes indicates the traffic volume and the color indicates the status. As we move the cursor on a specific node, network traffic details of the node will be provided.
matrix-tab

These are the very basic methods of monitoring network traffic in windows 7 with Capsa network analyzer, there are lot of advanced functions available on Capsa Network Analyzer 7 .

Share your experience with this tool and any new findings on this is welcomed.

Capsa network analyzer 7.2.1 reviewed by Firewall.cx

2010年7月5日 1 条评论

Author: Chris Partsenidis
July 3, 2010

Introduction

A Network Analyser is without doubt an Engineer’s best friend.
Using network analysing software, we are able to monitor our network and dig into the various protocols to see what’s happening in real time. This can help us understand much better the theoretical knowledge we’ve obtained throughout the years but, most importantly, help us identify, troubleshoot and fix network issues that we wouldn’t be able to do otherwise.
A quick search on the Internet will surely reveal many network analysers available making it very confusing to select one. Some network analysers provide basic functions, such as packet sniffing, making them ideal for simple tasks while others give you all the necessary tools and functions to ensure your job is done the best possible way.
Colasoft’s network analyser is a product that falls in the second category. We had the chance to test drive the Colasoft Network Analyser v7.2.1 which is the latest available version at the time of writing.
Having used previous versions of Colasoft’s network analyser, this latest version we tested left us impressed and does, in fact, promise a lot no matter what the environment demands.

Colasoft’s Capsa network analyser is available as a demo version directly from their website www.colasoft.com. We quickly downloaded the 21.8mb file and began the installation which was a breeze. Being small and compact meant the whole process didn’t take more than 30-40 seconds.
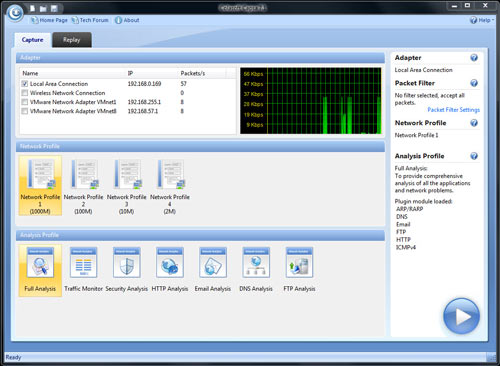
We fired up the software, entered our registration details, activated our software and up came the first screen which shows a completely different philosophy to what we have been used to:
reviews-colasoft-1
The Software
Before you even start capturing packets and analysing your network, you’re greeted with a first screen that allows you to select the network adaptor to be used for the session, while allowing you to choose from a number of preset profiles regarding your network bandwidth (1000, 100, 10 or 2 Mbps).
Next, you can select the type of analysis you need to run for this session ranging from Full analysis, Traffic Monitoring, Security analysis to HTTP, Email, DNS and FTP analysis. The concept of pre-configuring your packet capturing session is revolutionary and very impressive. Once the analysis profile is selected, the appropriate plug-in modules are automatically loaded to provide all necessary information.
For our review, we selected the ‘100Mb Network’ profile and ‘Full Analysis’ profile, providing access to all plug-in modules, which include ARP/RARP, DNS, Email, FTP, HTTP and ICMPv4 – more than enough to get any job done!
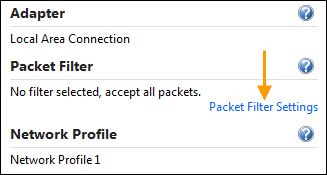
Optionally, you can use the ‘Packet Filter Settings’ section to apply filters to the packets that will be captured:
reviews-colasoft-2

The full review at http://www.firewall.cx/reviews-colasoft-v721.php

How to monitor instant message activity with Capsa?

2010年6月29日 没有评论

The latest released Capsa Network Analyzer 7.2 supports monitoring instant message activity, which not only gives us real time monitoring, but also auto-saving instant messages details to local disk. Whether a parent who has teenager kid, monitoring his teenager kids’ online activities like whom are they chatting with, what they are talking about are of great importance to make sure the kids are safe and will not be misled. Or a company policy requires taking some measures to guarantee the employees’ working efficiency, one of the measures is to find out who is chatting on MSN or Yahoo Messenger about some non-working stuffs. This article is to talk about how to monitor instant message activities with Capsa 7.2 as well as save the messages to local disk.

To monitor instant messages, we need first to enable the IM analysis modules in the analysis profiles, because none of them are enabled by double-clicking an analysis profile to change the profile settings.
analysis_profiles

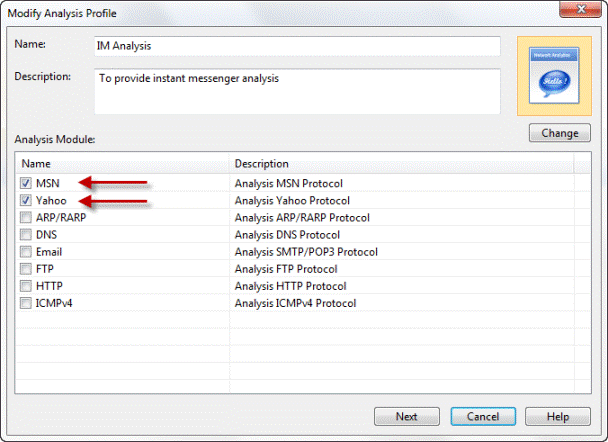
If we’d like to create a new analysis profile only used to monitor IM messages. Right-click anywhere in this section, and choose New from the context menu and only enable the MSN and Yahoo analysis modules.
im_analysis_modules

Then click Next and then OK to finish the settings. Now click the big run button to start a capture.

When the main program is initiated and we go to the Log tab which holds the IM monitor results. In this tab, we’ll see two IM logs, MSN log and Yahoo log, including the time, sender’s account and the receiver’s account.

Not only can Capsa monitor all IM activities in our network segment, but also save these records to a csv file. Click the Export icon, and give the file a name. We can open the csv file with Excel to make a deeper analysis.
im_monitor_log

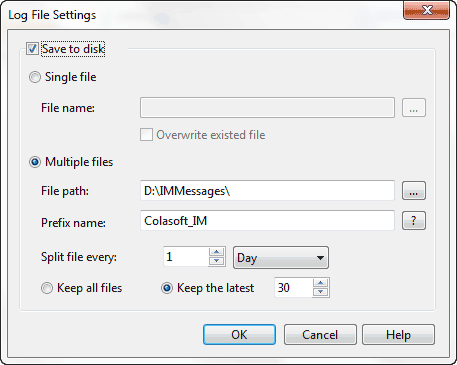
Someone may ask what if we are not around, is Capsa able to auto save the messages down to a file? Sure it is. Click the Log Settings icon, and click the Save Log File button. A new dialog box appears. Check Save to disk. There are two ways to save logs: save to a Single File and save to Multiple Files. For example, we enter the prefix for their name. And then decide how to split logs, say we split by everyone day. If we just want to save the latest files, we should check this and enter a number, say 30. We can read that we save everyday’s messages into a file, and just keep the latest 30. We’ll get the messages of the past 30 days. Now, any message goes from or to your network will be logged into a log file.
save_logs_to_disk

This is how Capsa monitors instant message activity and auto-saving the content to local disk. Hope it helps. And we have a video tuterial at our official site.

Capsa Network Analyzer 7.2.1’s Coming with IM & Email Monitor

2010年6月21日 1 条评论

June 22, 2010 – Colasoft, an innovative provider of all-in-one and easy-to-use network analyzer software, today announced the newest version 7.2.1 of its flagship product-Capsa network analyzer, which is the combination of powerful monitoring, alerting, and reporting capabilities. In this version, two long-awaited monitors are added in: IM monitor and Email monitor.

Emails are provided to employees as an efficient means of communication, along with this technological advancement are many collateral problems concerning enterprise information security, such as email worm thread, disclosure of trade secrets or other enterprises’ confidential information, etc. Capsa 7.2.1 provides you with powerful email monitoring. With the captured email file, you are accessible not only to basic email information such as client, server, sender name, time, etc, but also to the original content of the email. Capsa 7.2.1 supports auto-saving email content. All of the email information is captured and saved, which will serve as valuable electronic evidence when needed.

MSN (aka Live Messenger) and Yahoo Messenger are two of the most popular chat tools on internet, IM monitoring is a necessary and effective method for enterprises to ensure employees’ work efficiency. Capsa 7.2.1 gives a real-time instant message monitoring and recording. Capsa 7.2.1 is able to deliver the most accurate MSN and Yahoo messenger monitoring statistics which can be exported and saved for further analysis. To some extent, IM monitor helps enterprise achieve effective management as well as improve network and economic performance.

Besides IM and Email monitors, considering our users may have useful project files saved by version 6.9, Capsa 7.2.1 supports opening project file from Capsa 6.9.

Capsa 7.2.1 runs under Windows XP/2003/Vista/7. A trial version is available for download at the company’s website: http://www.colasoft.com/

About Capsa

Capsa is an easy-to-use Ethernet packet sniffer (network analyzer or network sniffer) for network monitoring and troubleshooting purposes. It performs real-time packet capturing, 24/7 network monitoring, reliable network forensics, advanced protocol analyzing, in-depth packet decoding, and automatic expert diagnosing. By giving you insights into all of your network’s operations, Capsa makes it easy to isolate and solve network problems, identify network bottleneck and bandwidth use, and detect network vulnerabilities.

About Colasoft

Ever since 2001, Colasoft has been an innovative provider of all-in-one and easy-to-use software solutions for users to monitor network activities, analyze network performance, enhance network security, and troubleshoot network problems. Currently, more than 5000 customers in over 80 countries trust the company’s flagship product, Capsa Packet Sniffer, as their network monitoring and troubleshooting solution. Featured customers include Alcatel, Airbus, Dell, Ericsson, IBM, Intel, and Pepsi. Learn more about Colasoft and its solutions, please visit http://www.colasoft.com/

How to monitor FBHOLE worm with Capsa network analyzer

2010年6月9日 1 条评论

We provide some tips on monitorring FBHOLE worm. In this article, we specificlly provide a step by step guide on how to build a fileter and monitor FBHOLE worm with Capsa network analyzer.

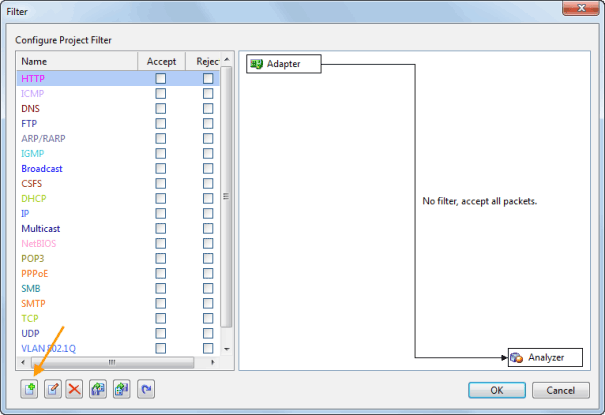
1. On the Start Page, click Packet Filter Settings link to open the Filter dialog box, which organizes all the filters.

packet_filter_settings_link

2. Click the Add button (on the bottom-left corner of the dialog box) to build a new filter.

new_filter

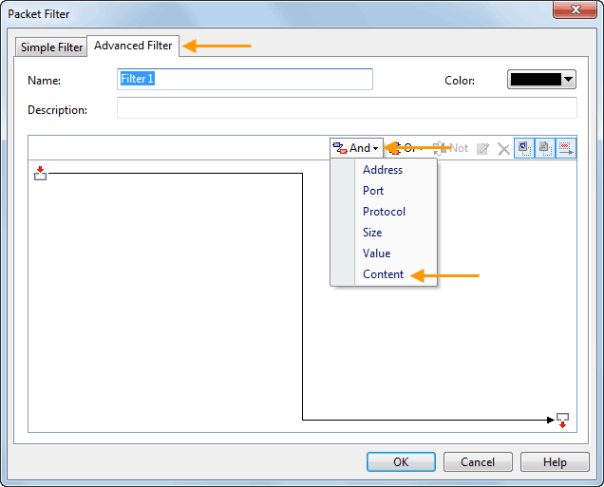
3.In the new window, choose Advanced Filter tab. And click the And icon. Choose Content from the context menu.

advanced_filter

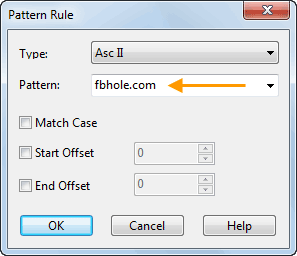
4. In the Pattern Rule window, just enter keyword: fbhole.com in the Pattern text box. Then click OK to close the window.

pattern

5. Click OK again to close the Packet Filter window.

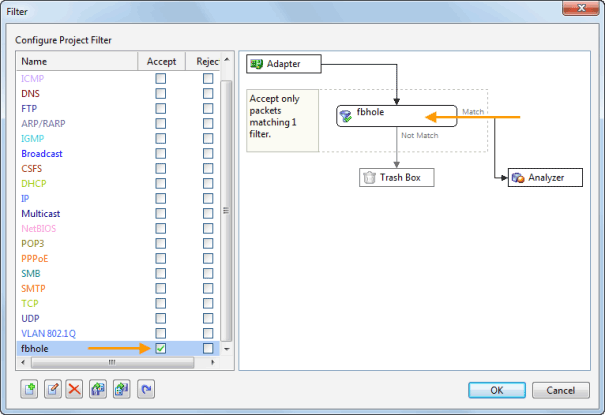
6. Check the Accept checkbox of the filter just built which enables the program only capture the packets containing keyword “fbhole.com”.

accept

7. Click OK and then start a capture.

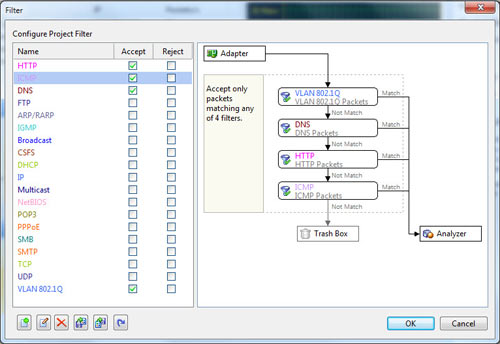
8. If there is already a project running, you’d better stop it to build the filter and restart the capture. To build a filter in a running project: click the Filter button on the Ribbon. You will also see the Filter dialog box as well.

filter_ribbon

Review: Colasoft Capsa from WindowsITPro.com

2010年6月1日 1 条评论

by Michael Dragone at June 1, 2010.

At some point in the career of almost any IT professional, there comes a time when a detailed examination of network traffic at the packet level is required to troubleshoot a problem. These problems often occur at the worst time, and having the ability to quickly perform a detailed traffic analysis is critical to resolving the problem swiftly and efficiently.

In the field of network analyzers, there’s a range of choices. On the one end, you can obtain free tools that support basic capture tasks but require you to perform much of the analysis. On the other end, you can purchase multifunctional tools that perform the analysis for you.

I took at look at the recently released Capsa 7.1 from Colasoft to see how it performed. I was especially interested to see how it fared against free tools such as Microsoft’s Network Monitor and Wireshark (formerly Ethereal). I ran the software on a Windows XP Professional SP3 computer.

Capsa downloaded quickly, and the installation process was brief. During installation, I was given the opportunity to install additional Colasoft tools such as a packet generator. I declined because I was focusing on the network analyzer, but it was nice to see those tools included as an installation option and not as an additional download. I was also happy that the installation process gave me full control over the creation of the desktop and Quick Launch icons instead of littering my test computer with icons everywhere. Finally, I was expecting to have to reboot my computer after the installation, as I assumed that the installation routine would make changes to the network stack. I was happy to see that this wasn’t the case and no reboot was required.

When you start Capsa, an interface presents you with intuitive options that let you select the network you want to analyze and the type of analysis you want to perform, such as Full Analysis, Traffic Monitor, Security Analysis, and Email Analysis. I wanted to analyze traffic, so I selected Traffic Monitor and clicked the large play button. The analysis began immediately.

As Figure 1 shows, Capsa uses the Fluent interface introduced in Microsoft Office 2007. As such, it’s extremely easy to navigate and almost, dare I say, fun to poke around the various tabs as the product captures network traffic.

ColaSoft-Capsa-125186-Fig1

The information that the product can capture can be daunting, but it was easy to filter the capture to look for only HTTP traffic. The filter interface provides an excellent graphical representation of what your newly created filter will do.

I was able to drill-down into my newly captured HTTP traffic to the packet level and examine all the details. Because it was encrypted HTTP Secure (HTTPS) traffic, I couldn’t look into the data payload, but all the header details were available. I was also able to examine entire TCP conversations, from the initial handshake all the way down to the FIN flag. The graphical representations that this product can produce are simply wonderful.

Overall, Capsa is a joy to use. My only complaint is the high price tag, which might make it difficult to obtain if you don’t spend a majority of your time examining network traffic, as free (and excellent) alternatives exist. Despite this, I highly recommend this product and would be glad to add it to my toolbox.

Google protects your search terms proved by Capsa network analyzer

2010年5月27日 4 条评论

google_ssl_search

Google announced last week that users can visit https://www.google.com to establish a secure connection for their searches, which Google says “helps protect your search terms and your search results pages from being intercepted by a third party on your network”.

In response to the worries that search terms are eavesdropped by third party on public Internet accesses, especially at public like WIFI hotspots at airport, Google offers a connection over HTTPS to protect your search terms been sniffed. The purpose of this article is to figure out how does the encrypted search connection work and see if it really protects you. As packets never lie, we will go down to the packet level to check the original traffic out. Let Capsa network analyzer to prove that. First let’s check out how the normal search goes.

Normal Google Search

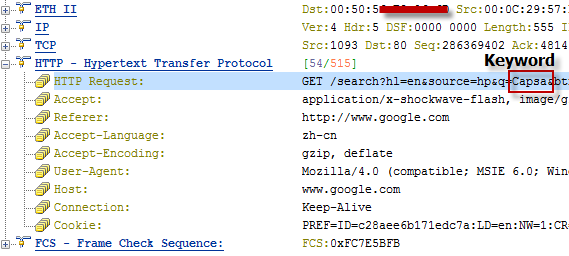
First run Capsa Network Analyzer and start a capture, then visit http://www.google.com, enter the keyword Capsa, and click the Google Search button. Until now, we can clearly see a HTTP packet captured with the keyword “Capsa”. If in a public network, the hacker can easily get the GET request and figure out your search terms with little tricks.

normal_keyword

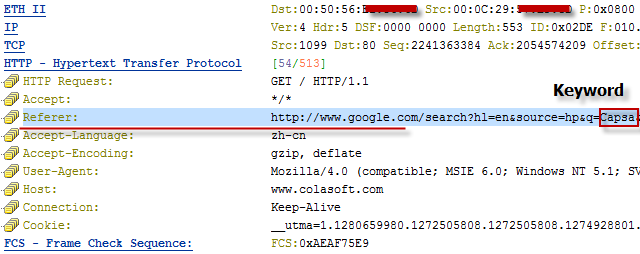
And another important way to get your search terms is to get the packet of your clicking on a link in the search results, which contains the keywords too. In this case we will click the second link in the results. When we go back to the packets, we can see there are two DNS packets, a DNS query and a response, then three-way-handshake with www.colasoft.com. The fourth packet is a HTTP GET packet.

normal_click_link

If you are interested in this GET packet, you will find a Referer string in it, which is pretty the same as the string in figure below.

normal_referer

Encrypted Google Search

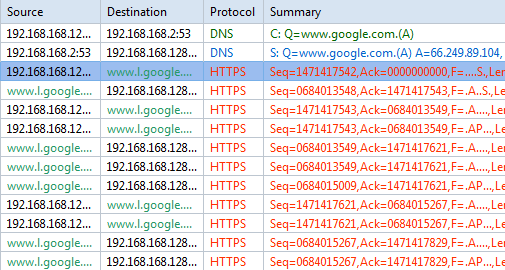
After the normal search, we flush the DNS, start a new capture, and reopen the browser. This time we visit https://www.google.com, enter the same keyword “Capsa”, and click the Google Search button. The page loaded and we go back to the analyzer and find there are DNS packets and HTTPS packets, without any HTTP packets (figure E). As all transmissions are protected by SSL, we cannot find any search keyword in these packets, unless you have that power to decode them.

ssl_packets

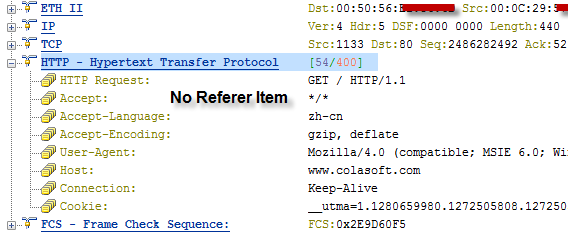
Then we click the same link over the returned search results, and we find there are two DNS packets too and three-way-handshake and then a HTTP GET packet to load the Colasoft page. We can check this packet and find there is not a Referer string (figure F) in it. As google’s explanation, they’ve stopped transferring this value to the clicked page to prevent keywords being tracked.

ssl_click_link

Google also pointed out that the encryption search only protects you from keywords tracking but the website you visit later could also be spotted because of you DNS queries. And that’s something they cannot do about. But that’s not the topic of this article. We can sure that the new HTTPS Google search does what it alleged (you can learn more Google SSL search from http://www.google.com/support/websearch/bin/answer.py?answer=173733&hl=en). Furthermore, the society is talking about the network security more and more these days. We should always pay attention to our communications on the Internet, emails, social media communications and passwords, and so on.

Packet Sniffer Tips: make use of packet size distribution statistics

2010年5月25日 6 条评论

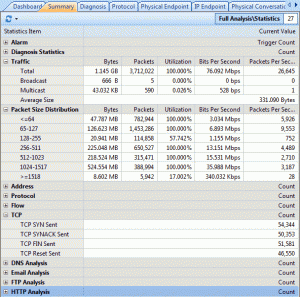
Packet Size Distribution is an important statistic group in the Summary tab in Colasoft Capsa, from which we can get useful information. The Packet Size Distribution group does statistic over seven packet size ranges with their own throughput, packet counting, utilization, and so on. The bigger packet size may result in more Bytes if the packets number equals the ones with smaller packet size. These statistics seem just do simple statistics, but they also give us important information to help us monitor and analyze the network.

packet_size_distribution
The Packet Size Distribution Statistic Group in Summary Tab

The packet size distribution group can help us manage the network in the following ways:

1. Excessive <=64, 65-127 Packets: Attacks

We know ARP packets are 64 bytes and general TCP STN packets are about 66 bytes. Small sized packets contain less data. A network device needs to spend much of its resource to deal with excessive small sized packets which will result in inefficient to handle normal packets. So if the number is very big than other packet size statistic items, you should be alerted that it might be an attack such as ARP flooding, ARP spoofing, port scanning, worm activities, or DDoS attack.

2. Excessive 1024-1517, >=1518 Packets: Download

With larger size, a packet has a bigger payload to carry more data. That’s why downloading and uploading tools often generate packets with large sizes. These packets are very greedy to consume a big portion of bandwidth. That’s why network administrators always pay much attention to downloading and uploading at workplace. You should keep an eye on this type of packets too.

Note that here we are talking about EXCESSIVENESS, which means the number VERY BIG like tenfold or hundredfold bigger than other counters. Especially the small sized packets and if there is any port scanning on your network, you will capture a big sum of packets of 64 bytes in a blink of an eye and clearly feel the network delay.

How to Save Network Traffic to Hard Disk with Capsa?

2010年5月4日 6 条评论

Why do we need to preserve packets to local?

We all know that packets never lie. Saving packets to local means we have preservation of evidence on the network. One basic mission of a network analyzer is to capture network packets and save them to disk. To help us understand easily, we can compare the network analyzer as a monitoring camera. A monitoring camera continuously records image 24 hours a day and stores the movie for a certain time span. When we need to check what really happened in the past, we just replay the movie and we figure all out.
Capsa is like a network monitoring camera which is able to capture packets traveling in and out of the network and save the packets to a hard disk as packet files. Capsa listens to your order to save captured packets to a single file or multiple files by your splitting settings. My network traffic is very heavy, I don’t think my hard disk has enough space to hold those files, you may wonder. Under such circumstance, we can use filters to help us capture packets we are just interested in.

When do we need to save packets to local?

•Monitor network activities such as downloading, using IM, sending Email
•Recording traffics when the network admin not around. We can check last night’s network health status the second morning
•A network problem can’t be solved. We can save traffics to a packet file and turn to other technicians for help.

How to save packets to hard disk?

Finally let’s see how to save network packets to a hard disk. There are just a few simple steps of settings to accomplish this. But please make sure you have enough space to store those files on your hard disk.
1. Click the Packet Storage icon (figure below) on the Ribbon to open the Analysis Profile Options dialog box.
packet_storage_icon

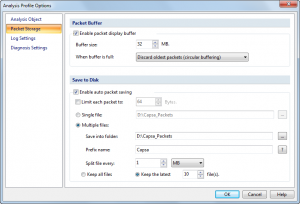
2. This is the Packet Storage page of the Analysis Profile Options. Check the Enable auto packet saving box in the Save to Disk group.
analysis_profile_options

Now, we will go through the options one by one:
2.1 Limit each packet to: If this box checked, only the first configured number of bytes of a packet will be saved. The excessive bytes will be discarded.
2.2 Single file: We should enable this option if we just need to store the packets to one packet file.
2.3 Multiple files: We should use this one when we need to capture packets for a long time. Capsa will split packets into multiple files according to the setting rules. It’s more useful for later analysis and traffic management. For example, we split packets by a time span of 24 hours. We only need to replay and analyze the packet file of that day which makes us focus on that traffic and make it easily to troubleshoot the network problems.
2.3.1 Save into folder: To choose a folder to store the packet files.
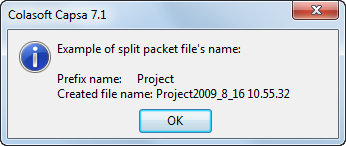
2.3.2 Prefix name: To set the file prefix for the packet files. We can click the ? button to see how the file names will be generated (figure below).
name_example

2.3.3 Split file every: Set the conditions for how to separate files. There are two conditions, by time or by file size. You can decide which one to choose by your certain network environment.
2.3.4 Keep all files/Keep the latest: If we choose to keep the latest number files, only the latest number of files will be kept and the older files will be deleted. To choose this option, we can save the space to store the packets files. Also the files exceed a long time are useless anymore.
When we need go back to pinpoint a network problem happened in the past, we just choose the interested packet files in the replay functionality of Capsa to reproduce the scenario of that time.