存档

‘Tips & How-tos’ 分类的存档

How to View and Analyze Historical Network Traffic

2014年5月21日 没有评论

How to View and Analyze Historical Network Traffic

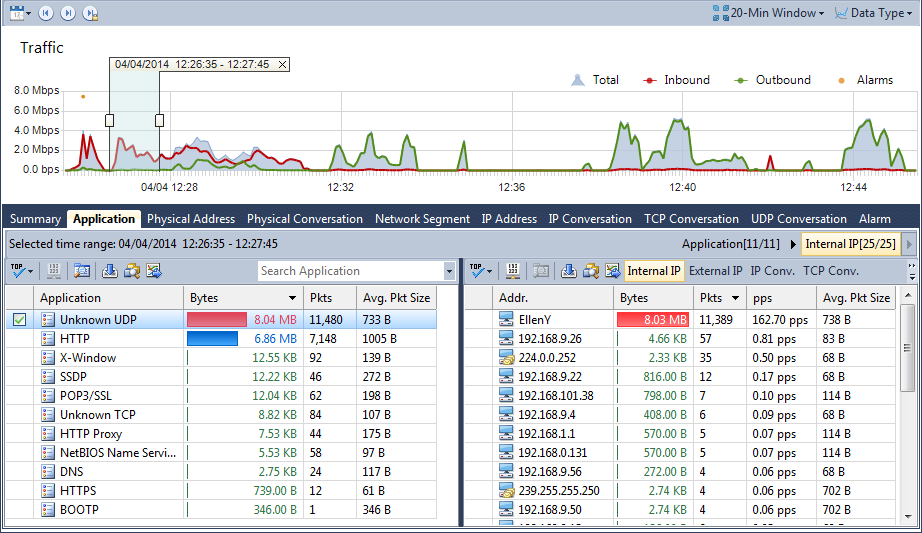
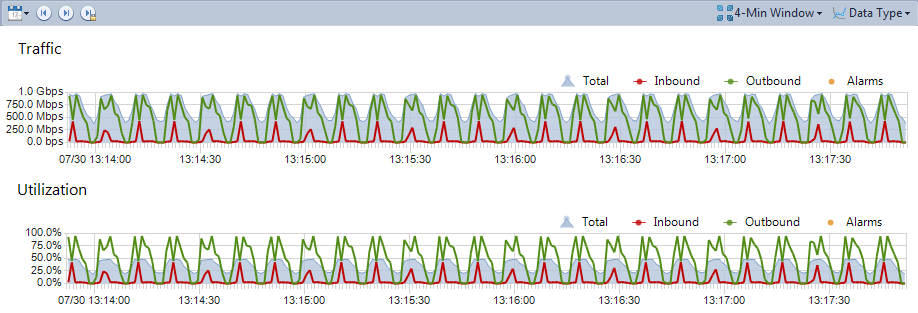
As a network forensic analysis application, nChronos allows users to view historical data just by a drag. Below is a screenshot of the Time Window, you can drag the trend charts back and forth to view the network traffic of any interested time period.

Download Capsa

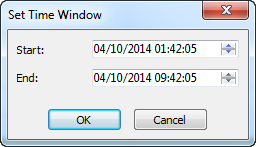
You can click the Set Time Window button  to set which time period to show:

When you select a time slice on the Time Window, the analysis views will only show data related to that time slice, and this is very convenient to analyze a traffic spike. Just select the spike to view and analyze the top talkers in that spike. Furthermore, you can double-click a record item to drill down it:

Download Capsa

from: colasoft.com

iLoveFreeSoftware Review: Free Software to analyze LAN and WLAN network – Colasoft Capsa Packet Analyzer

2014年3月24日 没有评论

By Shobhan Mandal

Colasoft Capsa Packet Analyzeris a free network analyzer software which can be used toanalyze and monitor WLAN andLAN networks. What it actually provides is network monitoring,in depth packet decoding, andadvanced protocol analysis of the network you are connected to. The best part is you do not have to install this software on a server to view the details; installing in any client machine of the network will provide you with all the necessary details.

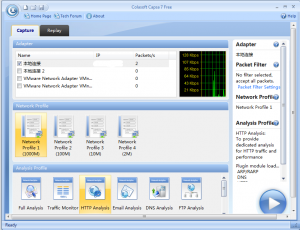
Colasoft Capsa-Home Screen


Well the software has a number of functionalities, like:

  • Troubleshooting Network Problems.
  • Know about the performance of the network thus finding any bottlenecks.
  • Can be used to detect virus,worms, or network attacks.
  • It can also be used to teach and learn various things about network.

Here we will talk about the free version of Colasoft Capsa which has limited capabilities, like you can monitor the network continuously for 4 hours only using a profile and you can use only 1 analysis at a time.

How to use Colasoft Capsa Free Network Analyzer:

When you are downloading Colasoft Capsa, you will be asked to register with your email address. On this email address, you will be sent activation key, which will be valid for 4 months, after which you have to renew. The installation process will take a minute or two. After the installation is over you will get the home screen which looks like the first screenshot of this review.

At first, you have to select the connection from the adapter which you would like to monitor. When selected, it immediately shows a graph for the speed of the network.

The profile section allows you to select what type of analysis you would like to do. The software offers:

  • Full Analysis
  • HTTP Analysis
  • Email Analysis
  • DNS Analysis
  • FTP Analysis
  • IM Analysis
  • Traffic Monitor

Full Analysis

Clicking on Full Analysis gives you various information regarding broadcast addresses, multicast addresses, local subnet, the IP addresses of the computer connected, etc. The center screen has various tabs like Protocol- tells about different protocols like IP, ARP, IPv6 and the amount of data and packets being transferred.

Physical Endpoint, IP Endpoint which tells about the MAC address and the IP address of the connected systems. Other tabs include TCP, IP, and UDP conversations. Somefunctionalities may not work in the free version.

Colasoft Capsa-Full Analysis

HTTP Analysis

The HTTP analysis gives you the various results regarding HTTP protocol. At any normal instance it will give the IP address of the computers with which your computer has a HTP connection. Through the IP, TCP, and UDP conversation you can know the amount of data and packets being shared among the computers.

Colasoft Capsa-HTML Analysis

The other analysis gives out more information regarding data and packet movements in the network you are connected to.

Talking to one of my friends who is a ethical hacker and wants to remain anonymous, said that the software is great. According to him:

  • This is really a great software and very powerful.
  • It helps the network administrator to get various details about the network in real time.
  • It can be used for educational purposes as the software tells how packet movement works actually in the network.

Downsides of the software

In the free version, the user cannot use more than one analysis simultaneously. If he wants to have a different analysis he must close the ongoing analysis. The free version has most of the good features restricted not allowing users to know the software’s working properly.

Also check out other network packet sniffer software.

Conclusion

It is a cool software to monitor the data traffic of your network. If you setup a private network you can watch out for any wrongdoings that might happen be happening in the network. It is very much useful for those who want to know more about computer networking.

Get Colasoft Capsa Packet Analyzer here.
Use Filters to Capture Packets between Two Hosts

2012年11月11日 2 条评论

Product Versions: Since Capsa 7.0

Intended Audience:

  • Capsa Enterprise users
  • Capsa Professional users
  • Capsa WiFi users
  • Capsa Free users
  • Including all Demo and Evaluation users

When we need to do some tests or experiments, we just need to capture packet data between two hosts. The typical instance is to capture packet data between my local host and another host/server. In order to capture packets only between two hosts we can use a capture filter to ignore all packet data that we don’t need. For instance, we want to capture packets only between my host and Colasoft website:

  • My IP address – 192.168.6.112
  • Colasoft Website IP address – 207.218.235.182

Before we get started we should figure out where is the best place to capture packet data, make sure you are capturing right on the path of the traffic flow, read Where to Capture Packets on my Network for more details. If you are planning to capture packet data between your local host and another machine, the convenient way to do so is to install Capsa on your machine. And follow the steps below to create and enable a capture filter.

Create a Capture Filter in Capsa

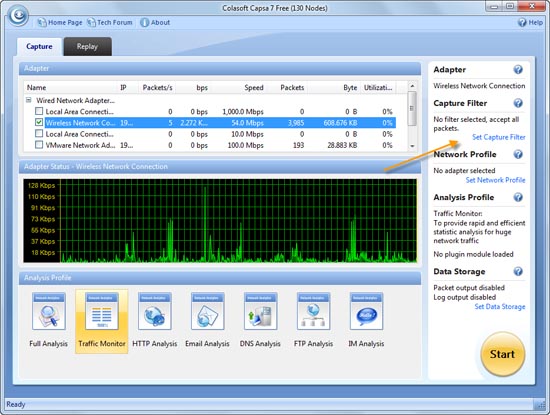
  • Run Capsa; click the Set Capture Filter link on top-right corner.
  • Capsa Start Page

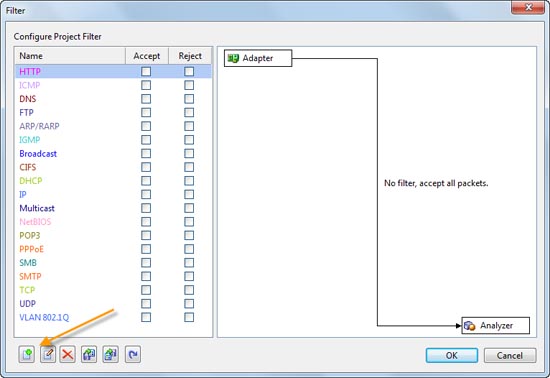
  • Capture filter window appears. Click the Add button (on the bottom on the window).
  • Filter Manager

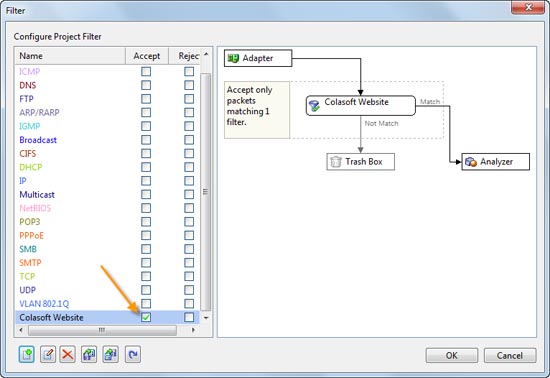
  • Input Name, check Address Rule, and choose IP Address from Address 1 drop-down list. Input IP address, 192.168.6.112, in the textbox under the drop-down list. Then choose IP Address from Address 2 drop-down list, and input IP address – 207.218.235.182.
  • Filter

  • Click OK.
  • Check the new filter’s Accept checkbox, and click OK.
  • Enable Filter

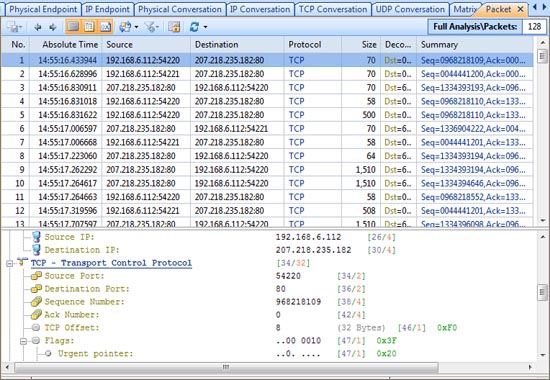
We’ve already created and enabled Capsa to capture packet data only between my host and the remote IP address. Next we can click Start button to start a capture. And we see only packets between my local IP and Colasoft website address. By this way we can create filters to capture packets for certain IP or MAC addresses and also use combinations to create advanced filters with multiple conditions.

Packets

Tips:

  • You are suggested to use the Export function to back up your filter settings (you can find the Export button on Figure A), and make sure you export all filters.

分类: Articles, Tips & How-tos 标签:

How to Create and Edit Custom Protocol

2012年5月20日 没有评论

Although Capsa network analyzer supports more than 160 protocols, there are still circumstances that you need add your private protocol rules. For example, you have a special service using a private TCP port in the network, and you want Capsa to recognize it. Or a protocol uses non-standard port. This document is to show you how to create your own custom protocols and edit built-in protocols as your need.
Create Custom Protocols
If you want to create a private protocol rule, follow the instructions below.
Step 1, run Capsa network analyzer. On the Start Page, click the Menu button (on the top-left corner). Choose Local Engine Settings -> Custom Protocol from the menu.
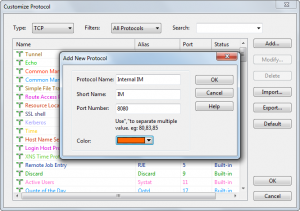
Step 2, on the Custom Protocol window, you can click the Add… button to create a custom protocol. For example, you are testing a new protocol, which uses TCP port 8080. You can just click Add, and type in protocol name, short name and port number, and choose a color for the protocol on the new dialog box. Then click OK to save the custom protocol.

Note: if the capture is running, you need to go back to the start page. Otherwise the Add button and Edit button will be grayed out.
Edit Protocols
If you use non-standard protocols in your network, for example, DNS isn’t on port 53 (TCP or UDP), or HTTP isn’t on TCP port 80, you should modify the default port number for these two built-in protocols. Or Capsa will recognize them as TCP/UDP Other type. Let’s make an example that HTTP uses TCP port 8080, rather than port 80.
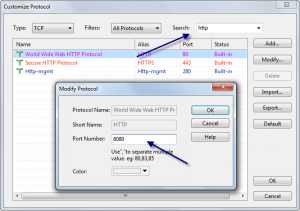
Step 1, open the Custom Protocol window, type in http in the search box.
Step 2, double-click on the HTTP protocol item, and modify its port number to 8080 in the dialog box. Click OK to save.

Now if you start a capture, or replay a packet file, all packets using TCP port 81 will be labeled as HTTP protocol. On the Custom Protocol window, you can create private protocols on TCP/UDP ports, IP protocol type, and Ethernet type. TCP and UDP port numbers are used more often rather than the other two. And also you can use the Import button and Export button to back up your private protocols.

FAQ: Why the Add/Edit/Delete buttons of the Custom Protocol window are grayed out?
You are not allowed to change protocol rules while there is a capture running because the changes could crash the program. If you need to add/edit protocol rules, you need stop the capture and go back to the Start Page (if you run multiple instances, you need to close all others). Then click on the Menu button on the top-left corner of the Start Page, and choose Local Engine Settings > Custom Protocol to open the Custom Protocol window. Now you will find the buttons are clickable.

How to baseline network throughput and performance

2012年5月10日 1 条评论

What is network baseline?

Do you know what your normal network throughput volume is, what types of traffic are most used in your network? If you can’t answer these questions then you should baseline your network. Network baseline is very important to network management because the data will tell you what it’s like when everything goes all right.

To baseline your network, you need software or hardware to listen on your network or a particular device. Both Colasoft nChronos and Capsa can be used to accomplish this task. Both of them are used to listen into packet data of a wire and generate all kinds of statistics on the network. To baseline a network, you need to use them to monitor the network traffic long enough, because a wider time span presents a more real picture of network traffic pattern. The use of network baseline is listed as follows:

• Understand healthy network pattern and traffic trends.

• Evaluate network management policies compliance.

• Understand how the network resources are allocated.

• Accelerate to troubleshoot network issues, i.e. abnormal traffic and spam traffic, etc.

• Provide data on network and security management to support decision making.

• Provide history statistics on network upgrade.
阅读全文…

Colasoft nChronos: How to Display IP Addresses as Host Names

2012年3月27日 1 条评论

If you use nChronos to monitor traffic on a core switch you will see lots of internal IP addresses, and also the Internet IP addresses. You can find that most of the Internet IP addresses are shown as their domain name, such as www.colasoft.com, and www.google.com, etc. Wouldn’t it be great if nChronos shows host names of our local machines, because they are much easier to understand, rather than just IP addresses? This tips article will show you how to use Name Table to display IP and MAC addresses as host names.

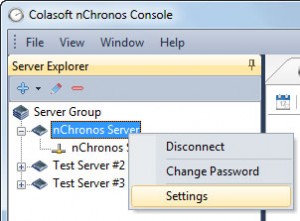
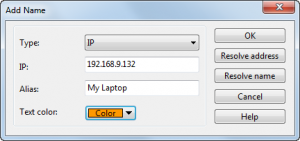
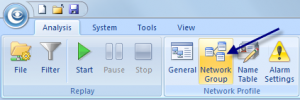
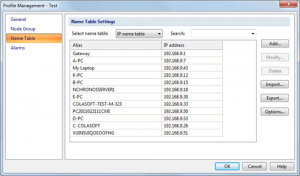
Suppose that there is a user, Steve, whose laptop has this IP address, 192.168.8.25, and you want nChronos to show his IP address as the text – Steve’s Laptop. First you run nChronos Console, connect to the server, right-click on the server name, and click Settings from the context menu. Then select Name Table on the Server Settings window.

阅读全文…

How to Display IP Address As Host Name

2011年11月2日 1 条评论

In business network settings, network administrators manage a large number of devices, like laptops, desktops, printers, switches and routers and they all have IP and MAC addresses. When we use a network analyzer to monitor the network traffic on the network, we can see lots of IP and MAC addresses. These addresses, however, aren’t friendly to read so we’d like to show their host names or give them labels.

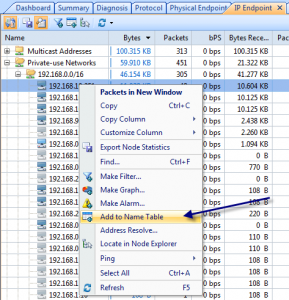
In Capsa we use Name Table to do this job for us. With name table we can not only label IP addresses but also MAC addresses and we can delete, export or reload the address items there. We can right-click on an IP address or MAC address and we see Add to name table in context menu.

On the dialog box we can give the IP (or MAC) address and alias, also we can choose a color for it. If we don’t know the host name, we can click Resolve address to automatically look up its host name. Then click OK to save the input.

Now back to Capsa and we can see the address is already replaced by the name alias we just created. The Add to name table function is applicable to any item on Node Explorer and all other views except Summary, Protocol and Report views.

If we need upgrade or reinstall Capsa, we can use Export function to back up the name items. Click Name Table icon on the ribbon, and click Export button to save the name table file. Then after installation or upgrade we can use the Import function to reload the name items back to the system.


How to monitor HTTP traffic with Capsa Free

2011年7月19日 1 条评论

It is one of the essential duties for network administrators to monitor their network traffic like HTTP traffic to see what applications are running on the network. There are countless network traffic monitor tools in the market which make us dazzling and hard to choose. Except for those costly network monitors, Capsa Free is a totally network freeware which serves much better than common network monitors in monitoring network traffic like HTTP traffic.

This article is mainly to guide you through the steps of how to monitor HTTP traffic with Capsa Free.

Capsa Free is a must-have freeware network analyzer for network monitoring, network troubleshooting and network analysis. It provides users with great experience to learn how to monitor network activities, pinpoint network problems,enhance network security and so on. Moreover, Capsa Free is a perfect choice for students, teachers and computer geeks to learn protocols and networking technology knowledge.

Step 1: Download and install Capsa Free.
Step 2: Initiate Capsa Free, choosing HTTP Analysis as the analysis profile.

Step 3: View the HTTP traffic statistics in different tabs of Capsa Free.

a. Summary view: overall statistics of the capture.
b. Log view: webpage visiting records (anyone visited a website, logged here).
c. Dashboard view: important statistic data showing in visualized charts.
d. Diagnosis view: auto detected network errors.
e. Protocol view: the applications/protocols running on the network, traffic statistics.
f. Physical Endpoint & IP Endpoint views: traffic volume statistics of each node (by MAC address or IP address).
g. IP Conversation, TCP Conversation & UDP Conversation views: statistics on two communication nodes (from layer 3 to layer 4).
h. Matrix view: map of how hosts are communicated (MAC or IP addresses).

For the different tabs view, please click here.

分类: Articles, Tips & How-tos 标签:

Find out which process/application is using which TCP/UDP port on Windows

2011年1月20日 3 条评论

During the process of analyzing a network problem with a network analyzer tool or a protocol sniffer, especially when we find a suspicious worm or backdoor activity, we get only useful information like MAC addresses, IP addresses and also the port number in transport layer. The analyzer may not even know which application layer protocol is used, even it tells, we still need to figure out which application or process is using this application layer protocol. Is there any method that we can find out the original application or process using that TCP or UDP port? If you are conducting an on-site analysis, Capsa can easily help find out which process is using what port.
Let’s see how.

Find out Port Number

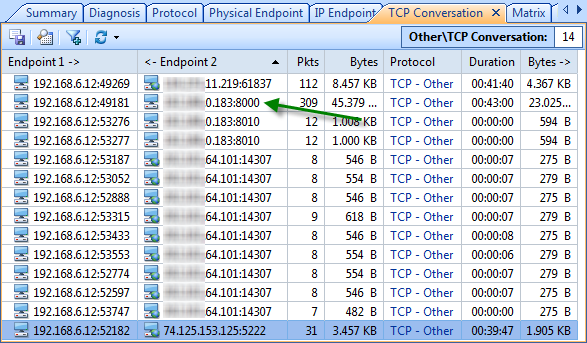
For example, I spot in Capsa Free the following TCP connection suspicious, which constantly communicates to IP: xx.xx.0.183, on port 8000. So I’m going to look up the process name using this port.

find_port

Find Process ID (PID)

At once I evoke Command Prompt, and entered the following string and hit enter.

netstat –aon | findstr :8000

Explanation:

-a: list all active connections and their ports. –o: show process IDs. –n: display the port numbers numerically.

| findstr :8000: display only the items with string :8000 (findstr means find string). Don’t forget the pipe symbol | at the beginning.

Let’s see what we get.

find_pid

We can read in this case 3968 is the PID, and the source IP address and the target address is the same as the first figure.

Find Process/Application

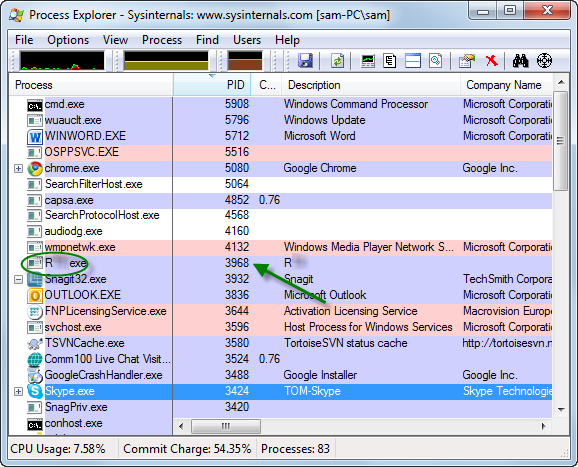
Next we’ll switch to another tool Process Explorer (a free tool that you can get from: http://technet.microsoft.com/en-us/sysinternals/bb896653) immediately. And we can easily find out the process or application of this PID: 3968.

process_explorer

I’m sure it’s an instant messenger used internal in my office and it’s safe. You can also try to find this PID in Windows Task Manager if you don’t have Process Explorer installed.

However task Manager will not provide as much information as Process Explorer. And command prompt is quite handy for geeks.

tasklist | findstr 3968

This command will list only the task items with string 3968. Please refer to previous command if you not sure about | findstr parameter.

Kill Process/Application

So next, you may want to kill a process when you find it’s malicious and want to end it at once? If you are with Process Explorer, you just right-click on a process item and choose Kill Process (Press Del button for short) to kill that process (you can do the same in Task Manager). Again, you may run the following in Command Prompt:

taskkill /F /PID 3968

Explanation:

/F means force to kill the process. And I suppose you understand PID so far.

Now we successfully detect and target the suspicious process with the specific port number, no matter UDP or TCP. And of course this procedure is reversible, you can find out the port number from the process’s PID.

Using Capsa for WiFi to Secure Your Wireless Network

2010年12月30日 3 条评论

By ZhaoRui Meng — CCIE Security

Wireless technology is one of the most fast-growing network technologies. It has been spreading rapidly around the company, campus, public area etc. Unfortunately, many implementations are being done without attention to issues of security and authentication. As a result, many wireless networks are set up so that anyone with mobile equipment can access, even from outside the building. Anyone with the proper equipment can also spy on traffic. The problem with WLAN users is that very few understand how their data is sent through the air, much less comprehend the associated risks.

Recently a study discovered that 40 – 50% of the wireless users aren’t implementing any form of protection. Some wireless networks are encrypted with WEP key, which is significantly less secure than WPA. To prove my point, I randomly scanned wireless networks around my office building and found out 7 WLANs were encrypted by WEP keys, one network unencrypted among 15 SSID received. It takes no more than 10 minutes to crack a WEP password by BT3. WPA has helped to increase the security available to wireless network. But a good dictionary may brute forcing a WPA password when the pre-defined key is weak.

Due to the broadcasting nature of radio propagation at typical Wi-Fi frequencies, anyone on the street or in the neighborhood will have chance to access to it. A whole subculture has sprung up of people going around, scanning for open wireless nodes, and publicizing them to people who want free wireless access. Capsa for WiFi helps network administrators manage access control by monitoring access IP addresses and security. Capsa for WiFi can detect all access IP addresses as well as peer hosts activities, to monitor network activities and identify network penetration and scanning anomalies. More specifically, any wireless engineers can use Capsa for WiFi to lock down network intruders, monitor clients’ online activities, and spot malware like worms, ARP attacks, Trojan horses etc. To deploy Capsa for WiFi is as simple as to connect your Caspa for WiFi equipped station with a common wireless card to your AP and enable traffic capturing on the fly. You can realize wireless network management without setting up port mirroring.