存档

文章标签 ‘Colasoft’

Colasoft Announces Capsa Data Packet Analyzer v7.8 Release

2014年8月20日 没有评论

August 20, 2014– Colasoft, an Oklahoma company, is a leading provider of innovative, affordable, network analysis software solutions. Colasoft today announced the release of its latest Capsa Network Analyzer, version 7.8, a real-time portable network analyzer for wired and wireless network monitoring, bandwidth analysis, and intrusion detection.

In addition to Bandwidth Monitoring and Traffic Analysis, Capsa Enterprise has added full support for VoIP communication analysis. Capsa customers can now, not only monitor VoIP calls, but also drill into a vast collection of call statistics detailing their jitter, loss, and MOS. The new VoIP Explorer and VoIP Diagnostic views allow users to visualize the VoIP data as Capsa visually displays the voice and video quality, assisting users in troubleshooting VoIP networks, software and hardware.

Colasoft has also added a new detailed Port Analysis view to their Capsa Enterprise packet capture application. This new Port Analysis view is quite useful in the analysis of application management issues to determine where the problem actually originates.

In addition to VoIP, Colasoft has added a new “Top Domain Name” view of the network traffic. Colasoft users can now view the traffic utilization by Domain Name in addition to IP Address. Additionally, this new release of Capsa Enterprise has added full support of IMAP4 to the hundreds of already supported protocols. A Free Trial version is available for download at: http://www.colasoft.com/download/products/download_capsa.php

With the increasing number of companies being hacked, Colasoft has seen a dramatic increase in the interest of its Capsa and nChronos products. As noted by Brian K. Smith, Vice President at Colasoft LLC, “Capsa is the only Packet Sniffer and Packet Decoder to provide an easy to use GUI combined with CyberAttack Detection features that were previously found only in more expensive Intrusion Detection Applications. Colasoft Capsa now offers the Network Engineer one of the most robust Bandwidth and Packet Analysis tools available.”

With the release of Capsa 7.8 there is now added support for protocols like: IMAP4, SIP, SDP, MEGACO/H.248, MGCP, Q.931, SAP, H.225, RMI, Oracle, MMS, GOOSE, SMV, and GMRP. Capsa also added several new VoIP protocols. Capsa inherently analyzes VoIP issues, like voice quality QOS, dropped packets and connectivity issues.

Capsa 7.8 is compatible with Windows XP/2003/2008/Vista/Windows 7/Windows 8 and Windows Server 2012. A trial version is available for download at: http://www.colasoft.com/download/products/download_capsa.php

Source Link

Capsa How-to : Migrating Capsa Configuration Files

2014年7月15日 没有评论

Capsa Professional and Capsa Enterprise packet capture application provides the ability feature to backup configurations, including analysis profile settings and network profile settings.

Download Capsa

To migrate configuration files from a Capsa Demo version to Capsa licensed version you should:

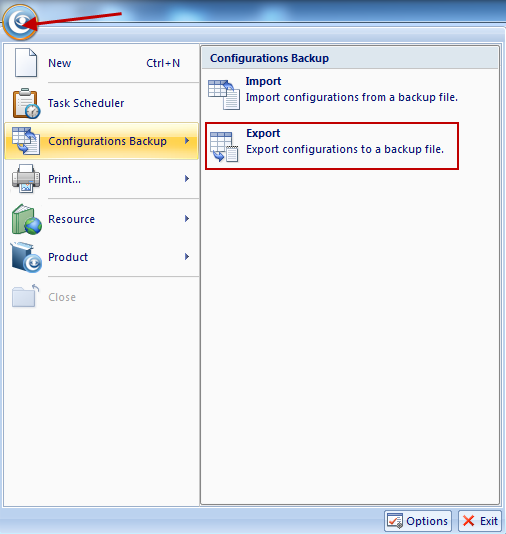
1. On the Start Page, click the menu button, go to Configurations Backup, and click Export to save the configurations as a file:

2. Uninstall the Capsa Demo version and install the Capsa licensed version.

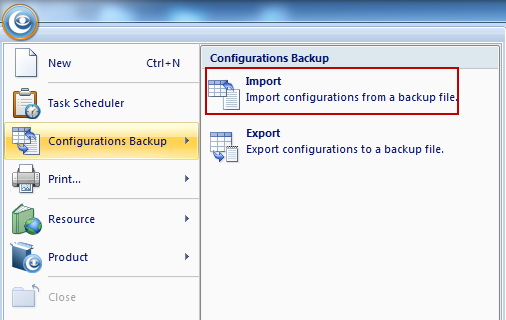
3. From the new Capsa licensed version go to the Start Page, click the menu button, select Configurations Backup, finally click Import to import the saved file in step 1.

4. After the import, Capsa will restart automatically. Your configuration data is now migrated.

Download Capsa

From: colasoft.com

How to Capture Wireless Network Traffic

2014年6月9日 没有评论

As an innovative and high quality network analysis solution, Capsa network analyzer is not only designed to monitor and analyze wired network traffic, but also for wireless LAN traffic, including 802.11 a/b/g/n networks.

The Enterprise Edition of Capsa network analyzer provides you the capability of wireless network capturing and encrypted wireless data decoding. No matter which encryption type an AP uses, all WEP, WPA and even the hardest WPA2 wireless traffic can be decrypted with the pre-specified security key. Additionally you do not have to figure out the encryption type of an AP, Capsa identifies and matches the encryption type of keys automatically.

Download Capsa

We all know that users have to connect to an AP (Access Point) in order to access wireless network; users must have a wireless network adapter in order to access a wireless AP. Therefore, to capture wireless traffic, we use Capsa to monitor a wireless network adapter.

Please follow steps below to monitor and capture the traffic of wireless network.

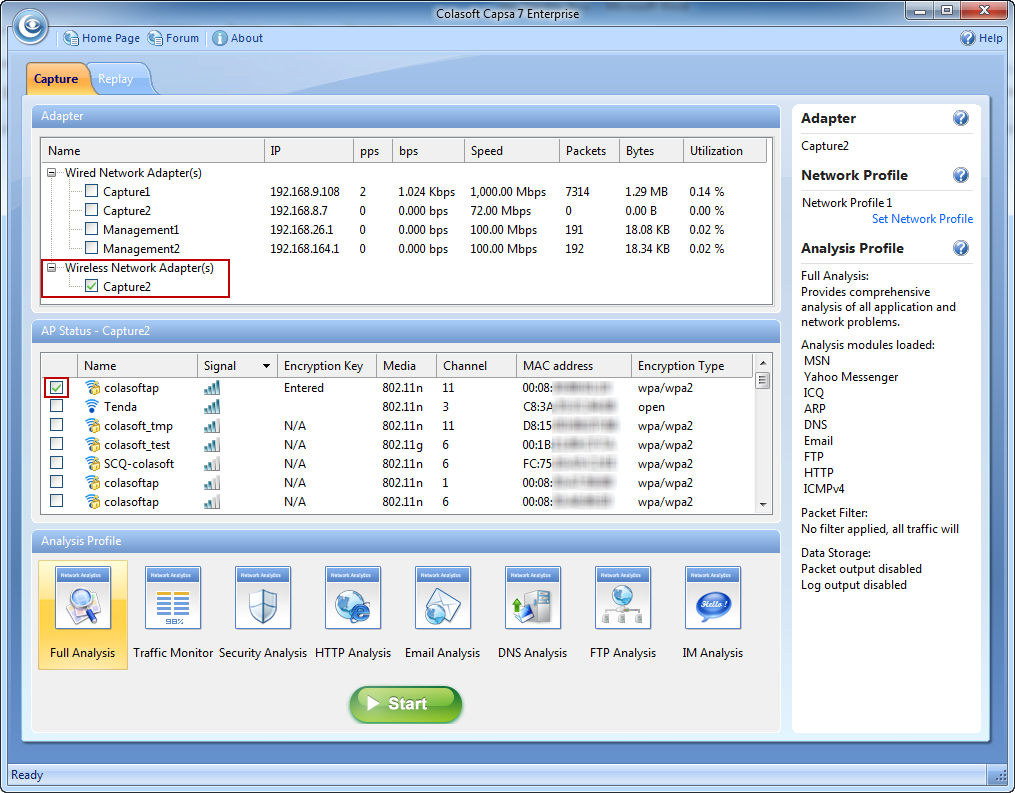
1. On the Start Page, choose a wireless network adapter. Once a wireless network adapter is enabled, Capsa automatically detects and displays all available APs.

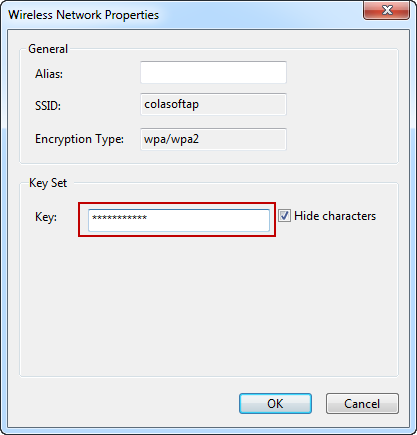
2. Choose an AP that you want to monitor, and if the AP is encrypted, enter the password for it. Once an encrypted AP is enabled, a dialog box pops up to let you enter the key. If the dialog box doesn’t pop up, just double-click the AP to open the box.

3. Click Start to start monitoring; or if you want to set up alarms, capture filters, packet auto-saving, choose a proper network profile and a proper analysis profile and then click Start to start monitoring

  • Once a wireless network adapter is used for capturing packets, it cannot be used for accessing the network anymore.
  • If you enter the wrong key for an AP, the analysis project will run as well but it will not decode any packets.
  • One analysis project can monitor multiple APs at a time, but the APs must be at the same channel.

 To decode and analyze wireless traffic, you are recommended to:

  • Make sure the password for monitored AP is correct.
  • Be close enough to the wireless router (signal source) to thereby capture all packets.
  • Monitor the AP before other hosts access the network to thereby capture EAPOL handshake packets.

Download Capsa

from www.colasoft.com

nChronos How-to: Define and Customize a Report

2014年6月3日 没有评论

Colasoft nChronos provides twelve system reports, and users can define new reports according to need.

To define a report,,

1. On the Report window, first click the node User-Defined Reports, and then click to open the New Report dialog box:

2. Enter the report name and the description.

3. Select the report scope.

  • If you want to create a report for all network objects, click Global, which means the report statistics are calculated based on all network objects.
  • If you want to create a report for a specific network object, click Limited to open the Report Scope dialog box:

    The scope could be IP addresses, MAC addresses, network segment, or a user-defined application, which means the report statistics are calculated based on selected scope.

4. Click the report modules you are interested and then click Add to add the interested report modules to the new report. Different report scope is provided with different report modules. The Global scope is provided with all report modules. For some modules, you can set the number of statistical objects.

5. Click OK to save the definitions. You can view the new report under the node User-Defined Reports.

Besides defining new reports, you can customize the company name, company logo, author, report title prefix, whether to show create time, and all these settings can be done on the Report Notification page from Server web portal:

Download Capsa


From www.colasoft.com

nChronos How-to: Set up a Traffic Alarm and Get Notification Emails

2014年6月3日 没有评论

nChronos provides a Traffic Alarm, which is defined by users, so as to notify there is traffic abnormal on the network.

To set up a traffic alarm,

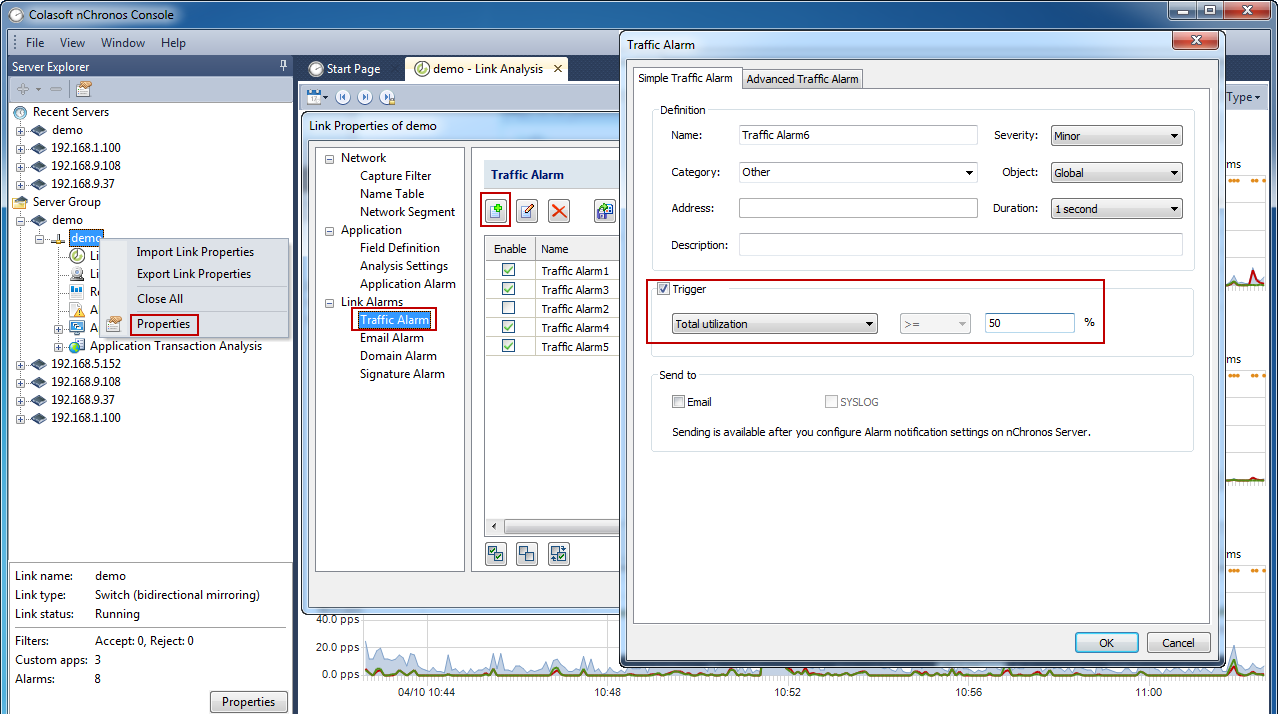
1. Right-click the network link, click Properties to open the Link Properties dialog box. On the Link Properties box, go to the Traffic Alarm tab, and click the New Traffic Alarm button to open the Traffic Alarm box:

Download Capsa

2. On the Simple Traffic Alarm tab of the Traffic Alarm dialog box, complete theDefinition section. The following list describes the options:

  • Name: The name of the new alarm.
  • Severity: The severity of the new alarm. It could be Minor, Major, and Severity.
  • Category: The category of the new alarm.
  • Object: Specifies the object that the alarm is made for.
  • Address: This setting will change to be Application when the Object setting is Any application or Single application. This setting is for specifying an address or an application.
  • Duration: The time that the trigger condition lasts.
  • Description: The description of the alarm.

3. Select the Trigger checkbox to set the trigger condition.

4. Click OK on the Traffic Alarm dialog box, and then click OK on the Traffic Alarm tab to make the traffic alarm take effect.

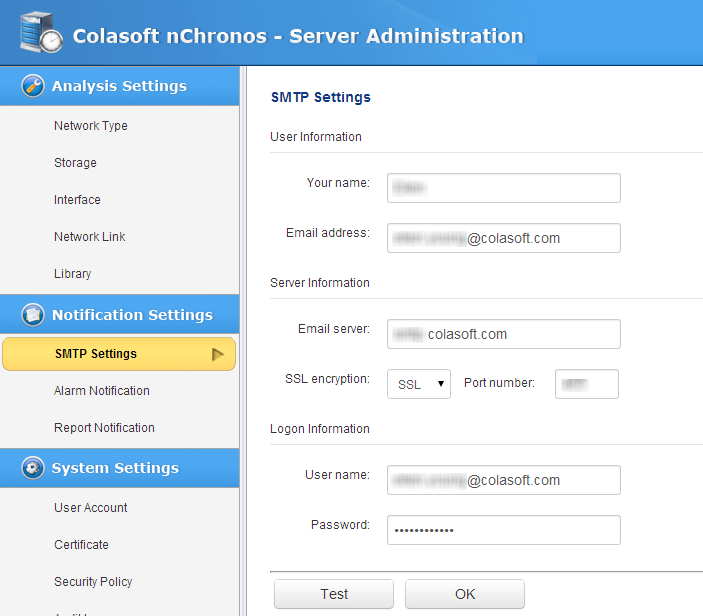
When alarms are triggered, there are alarm logs to record related information. The alarm logs are displayed on the Alarm window. If you want to receive emails containing the alarm logs, you need to enable the checkbox Email  when defining an alarm. If the checkbox is unavailable, you should first configure SMTP settings and Alarm Notification settings from Server web portal:

Download Capsa


source: www.colasoft.com

Colasoft nChronos How-to: Define and Customize a Report

2014年5月30日 没有评论

Colasoft nChronos provides twelve system reports, and users can define new reports according to need.

To define a report,,

1. On the Report window, first click the node User-Defined Reports, and then click to open the New Report dialog box:

2. Enter the report name and the description.

3. Select the report scope.

  • If you want to create a report for all network objects, click Global, which means the report statistics are calculated based on all network objects.
  • If you want to create a report for a specific network object, click Limited to open the Report Scope dialog box:The scope could be IP addresses, MAC addresses, network segment, or a user-defined application, which means the report statistics are calculated based on selected scope.

4. Click the report modules you are interested and then click Add to add the interested report modules to the new report. Different report scope is provided with different report modules. The Global scope is provided with all report modules. For some modules, you can set the number of statistical objects.

5. Click OK to save the definitions. You can view the new report under the node User-Defined Reports.

Besides defining new reports, you can customize the company name, company logo, author, report title prefix, whether to show create time, and all these settings can be done on the Report Notification page from Server web portal:

Download Capsa


Read more…

Colasoft nChronos How-to: How to Display IP Addresses as Host Names

2014年5月28日 没有评论

How to Display IP Addresses as Host Names

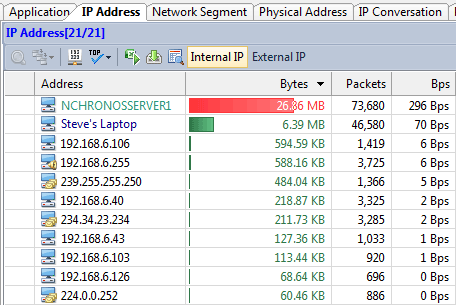
If you use nChronos to monitor traffic on a core switch you will see lots of internal IP addresses, and also the Internet IP addresses. You can find that most of the Internet IP addresses are shown as their domain name, such as www.colasoft.com, and www.google.com, etc. Wouldn’t it be great if nChronos shows host names of our local machines, because they are much easier to understand, rather than just IP addresses? This tips article will show you how to use Name Table to display IP and MAC addresses as host names.

Download Capsa

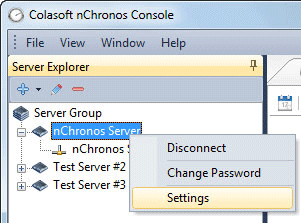
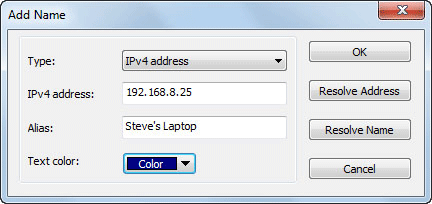
Suppose that there is a user, Steve, whose laptop has this IP address, 192.168.8.25, and you want nChronos to show his IP address as the text – Steve’s Laptop. First you run nChronos Console, connect to the server, right-click on the server name, and clickSettings from the context menu. Then select Name Table on the Server Settingswindow.

Then click the Add… button on the right side, you see a new dialog box. On this dialog box, input the IP address, 192.168.8.25, and input Steve’s Laptop in the Alias textbox. You can even choose the font color for this name if you like. Then click OK.

There is a little trick that you can input the IP address and click Resolve Address to find the host name automatically. It uses NetBIOS protocol and it’s able to retrieve the host name from that system. Or you can click Resolve Name button to translate the host name into IP address.

Download Capsa

The names you add will be saved on nChronos server, so you see them from every nChronos console. And besides IP addresses, you can still give names to MAC addresses, only that you cannot use name resolution function for MAC addresses.

You’ll find that you cannot click the Edit and Delete buttons sometimes. That’s because you have link window open, and the window uses the names for display. So it doesn’t allow any changes to the names if a link window is open. So you just close all link windows of that nChronos server, and you’ll find the buttons are clickable now.

Colasoft nChronos How-to: How to Connect to nChronos Server

2014年5月26日 没有评论

How to Connect to nChronos Server

Based on the architecture that nChronos stores all data on nChronos Server while nChronos Console works like a display, users who want to view network data have to connect to nChronos Server first.

To connect to nChronos Server, you should first add nChronos Server to nChronos Console.

To add nChronos Server,

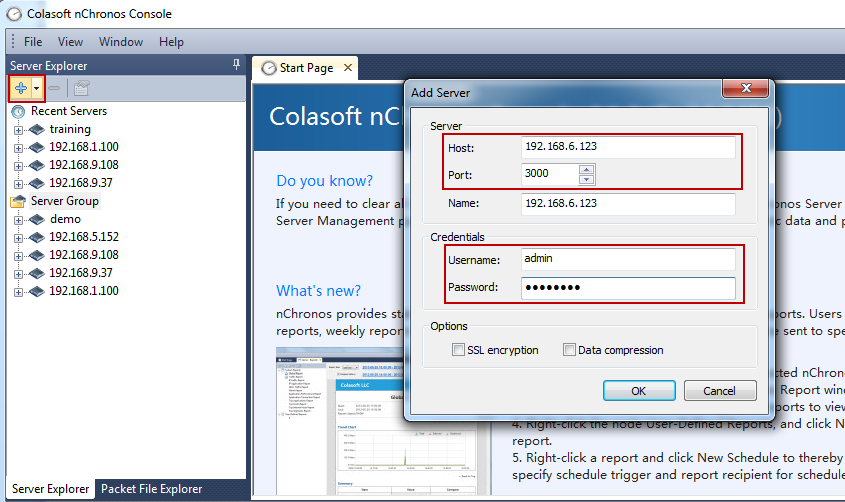
1.On the Server Explorer, clickto open the Add Server dialog box:

2. Complete the dialog box. See the following list of each label for more information.

  • Host: The IP address of the management interface on nChronos Server.
  • Port: The port number for connecting to Server. It is 3000 by default.
  • Name: A readable name for identifying the Server, for example, Marketing Dept. It will be the same as the IP address if you don’t enter one.
  • Username: The account for logging the Server.
  • Password: The password for the account.
  • SSL encryption: Applies SSL encryption when transmitting data from the Server to the Console.
  • Data compression: Compresses the data in the transmission from the Server to the Console.

Click OK to save the settings. Then the added server will display under the Server Group on the Server Explorer.

After adding nChronos Server, on the Server Explorer double-click it to make the connection, and then you will see the network link. Double-click Link Monitor and you will view real-time network traffic status.

Download Capsa

Source: colasoft.com

Colasoft Capsa Free Review – Capsa Is A Comprehensive Network Analysis Tool For LAN & WLAN

2014年5月26日 没有评论

by  on 

If you’re a network administrator, you already know how critical it is to have tools at your disposal to keep you apprised of the status of your network and its connected systems. Among the gazillion different apps for Windows, there are numerous different tools and utilities that can aid in network administration. Colasoft’s Capsa desktop application for Windows is one such highly feature-laden, comprehensive network analyzer that can help you in analyzing both your LAN and WLAN in real-time. The application carries a wide array of features including 24 hour network monitoring, advanced protocol analyses, in-depth packet decoding and capturing, and automatic diagnosis.

The software can be deployed in a number of scenarios and usage needs, for instance, troubleshooting various network related issues, analyzing your networks performance and pinpointing any bottlenecks, detecting malicious activities in the network, for example, presence of virus or worm, as well as debugging other similar problems.

Capsa is a freeware program but you need a free license key in order to activate it. To get your license, simply fill in the sign up form at Capsa’s website  and the developer will email the key to you.

Capsa_Download

Once you have received the key, enter it in the ‘Serial Number’ field during the setup wizard, enable ‘Activate Online’ and click Next.

Capsa_Reg

Capsa basically comprises of two different windows. The one that pops up upon launch, looks fairly understandable. It carries two tabs at the top labeled Capture and Replay. Under Capture, you can select the network interface you require to monitor or analyze. As stated earlier, Capsa works well with all wired and wireless interfaces, including Bluetooth, Wi-Fi and Ethernet. And toggling an interface displays its bandwidth stats in real time.

Colasoft Capsa 7 Free

Capsa houses a number analyses profiles, and it’s up to the users which profile they want to deploy. For an in-depth analyses, you can choose Full Analyses, but if you need to analyze different network modules separately you can do that too by choosing the appropriate profile name. These analyses types include Traffic, HTTP, Email, DNS, FTP and IM. After selecting the analyses type, you can click ‘Start’ to initiate the capture process.

The main window of Capsa then shows up, providing a wide range of statistics and analysis results. The Ribbon-like UI of Capsa carries a menu bar at top, the main Ribbon, a node explorer to the left, status bar, and the main view at center. You can also stop and resume the capture process anytime. The application displays various different kinds of information and its up to the users how they approach with the analyses of the network.

Analysis Project 1 - Full Analysis - Colasoft Capsa 7 Free

The sub-tabs within the main view section of Capsa allow you to navigate between various sub sections, fourteen in total, such as statistics, logs, reports, graphs, data packets, diagnosis results and so on. There’s also a Node Explorer to the left which gives an overview of physical and IP addresses of the network, giving you a general understanding of your network.

Full Analysis - Colasoft Capsa 7 Free

Capsa also lets you save captured packets by exporting the results as a Capsa-compatible file and save it to your hard disk. You can then replay the same file later from the ‘Replay’ tab that I mentioned earlier. To do that, click Replay button when Capsa is relaunched, under Replay tab, click Add, select the packet file you saved and click Start to initiate replay.

Full Analysis - Replay

Overall, Capsa is an extremely useful and feature-rich program if you need to monitor and analyze various aspects of the network. Besides its Free version that we reviewed, it also comes in Enterprise and Professional editions both of which offer additional features. It works on all versions of Windows.

Download Capsa

From: addictivetips.com

How to Baseline Network Throughput and Performance

2014年5月22日 没有评论

How to Baseline Network Throughput and Performance

What is network baseline?

Do you know what your normal network throughput volume is, what types of traffic are most used in your network? If you can’t answer these questions then you should baseline your network. Network baseline is very important to network management because the data will tell you what it’s like when everything goes all right.

To baseline your network, you need software or hardware to listen on your network or a particular device. Both Colasoft nChronos and Capsa can be used to accomplish this task. Both of them are used to listen into packet data of a wire and generate all kinds of statistics on the network. To baseline a network, you need to use them to monitor the network traffic long enough, because a wider time span presents a more real picture of network traffic pattern. The use of network baseline is listed as follows:

  • Understand healthy network pattern and traffic trends.
  • Evaluate network management policies compliance.
  • Understand how the network resources are allocated.
  • Accelerate to troubleshoot network issues, i.e. abnormal traffic and spam traffic, etc.
  • Provide data on network and security management to support decision making.
  • Provide history statistics on network upgrade.

Download Capsa

How to baseline a network

Preparation

If you want to baseline a network, you can start from the tasks listed below:

1. Network diagram: draw the layout of the network structure, marking IP/MAC addresses, VLAN, and places of all routers, switches, firewalls, servers, management devices, and even the data flow directions.

2. Network management policy: helps you understand what services are allowed to run on the network, what traffic is forbidden, and what services should enjoy higher priority.

Scope & Objectives

When you are ready to start baselining your network, first you should think what to baseline because it’s hard or sometimes unnecessary to include all hosts, switches and routers of a big network into you baseline report. The suggestion is that you divide the network into several layers and only baseline the critical layers. For example, only baseline the services like ERP, Email, HTTP traffic and devices like core switches, routers and critical servers.

In addition to last point, different devices, hosts and links require different types of baseline data. For example, performance and security baseline is important to the servers, and network itself cares about throughput, utilization and types of traffic.

Collect baseline data

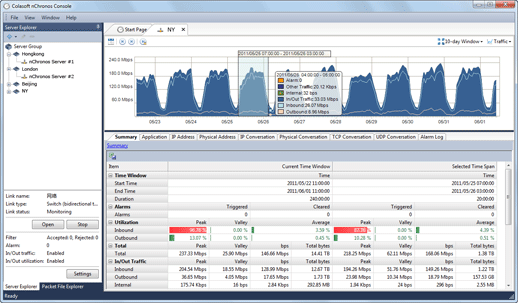
Generally speaking, a network baseline report contains these basic data: network utilization, traffic components, top protocols talkers, top hosts talkers, conversation statistics, address statistics, packet sizes, average packet length, and key server info, etc. Both nChronos and Capsa Network Analyzer provide these types of data (figure below).
To use nChronos or Capsa to baseline a network, you need run nChronos or Capsa and use an excel sheet to record statistics over each specific time period. The following figure shows a typical Excel network benchmark table.
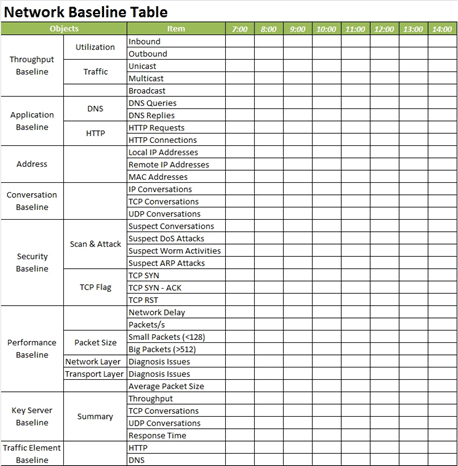
Then you can use formula to work out the max, min, and average value of each data type. And if you keep recording long enough, you get a much precise baseline statistics.

The use of network baseline data

The baseline data is often used when the network is reported to be running improperly. For example, when the network performance drops, you can compare the real-time datacollected from the analyzer with the baseline data to help you spot where the anomalies are.

Download Capsa

Tips for network baselining

Update the baseline document in time

The baseline report is useful only when it provides accurate and up-to-date data. It requires that you update the data in time when there are any changes to the network. For example, when a new device is added, or a new application is implemented, the changes need to be marked on in the baseline report.

An IP/MAC database is necessary

If the network is full of desktops, laptops and switches, you should consider an IP/MAC database to record the user name and place of each individual IP and MAC address. It’s very helpful when you need figure out who is using the IP or MAC and where it is when you decide to give it an examination.

Baseline the critical devices only

Remember, you don’t have to maintain a baseline table which covers all your host computers, laptops, servers, switches, firewalls and routers. If you insist to do so, you’d better prepare enough time for it. You are suggested to only cover the mission-critical servers, such as email, web site, OA and CRM servers, and core switches and routers in your baseline report. And they’d better be organized in separate sheets to help you easily find what data you need.

Baseline over a long time period

It takes a long time to set up a network baseline because your network probably works in different patterns through Monday to Sunday. For example, on Monday morning, your email traffic could be higher than other days because there are lots of emails waiting to be processed after the weekend. On Friday afternoon after 4:00 PM, web traffic could be higher because some are browsing the web to find a place for the weekend. Therefore, your baseline report should cover the time period of a week at least, and you are suggested to extend to 2 ~ 4 weeks.

Keep baseline report easy to read

You should include all useful diagrams and illustrations in baseline report, the more the better, such as a network diagram, network policy, backups for switches and routers. The documents should be standardized with explanations and descriptions, especially for the technical terms. All of them are helpful when someone else is trying to access and read the documents.

Download Capsa

from: colasoft.com