How to save monitored email contents with Capsa 7.3
Colasoft just released a major upgrade of Capsa Network Analyzer a few days ago and we notice that the Security Analysis Profile is the most important new feature in Capsa 7.3 which helps users to locate and troubleshoot network issues and attacks like ARP attack, DoS attack and port scanning. Besides that, the feature of email auto-saving that users appreciated in previous versions had some adjustments. So, this article is aims to teach you how to save monitored email contents.
In Capsa Network Analyzer 7.3, if you need to save a copy of the monitored email to your hard disk, you should do the following:
Step 1. Enable Log Output
a. Go to the Start Page and click the Set Data Storage link on the right panel.
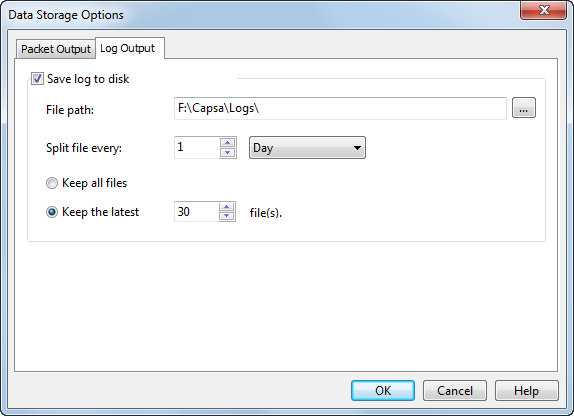
b. You see the Data Storage Options dialog box, highlight the Log Output tab and then check the Save log to disk checkbox.
c. Finish the settings of choosing file folder and setting up the rules to save logs in different files.

Step 2. Enable Email Copy
a. Double-click the analysis profile you want to use and enable the Email analysis module. Probably you’ll use Full Analysis or Email Analysis because they initially enabled the Email analysis module. This step is very important and if you don’t enable Email analysis module, Capsa will not analyze and capture any email.
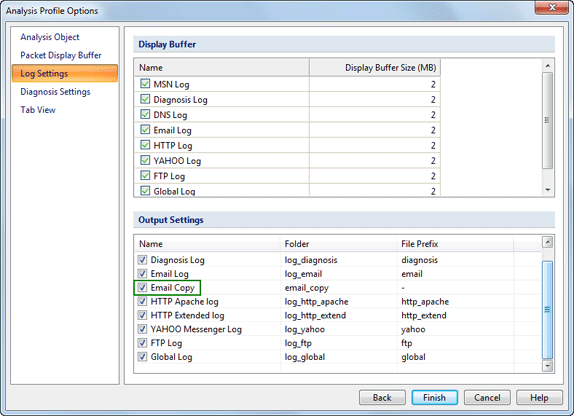
b. Click Next and click Log Settings. You will focus on the Output Settings and make sure the Email Copy item is checked.

Set up as the instructions above, Capsa will save all captured inbound and outbound email contents to your hard disk. Why did you make these adjustments, you may ask? This is because users of the earlier versions might be toggled among different analysis profiles and they often forget to enable log output on different profiles. That means in previous versions, every analysis profile has a switch of email auto-saving. Therefore this time we can see the switch is made globally. Once you enabled log output, the logs will be saved to your hard disk no matter which analysis profile you choose.
It’s also notable that this time Capsa is able to output logs in multiple files as the rules you set. For example, you can set to save logs to a separate file every 10 minutes. It makes it easy for you to find useful logs in time-split small files rather than in a big log file.
I’m sure you already know how to save emails with Capsa 7.3 after reading through this article.


