存档

‘Articles’ 分类的存档

THE IMPORTANCE OF A NETWORK ANALYZER – PACKET SNIFFER. MUST-HAVE FEATURES FOR DEMANDING ENGINEERS & ADMINISTRATORS

2015年4月22日 1 条评论

Network Analyzers, also known as Packet Sniffers, are amongst the most popular network tools found inside any Network Engineer’s toolkit. A Network Analyzer allows users to capture network packets as they flow within the enterprise network or Internet.

Engineers usually make use of Network Analyzers to help uncover, diagnose andfix network problems, but they are also used by hackers to obtain access tosensitive information and user data.


FEATURES OFFERED IN HIGH-QUALITY NETWORK ANALYZERS

When dealing with network problems, engineers usually follow standard tests to try to identify the source of the problem and make any necessary corrections. These tests usually involve checking the source (Client or Network device) IP address, Gateway, DNS server, Nslookup and performing a few ICMP Echo Requests (aka Ping) to verify connectivity with the local network and destination IP.

These methods are usually enough to diagnose simple problems, but are clearly inadequate when dealing with complex network problems. This is where a high-quality network analyzer comes into play.

Any typical network analyzer will capture and display packets, providing basic packet information such as time of capture, source & destination MAC address, source & destination IP address, Layer 4 protocol information (TCP/UDP flags, ports, sequence/acknowledgement numbers) and the data payload. While this information is extremely useful information, it often means that additional time is required by the engineer to locate the data stream/conversation of interest and track down all associated packets.

Further analysis of the captured data usually increases the difficulty and expertise level required to make sense of the information captured.

Let’s take a look at the most important features high-end network analyzers have, that helps simplify complex troubleshooting in our everyday routine.

Download your copy of Capsa Enterprise Network Analyzer now!

REAL-TIME NETWORK CARD UTILIZATION

Real-time network card utilization is a very handy ‘visual tool’ as it shows the bandwidth utilization of the network card used to capture packets.

When configuring SPAN on Cisco Catalyst switches to monitor a switchport that connects to a router or server, the real-time visual representation of network traffic has proven to be extremely useful as it’s much easier spot packet bursts and other traffic patterns.

important-network-analyzer-packet-sniffer-features-1

Figure 1. Capsa Enterprise real-time network utilization

CONFIGURABLE BUFFER SIZE

All traffic captured by the network analyzer is stored in a special buffer. This buffer usually resides in the workstation’s RAM and can be saved on the hard disk, so that additional analysis can be performed later. While most packet analyzers allow the buffer size to changed, its size is usually restricted to a few MB.

The ability to use an extremely large capture buffer e.g 1024MB or 1 Gigabyte, is necessary when performing analysis of heavy traffic where a couple of hundreds of MBs are typically required.


IP CONVERSATION TRACKING & TRANSACTION SEQUENCE DIAGRAMS

A high-quality network analyzer smartly presents all captured information in an easy-to-understand manner, making it easy and fast to locate any IP Conversation between hosts:

important-network-analyzer-packet-sniffer-features-2

Figure 2. Capsa Enterprise displays IP Conversations between our workstation and Firewall.cx

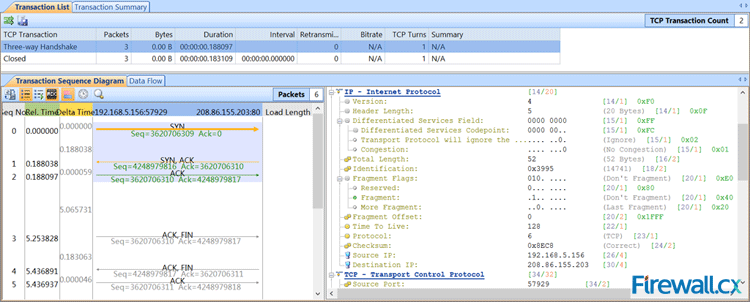
Having the ability to drill-down into each IP Conversation is equally important. Colasoft Capsa provides this important feature by simply double-clicking on any of the displayed conversations:
important-network-analyzer-packet-sniffer-features-3

Figure 3. Capsa Enterprise allows us to drill-into each IP Conversation

The Transaction Sequence Diagram section on the left side displays the flow of packets of the displayed IP Conversation. Tracking TCP sequence numbers and TCP acknowledgements is often a very time-consuming process but tools such as Capsa Enterprise makes it easy and allows engineers to focus on the more important information.


AUTOMATIC DIAGNOSTIC TOOLS

Network engineers often need to deal with network problems that occur either from user configuration errors (e.g invalid Domain, incorrect URL etc) or other problems that are often difficult to identify.

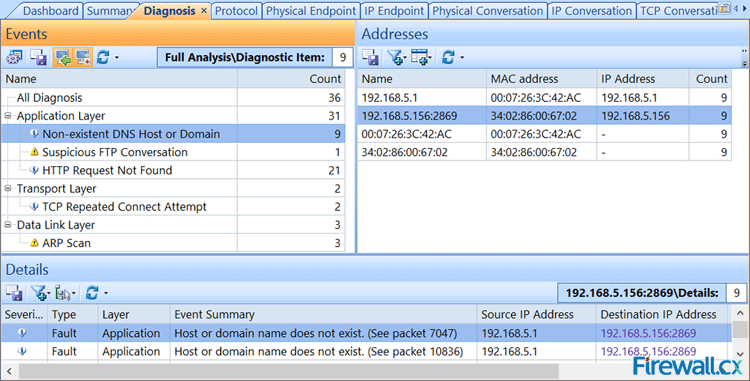
Considering the fact your network analyzer captures all traffic, it should be able to automatically identify network/session problems anderrors. This helpful feature helps dramatically when dealing with various network issues as it provides an overall view of problems that have been identified.

In many cases, these errors can lead to uncovering suspicious user activity or hacking attempts:
important-network-analyzer-packet-sniffer-features-4
Figure 4. Capsa Enterprise automatically identifies problems that would otherwise be missed

As shown in the screenshot above, our network analyzer has identified 36 events that can be examined by double-clicking on the specific event in the left window and then selecting the associated addresses from the right window. Packets are then displayed at the bottom area. Double-clicking on these packets will open them for further examination.


TOP NETWORK TALKERS

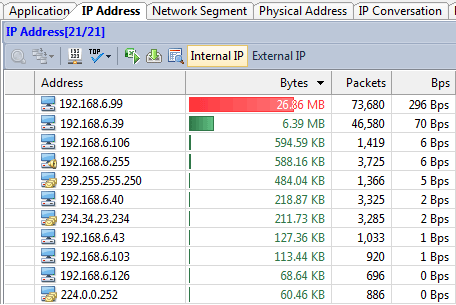
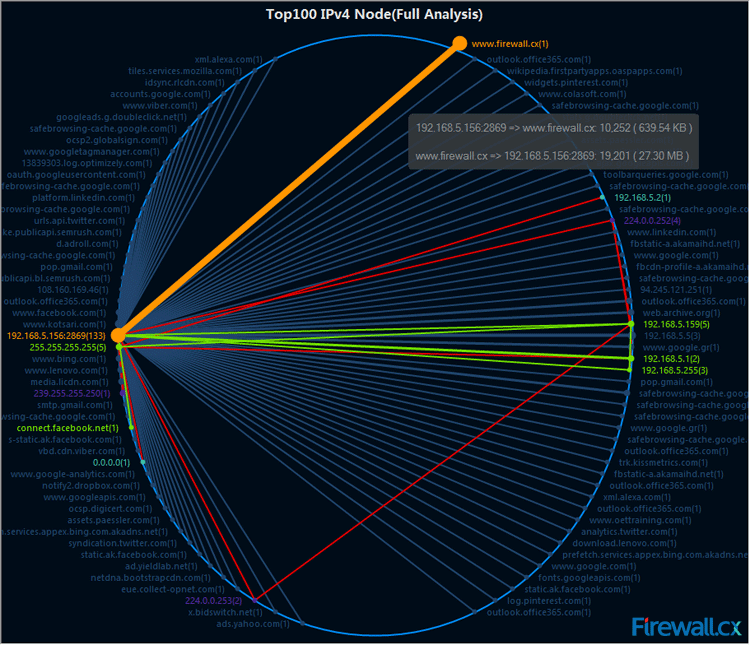
During times of excessive traffic, it is usually required to identify the network’s top talkers and take action. When supported by the network analyzer, it makes life very easy. When not supported, a sample of network traffic must be taken and sorted by the IP address with the greatest amount of data transferred.
important-network-analyzer-packet-sniffer-features-5

Figure 5. Capsa Enterprise provides the network’s top talkers and their traffic

Capsa provides 4 reports of Top Talkers: Top100 IPv4 Nodes (shown above), Top100 IPv4 Conversations (IP Based), Top100 Physical Nodes (MAC Based) and Top100 Physical Conversations (MAC Based).

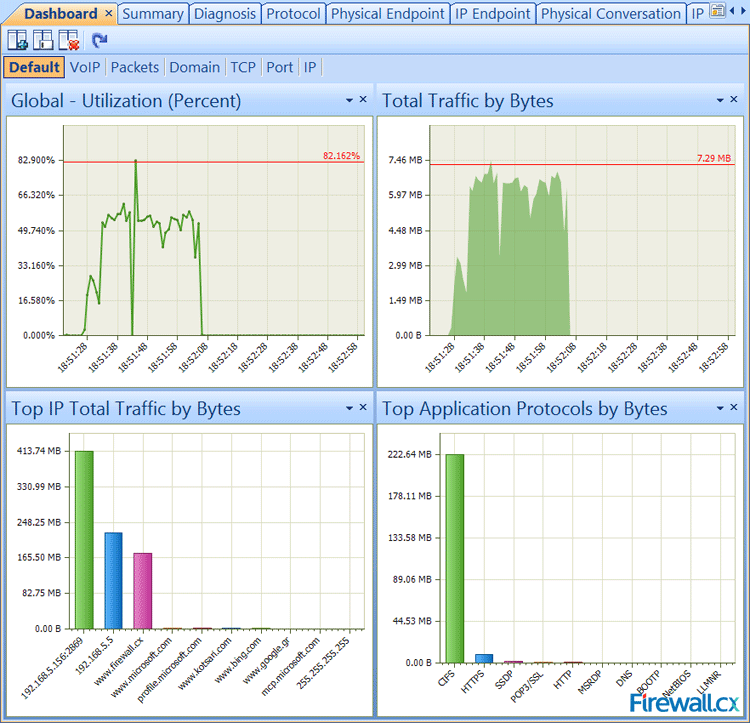
Top IP’s can also be obtained via Capsa’s Dashboard (shown below) which provides Global Utilization (% of total interface bandwidth) and Traffic (bytes) within a specific timeframe, Top IPs based on bytes transferred, and Top Application Protocols based on the protocol used:
important-network-analyzer-packet-sniffer-features-6
Figure 6. Capsa’s Dashboard provides a healthy amount of real-time information and traffic captured

ADVANCED FILTERING

Filtering is a core feature that allows network engineers to select specific type of traffic based on its characteristics. Common filtering found on most network analyzers includes: Source/Destination MAC or IP address, Protocol and Port numbers.

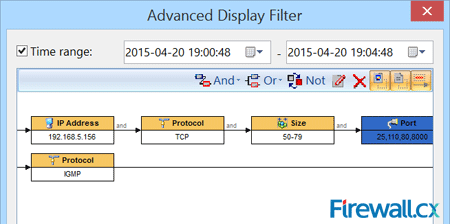
Advanced filtering is a feature most engineers require in their network analyzer, but often don’t have. Advanced filtering allows special complex filters to be created based on additional characteristics such as Time, Packet size, Data Payload values in conjunction with AND/OR/NOT logical operations.
important-network-analyzer-packet-sniffer-features-7

Figure 7. Capsa’s Advanced Filtering leaves nothing to be desired

CONCLUSION

A high-quality network analyzer bundled with useful advanced features as the above will help any engineer or administrator diagnoseand deal with network problems quickly and efficiently, but also capture suspicious network traffic patterns often associated withhacking attempts. When selecting your network tools, ensure they are of the highest quality and provide features that will help make your job easier.

from: http://www.firewall.cx/networking-topics/general-networking/1084-important-network-analyzer-packet-sniffer-features.html


分类: Articles, Reviews, Tips & How-tos 标签:

Capsa by Colasoft: A Network Engineer’s Product Review

2015年2月9日 没有评论

By Shane Killen

I wanted to take the opportunity to do a review of the Colasoft Capsa program.  I have been asked about this program often, and I think it is time I do a review. Everyone knows that I like this program and I personally use this network analyzer all the time in my consulting position.  I love it and I have recommended this program on my blog and to customers of the company I work for.  It has saved me time and money in diagnosing problems.  And if I’m saving money, that means my customers are saving money.  And everyone loves that!

A personal story:
Just to start this out, I want to tell you a quick, condensed story.  I had a customer that called me up one morning.  They told me that their network was “crawling” and they wanted to know if I knew of anything going on.  I was at another client at the time, and all I knew to say at that point was that I could come over and take a look.  They told me to hold off at the moment, and they would call me if you needed me.  By the time 4PM came, I called that customer back to see what they had found.  He told me that they still had the problem, and they wanted me to come on in and see if I could find the problem.  I did just that.  From the time I got there and started working on the problem, I set up a monitor session and connected my laptop up.  Within 10 minutes, I told them what was the problem, what was causing the problem, and how it needed to be resolved.  It was a device that had a NIC that started flooding the network.  180K packets per second (Capsa told me this).  They went and disconnected the offending network cable for the device, and everything came back up without issue.  Key NOTE:  They had been working all day on this problem without resolution.  I came in and within 10 minutes pointed out what the problem was, what was causing the problem, and what to do to fix it.  I was able to do this with the Capsa network analyzer within 10 minutes of starting the troubleshooting.  In this example, think of how much money and productivity was lost. The very next day, this customer bought Capsa.

Now, the review:
At first look, the Capsa dashboard has a very nice look and feel to it. The dashboard colors are easy on the eyes when looking at it for long periods time, which is important when needing to troubleshoot problems.  You don’t need something hard to look at on top of using your brain to pinpoint issues, and Capsa is certainly easy on the eyes.  See below for the first look.

The layout is also well designed.  The tabs across the display make it easy to navigate to areas you need to get to.  Its almost like the company had true technical engineers design the layout.

The first display I tend to look at and use is the default view.  You can easily customize this to whatever it is you are looking for.  Capsa puts out some displays for you by default.  The defaults are good, but if you need more for what you are trying to accomplish, they made it very easy to add to this display if you want to.  I personally modify it to what I like to see.

The “Summary” tab has very good statistical information in it.  I personally dont use this tab much, but if you are looking for general statistical information about your network, this is a good place to view.  I do know engineers that just want to take samplings on a network, and this is a good tab to view for just that.  Things like Diagnosis statistics, Traffic statistics, Packet size Distribution statistics, Protocol statistics by OSI model, etc.  Again, very good for taking statistical snapshots during timed intervals.

This next tab is really handy for doing network assessments.  Its called the “Diagnose” tab, and this tab will tell you potential problems on the network that Capsa sees.  Anything from delays, re-transmissions, SMTP server slow response, HTTP client error, etc. And when I say “etc”, I mean a lot of “etc”s.  I use this all the time, and its very handy and helpful for the network engineer.  Its handy because it even makes suggestions on what the actual problem resolution might be.  That is a pretty cool feature.

The next tab shows a “Protocol” view of the network.  This is an excellent view into what protocols are traversing your network.  If you see a protocol in this display that you didn’t want on the network, this is a great place to see it quickly.  Easy to see and right in front of your eyes without the need to sift through traffic or selecting a column view and then finding the protocol.  Its just right in front of you with ease to see.  This is very helpful when in a hurry to hunt down what you don’t want on the network, as far as protocol view is concerned.  I have had plenty of times when trying to see what protocol is running on a network, just to know for sure what is there and what is not there.  And when Im doing a deep inspection of a network, this is definitely one view I look at.

The “Physical Endpoint” tab gives you a view into the layer 2 and layer 3 view into the network for statistics.  I personally don’t use this view much.  However, I do see the benefit of this tab.  You can find problems by either MAC address or IP address, like a malfunctioning NIC.  This is a good statistical view of that.  I personally will see it in the default view, because Ill customize the view there to see such things.  But, this is also a great place for that sort of detail.  One thing I really like about this view is that you can see the actual packets if you choose to.  Just like what you would see in a wireshark packet capture.  This is a great feature.

The “IP Endpoint” is a layer 3 view only into this view.  Its very similar to the “Physical Endpoint” tab, with the same features for the most part.  This is mostly a statistical view.  Again, you can see the actual packet here if you want to see it, just like in wireshark.  I have used this screen to find packets from a particular IP address, so that I can use the packet view before.  This is very handy and easy to find what you are looking for if you are looking for a particular IP address.  From the “offender”, you can view all you want as far as raw packets go.  I personally like this and have used this often in the past.

The “Physical Conversation” and “IP conversation” tabs has some important information for troubleshooting delays, etc.  I personally have used this tab a lot, especially when looking for delays in traffic to find out what is actually happening.  There is a lot of good information in these tab views.

The “TCP Conversation” view is an excellent view for seeing delays, etc.  In application type delays, you can easily prove where delta delays are when everyone is pointing at the network as fault.  I have used this many times to prove application delays, and where the network was fine.  This view makes it very easy to see these types of delays with transaction sequence diagrams, along with seeing the actual packet if you want to (which I do).  Again, it just makes it easy.  See below for a screenshot.

The “UDP Conversation” view is similar, with the exception of a data flow view.  After all, its UDP.  I personally dont utilize this tab much.  Although, I do see the value in seeing the conversations between devices.

There is now a new section called “VoIP Call” tab.  I have experimented with this and I do like this tab.  It will show you the calls made via SIP, the status of the calls, duration, invite time, etc.  It even has a “translatorX” like view if you are a visual person and want to see the call setup steps that each call has taken.  This is especially helpful when troubleshooting failed SIP calls.  This is a welcomed addition to the Capsa package.  With that said, I must tell you that for now, it only will recognize SIP calls.  It will not recognize H323, MGCP, or SCCP.  I have to admit, that is a little disappointing.  However, that is really the only negative thing I can say about this tab.  But, I suspect that will change in the future.  But, keep in mind, you can still view H323, MGCP, and SCCP in the other tabs if you looking for them.  Its just not in this tab.  Overall, I’m still impressed with this VoIP capability.  I’d really like to show you this screen, but there is just too much sensitive information I cant give out in my capture.  So I’m only going to show you a piece of the screen, so that you get the idea of what you will see.  I did blot out the personal info on this screenshot, but again, there is more to this screen than what I’m showing below.

There is a new “Ports” tab that shows all the ports being used on the network.  From here, you can view the traffic conversations, along with the data flows.  Again, this is really important in finding delays, etc.  I really like this new addition to the Capsa product.

There is a “Matrix” tab which shows you in a circular diagram the traffic from source to destination.  I dont use this much, except to get an impression on how many devices are actually talking to each other.  From here, you can, again, look at the raw packets.  I have heard other engineers say they like this view.  I think this must be just personal preference.

The “Packet” tab takes you right to the raw packet view.  Again, this is convenient, as you can go directly to search for specific IPs or MAC addresses quickly. And again, with all the info you would need in the display for finding what you want in the packet capture.

The “Log” view is just that.  It shows you a log of successful and failed events.  Anything from a global view of all traffic, to seeing only DNS, Email, HTTP, etc types of traffic.  This is an excellent addition to the product when you need to see events outside a packet view.

The last tab is called “Report”.  I absolutely love this tab.  For the executives, you can run the reports they want to see without them actually being technical in nature.  Lets face it, they just want the high level overview.  They dont want to see the packet details, the troubles, etc.  They just want the facts, and these canned reports will give them just that.  Also, you can customize your own reports as well.  You can even customize this to your company name, logo, etc.  This is a nice feature.

Other features:
You can get Capsa to send you an audible alarm when an event happens, something you customize yourself.  You can also get it to send you an email when the event happens, if you happen to not be in front of your Capsa PC/Server.

I also like the displays across the top of the program.  I use the “utilization” and “pps” (packets per second) displays almost every time I use Capsa.  These views are easy to detect broadcast storms, over utilization, etc. There is also a “Traffic Chart (bps)” chart that is a visual of the amount of traffic that is on the network.  I like these views for sure.  They are always up front and if something starts happening on the network, you can easily see some of these types of events in these displays.  Very handy when you are going through the tabs and still able to see these views at the top.  I personally like that this was carefully thought of for the network engineer.

Another thing I like, is that if you are looking for only certain types of traffic, you can filter Capsa to only display that traffic without seeing all the other traffic you are not looking for.  This is handy when you know where the problem is, but dont know the cause of the problem.

One thing to note here in this review.  I have mentioned a lot of features in this program.  However, what I have not mentioned is ALL of the capabilities in each tab.  There are a ton of things you can do in most of the tabs.  Don’t think I covered everything.  I have only covered a fraction of what you get out of this product. What I suggest is that you go and download a demo of this product.  Try it for yourself and download a trial of this to see if you like it.  Visit Colasoft at www.colasoft.com, and let me know how you like it.

About Shane Killen

Shane Killen currently works at a consulting company in Birmingham, Alabama.  It is a consulting firm that deals with most aspects of IT Technology.
He works as a IT consultant, serving as a Senior Network Engineer. Shane Killen has been working in IT professionally since 1996.  Certifications currently hold –  Cisco CCNP (R&S), Cisco CCNP Voice, Cisco CCDP, Brocade BCNP, ShoreTel Advance Systems and Troubleshooting, CompTIA Network+, CompTIA A+, CSSA, Palo Alto ACE.

From: http://www.shanekillen.com/2015/02/capsa-by-colasoft-product-review.html

What’s New in nChronos 4.3?

2014年11月25日 没有评论

Service Port Monitor

nChronos 4.3 provides a Port view and a Service Access view to monitor and analyze service ports. The Port view calculates the statistics based on IP address + TCP/UDP service port. Together with the sorting function of nChronos, you can easily know which service ports are running on the network, and running for which IPs. The Port view further provides other information about the service port, including the application, the uplink and downlink traffic, the service access time, access times, etc. The Service Access view calculates the statistics based on server and client IPs, port number and applications. It provides the access details for each service port. You can drill a service port down to a specific service access session.

Request a demo

VLAN and VPN Virtual Link Support

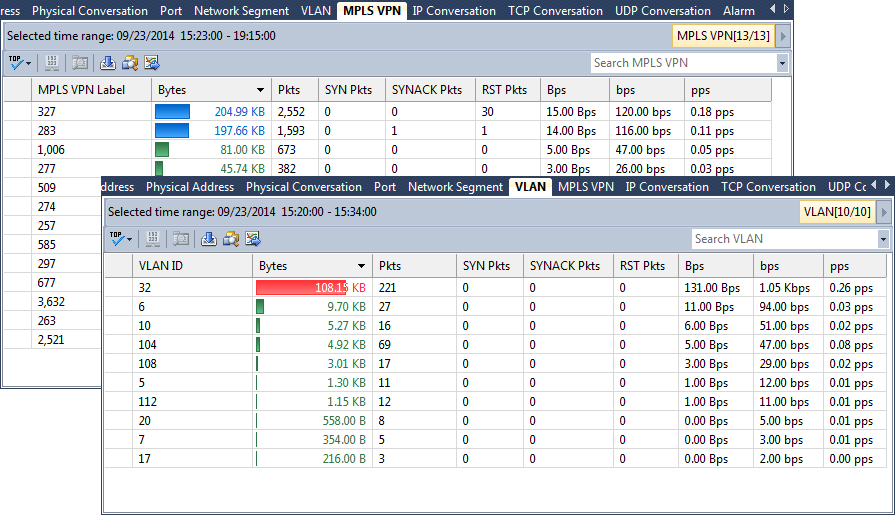
nChronos 4.3 provides support for virtual links, including VLAN and MPLS VPN. You can add virtual interfaces and set up network links based on the virtual interfaces. There is a VLAN view, which displays traffic statistics based on VLAN ID. An MPLS VPN view is also provided to display traffic statistics based on MPLS VPN label. Together with the name table function of nChronos, you can add names for VLANs and MPLS VPNs.

Millisecond Analysis

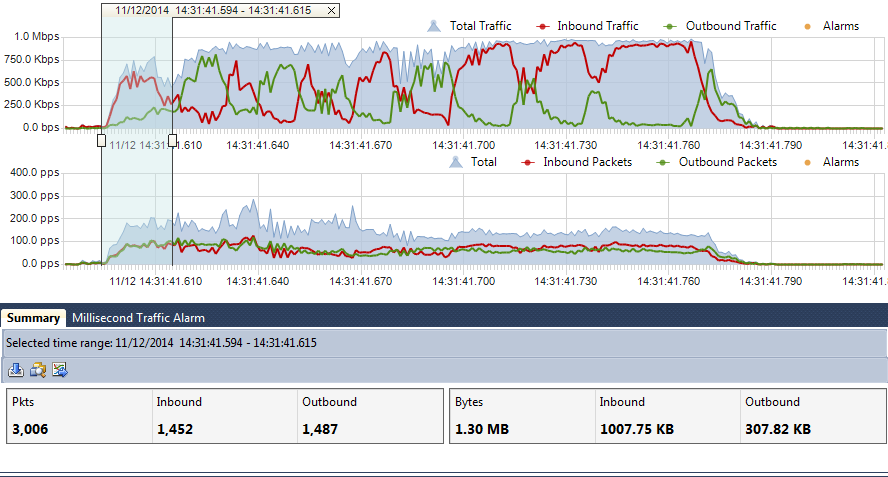
Millisecond analysis provides traffic analysis accurate to one millisecond. It is important for users who care about transient traffic burst. Colasoft nChronos 4.3 provides millisecond traffic statistics and millisecond traffic alarm. Users can define any millisecond traffic alarm according to the need. The Millisecond Analysis window displays the millisecond traffic statistics trend charts in real-time.

Multi-Segment Analysis

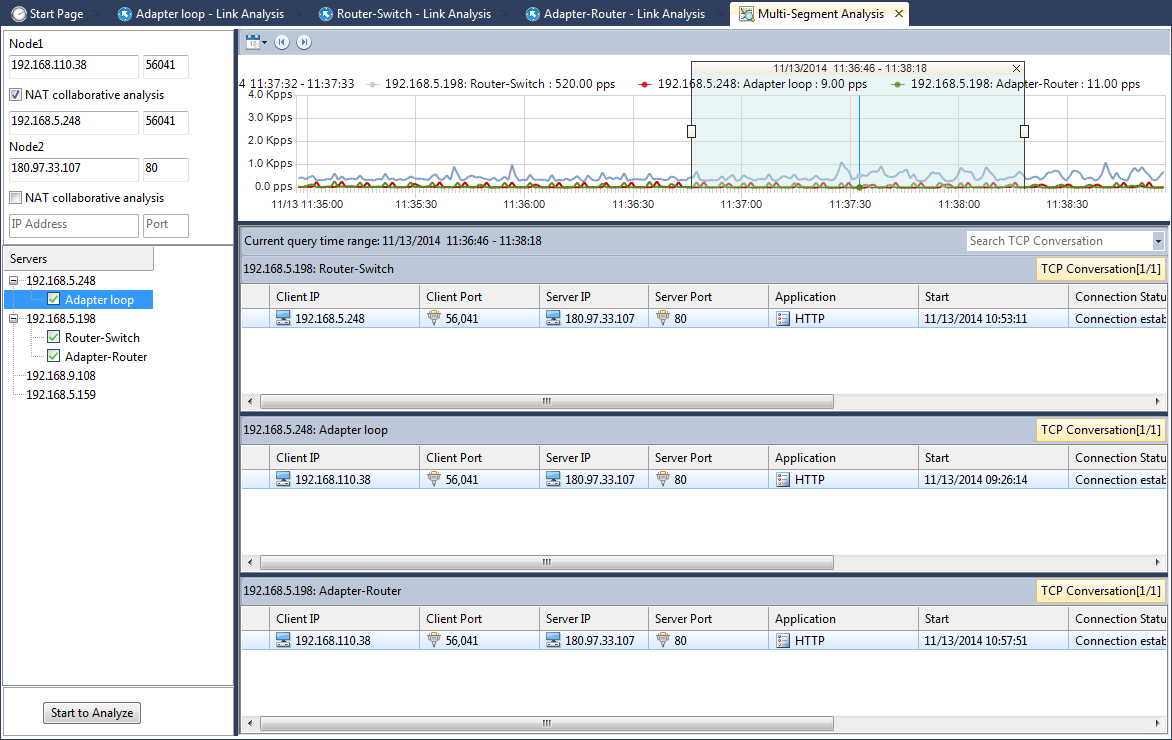
Sometimes the responses from large websites are very slow, and to find out the system bottleneck for the websites, it is necessary to analyze each link of the websites. Colasoft nChronos 4.3 provides a multi-segment analysis function, which associates and correlates the data of the same conversation collected on two or more network segments, and displays graphical performance analysis results, like packet loss, delay, retransmission, etc., thus providing visibility into the areas where bottlenecks may occur. A Multi-Segment Analysis window has a timeline pane to show the traffic trends of monitored links. When a conversation is analyzed, the conversations on other segments will be picked up and analyzed automatically.

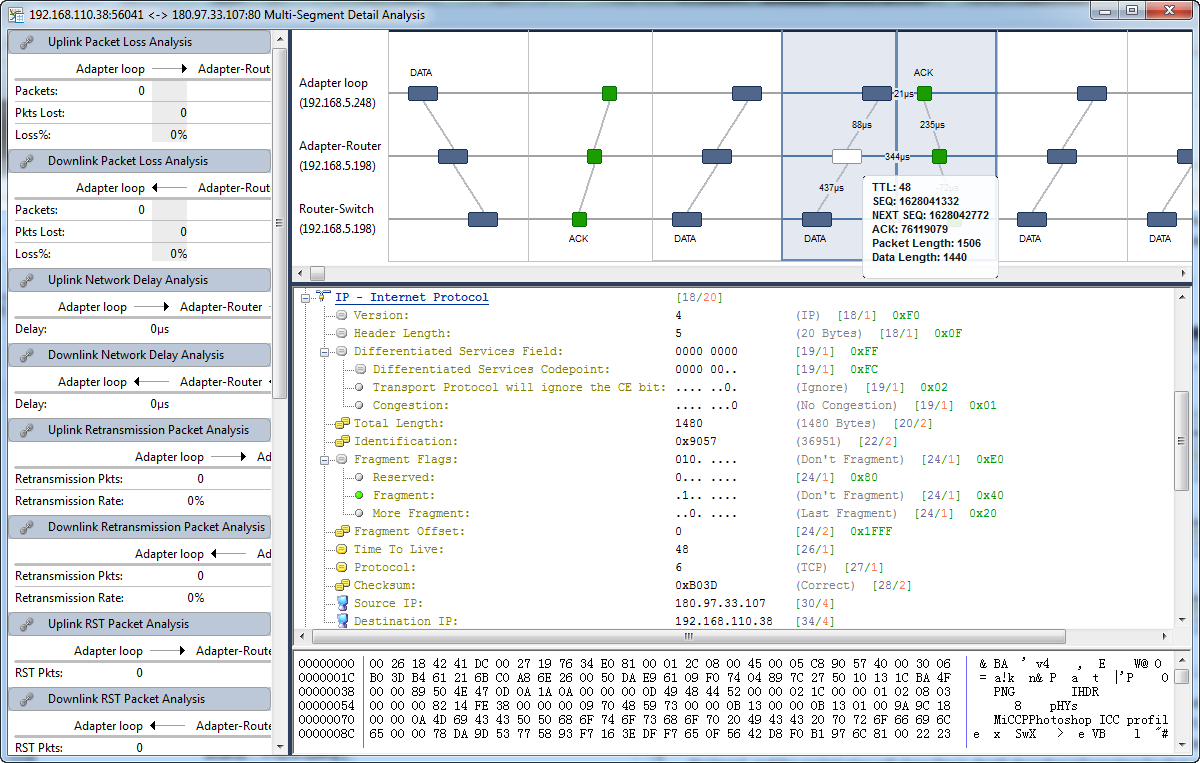
A Multi-Segment Detail Analysis window shows the detailed analysis results and visualizes the conversation flow across multiple segments. When clicking and hovering a packet, correlated packets will be highlighted, the time difference between the packets will be displayed, and the packet view will show the in-depth decoding information for that packet.

Storage Filter

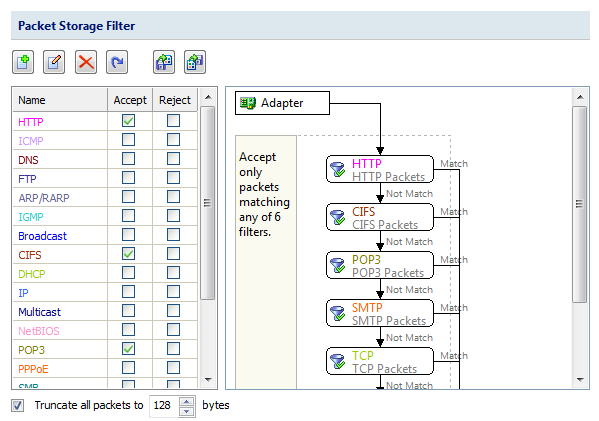
nChronos 4.3 provides Storage Filter for users to store packets that match the filer rules. You can define the filter rules based on IP/MAC address, port number, protocol type, packet size, etc., and only packets matching the rules will be stored. Besides the filter rules, Storage Filter provides a functionality to truncate the stored packet to a specified size. With Storage Filter, you can store interested packets, and even store only the first few bytes of interested packets. It saves storage space, and helps you avoid from policy problems in some environment.

Request a demo

from: http://www.colasoft.com/nchronos/whatsnew.php

How to Monitor Network Packet Loss

2014年6月10日 没有评论

When data is transmitting over computer network, one or more packets may fail to reach their destinations, and this is packet loss.

Packet loss can be caused by multiple factors including network congestion, the performance or policy of networking devices, and networking hardware faults.

Download Capsa

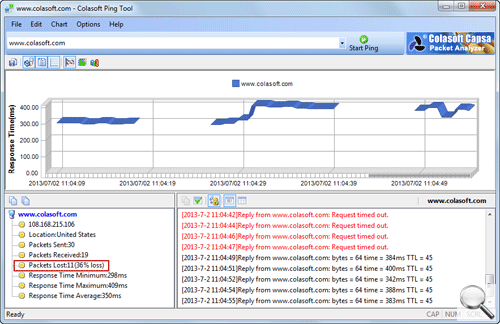
To test the packet loss rate, you can use Colasoft Ping Tool:

To monitor network packet loss to thereby monitor the quality of the network, you can use Colasoft Capsa.

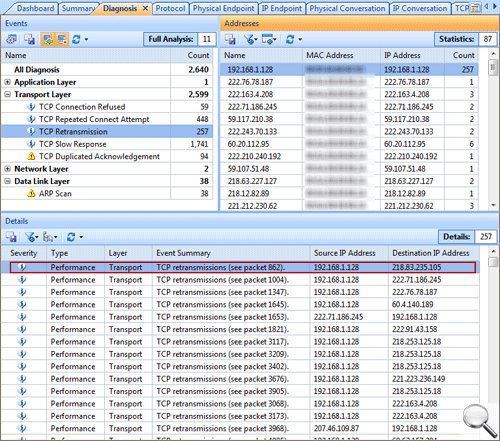
There is a Diagnosis view on Capsa.

  1. If you have a diagnosis event of TCP Retransmission, it means there is maybe packet loss on the network (according to the transmission policy based on TCP/IP protocols, the packet will be retransmitted if it is lost).

  2. Then, double-click the event on the Details pane:

  3. A window pops up to show the decoding information. According to the Sequence number and the Acknowledge number, it is determined that there is packet loss on the network.

Packet loss is not always a bad thing. It depends on the type of data being sent. For example, when a text document is transmitted, it is unacceptable to drop a single packet. But, for VoIP (Voice over IP) traffic, it is acceptable to drop one or two packets every now and then.

Download Capsa

source: www.colasoft.com

How to Capture Wireless Network Traffic

2014年6月9日 没有评论

As an innovative and high quality network analysis solution, Capsa network analyzer is not only designed to monitor and analyze wired network traffic, but also for wireless LAN traffic, including 802.11 a/b/g/n networks.

The Enterprise Edition of Capsa network analyzer provides you the capability of wireless network capturing and encrypted wireless data decoding. No matter which encryption type an AP uses, all WEP, WPA and even the hardest WPA2 wireless traffic can be decrypted with the pre-specified security key. Additionally you do not have to figure out the encryption type of an AP, Capsa identifies and matches the encryption type of keys automatically.

Download Capsa

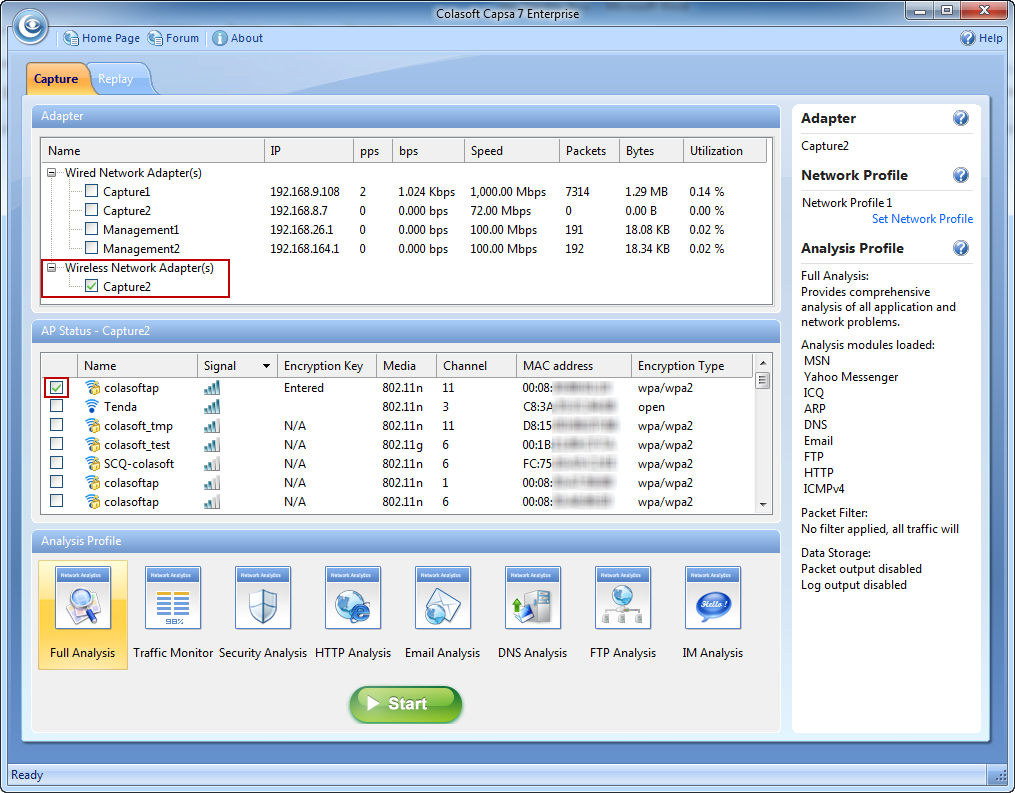
We all know that users have to connect to an AP (Access Point) in order to access wireless network; users must have a wireless network adapter in order to access a wireless AP. Therefore, to capture wireless traffic, we use Capsa to monitor a wireless network adapter.

Please follow steps below to monitor and capture the traffic of wireless network.

1. On the Start Page, choose a wireless network adapter. Once a wireless network adapter is enabled, Capsa automatically detects and displays all available APs.

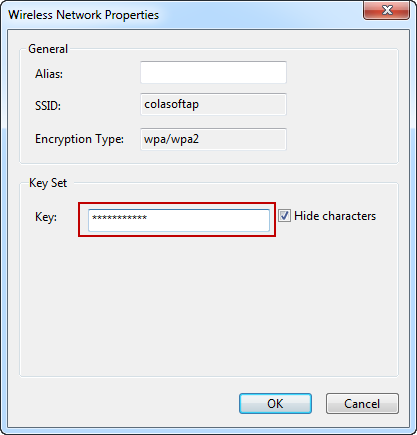
2. Choose an AP that you want to monitor, and if the AP is encrypted, enter the password for it. Once an encrypted AP is enabled, a dialog box pops up to let you enter the key. If the dialog box doesn’t pop up, just double-click the AP to open the box.

3. Click Start to start monitoring; or if you want to set up alarms, capture filters, packet auto-saving, choose a proper network profile and a proper analysis profile and then click Start to start monitoring

  • Once a wireless network adapter is used for capturing packets, it cannot be used for accessing the network anymore.
  • If you enter the wrong key for an AP, the analysis project will run as well but it will not decode any packets.
  • One analysis project can monitor multiple APs at a time, but the APs must be at the same channel.

 To decode and analyze wireless traffic, you are recommended to:

  • Make sure the password for monitored AP is correct.
  • Be close enough to the wireless router (signal source) to thereby capture all packets.
  • Monitor the AP before other hosts access the network to thereby capture EAPOL handshake packets.

Download Capsa

from www.colasoft.com

nChronos How-to: Define and Customize a Report

2014年6月3日 没有评论

Colasoft nChronos provides twelve system reports, and users can define new reports according to need.

To define a report,,

1. On the Report window, first click the node User-Defined Reports, and then click to open the New Report dialog box:

2. Enter the report name and the description.

3. Select the report scope.

  • If you want to create a report for all network objects, click Global, which means the report statistics are calculated based on all network objects.
  • If you want to create a report for a specific network object, click Limited to open the Report Scope dialog box:

    The scope could be IP addresses, MAC addresses, network segment, or a user-defined application, which means the report statistics are calculated based on selected scope.

4. Click the report modules you are interested and then click Add to add the interested report modules to the new report. Different report scope is provided with different report modules. The Global scope is provided with all report modules. For some modules, you can set the number of statistical objects.

5. Click OK to save the definitions. You can view the new report under the node User-Defined Reports.

Besides defining new reports, you can customize the company name, company logo, author, report title prefix, whether to show create time, and all these settings can be done on the Report Notification page from Server web portal:

Download Capsa


From www.colasoft.com

nChronos How-to: Set up a Traffic Alarm and Get Notification Emails

2014年6月3日 没有评论

nChronos provides a Traffic Alarm, which is defined by users, so as to notify there is traffic abnormal on the network.

To set up a traffic alarm,

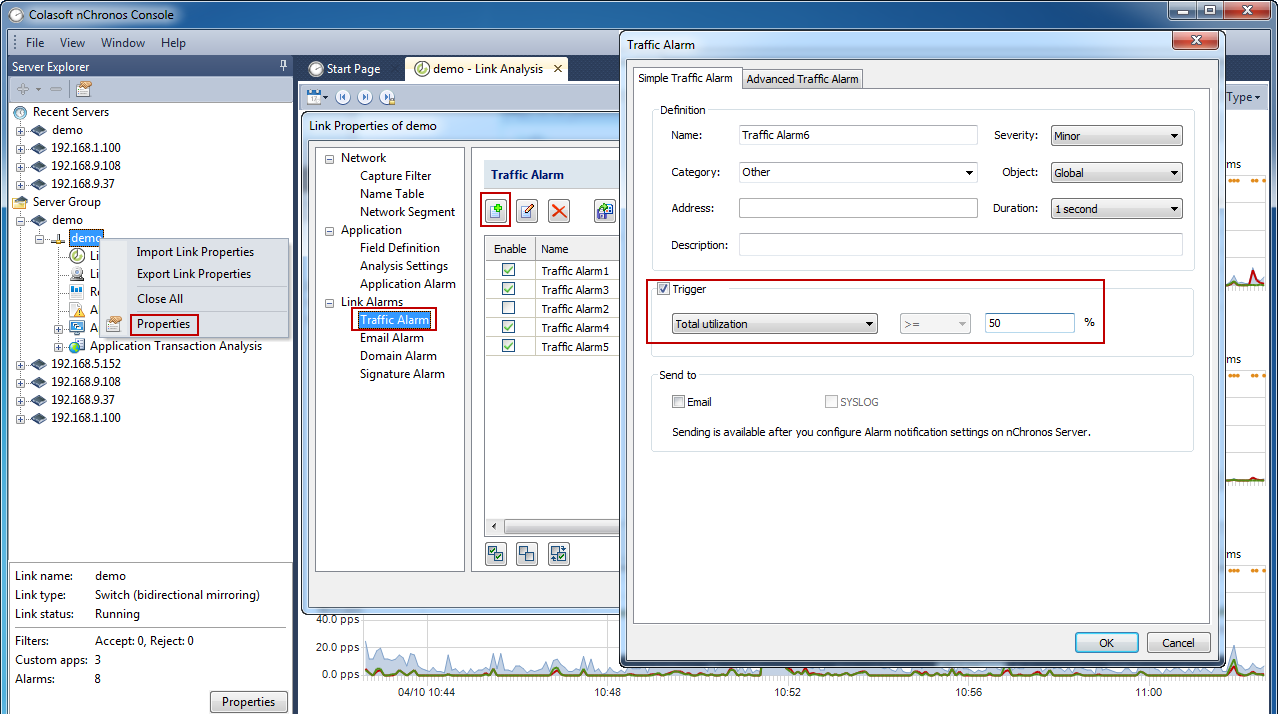
1. Right-click the network link, click Properties to open the Link Properties dialog box. On the Link Properties box, go to the Traffic Alarm tab, and click the New Traffic Alarm button to open the Traffic Alarm box:

Download Capsa

2. On the Simple Traffic Alarm tab of the Traffic Alarm dialog box, complete theDefinition section. The following list describes the options:

  • Name: The name of the new alarm.
  • Severity: The severity of the new alarm. It could be Minor, Major, and Severity.
  • Category: The category of the new alarm.
  • Object: Specifies the object that the alarm is made for.
  • Address: This setting will change to be Application when the Object setting is Any application or Single application. This setting is for specifying an address or an application.
  • Duration: The time that the trigger condition lasts.
  • Description: The description of the alarm.

3. Select the Trigger checkbox to set the trigger condition.

4. Click OK on the Traffic Alarm dialog box, and then click OK on the Traffic Alarm tab to make the traffic alarm take effect.

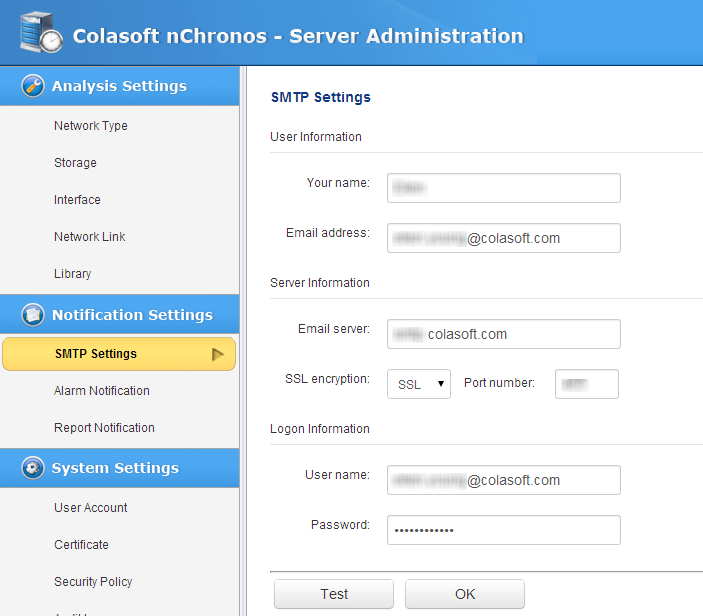
When alarms are triggered, there are alarm logs to record related information. The alarm logs are displayed on the Alarm window. If you want to receive emails containing the alarm logs, you need to enable the checkbox Email  when defining an alarm. If the checkbox is unavailable, you should first configure SMTP settings and Alarm Notification settings from Server web portal:

Download Capsa


source: www.colasoft.com

Colasoft nChronos How-to: Define and Customize a Report

2014年5月30日 没有评论

Colasoft nChronos provides twelve system reports, and users can define new reports according to need.

To define a report,,

1. On the Report window, first click the node User-Defined Reports, and then click to open the New Report dialog box:

2. Enter the report name and the description.

3. Select the report scope.

  • If you want to create a report for all network objects, click Global, which means the report statistics are calculated based on all network objects.
  • If you want to create a report for a specific network object, click Limited to open the Report Scope dialog box:The scope could be IP addresses, MAC addresses, network segment, or a user-defined application, which means the report statistics are calculated based on selected scope.

4. Click the report modules you are interested and then click Add to add the interested report modules to the new report. Different report scope is provided with different report modules. The Global scope is provided with all report modules. For some modules, you can set the number of statistical objects.

5. Click OK to save the definitions. You can view the new report under the node User-Defined Reports.

Besides defining new reports, you can customize the company name, company logo, author, report title prefix, whether to show create time, and all these settings can be done on the Report Notification page from Server web portal:

Download Capsa


Read more…

Colasoft nChronos How-to: How to Display IP Addresses as Host Names

2014年5月28日 没有评论

How to Display IP Addresses as Host Names

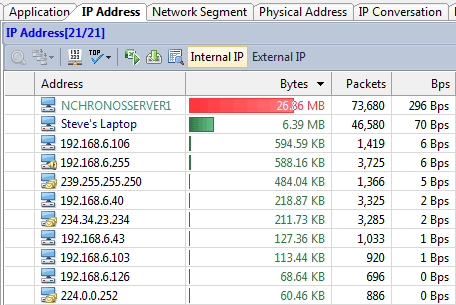
If you use nChronos to monitor traffic on a core switch you will see lots of internal IP addresses, and also the Internet IP addresses. You can find that most of the Internet IP addresses are shown as their domain name, such as www.colasoft.com, and www.google.com, etc. Wouldn’t it be great if nChronos shows host names of our local machines, because they are much easier to understand, rather than just IP addresses? This tips article will show you how to use Name Table to display IP and MAC addresses as host names.

Download Capsa

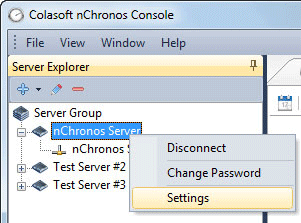
Suppose that there is a user, Steve, whose laptop has this IP address, 192.168.8.25, and you want nChronos to show his IP address as the text – Steve’s Laptop. First you run nChronos Console, connect to the server, right-click on the server name, and clickSettings from the context menu. Then select Name Table on the Server Settingswindow.

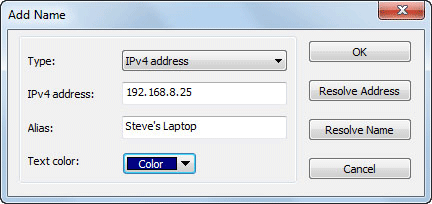
Then click the Add… button on the right side, you see a new dialog box. On this dialog box, input the IP address, 192.168.8.25, and input Steve’s Laptop in the Alias textbox. You can even choose the font color for this name if you like. Then click OK.

There is a little trick that you can input the IP address and click Resolve Address to find the host name automatically. It uses NetBIOS protocol and it’s able to retrieve the host name from that system. Or you can click Resolve Name button to translate the host name into IP address.

Download Capsa

The names you add will be saved on nChronos server, so you see them from every nChronos console. And besides IP addresses, you can still give names to MAC addresses, only that you cannot use name resolution function for MAC addresses.

You’ll find that you cannot click the Edit and Delete buttons sometimes. That’s because you have link window open, and the window uses the names for display. So it doesn’t allow any changes to the names if a link window is open. So you just close all link windows of that nChronos server, and you’ll find the buttons are clickable now.

Colasoft nChronos How-to: How to Connect to nChronos Server

2014年5月26日 没有评论

How to Connect to nChronos Server

Based on the architecture that nChronos stores all data on nChronos Server while nChronos Console works like a display, users who want to view network data have to connect to nChronos Server first.

To connect to nChronos Server, you should first add nChronos Server to nChronos Console.

To add nChronos Server,

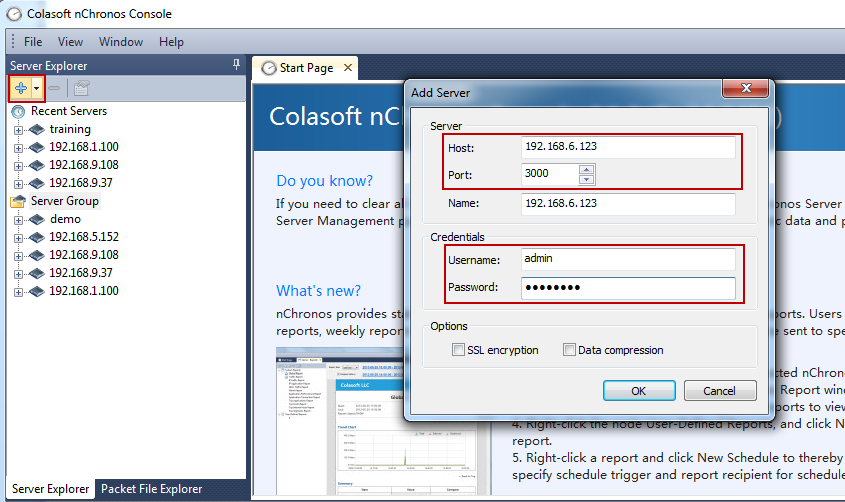
1.On the Server Explorer, clickto open the Add Server dialog box:

2. Complete the dialog box. See the following list of each label for more information.

  • Host: The IP address of the management interface on nChronos Server.
  • Port: The port number for connecting to Server. It is 3000 by default.
  • Name: A readable name for identifying the Server, for example, Marketing Dept. It will be the same as the IP address if you don’t enter one.
  • Username: The account for logging the Server.
  • Password: The password for the account.
  • SSL encryption: Applies SSL encryption when transmitting data from the Server to the Console.
  • Data compression: Compresses the data in the transmission from the Server to the Console.

Click OK to save the settings. Then the added server will display under the Server Group on the Server Explorer.

After adding nChronos Server, on the Server Explorer double-click it to make the connection, and then you will see the network link. Double-click Link Monitor and you will view real-time network traffic status.

Download Capsa

Source: colasoft.com