存档

文章标签 ‘Capsa network analyzer’

Released: Capsa Network Analyzer 7.3.1

2010年10月20日 没有评论

We are so proud to announces the release of Capsa Network Analyzer 7.3.1. A brand-new analysis profile-Security Analysis Profile is added as well as more powerful Reporting Capabilities to enhance user experience.

The newly-designed Security Analysis Profile makes it more convenient and easier for users to find out potential security events with six new customer-requested Views. With Capsa 7.3.1, users can not only choose to open and close specific View, but also set up the sequences of Views to display. Report Logo Preview is available in this version which highly enhances Capsa’s reporting capabilities.

Roy Luo, CEO of Colasoft, states, “This new version addresses users’ requirement of security events analysis and also demonstrate our responsiveness. We only display security-related information in Diagnosis and Matrix Views before, this time we add six Views to broaden the scope of Capsa and provide better analysis experience. We’ll spare no efforts to provide extended capabilities to Capsa.”

New features of Capsa network analyzer 7.3.1:

Unique security analysis profile, analyzing DoS attack, ARP attack, and worm activities, etc
Flexible tab management panel of the main view
Data Storage option on the Start Page for packet and log save settings
Add Report Logo preview in Report Settings

New Views in Security Analysis Profiles:

ARP Attack: detects ARP attack activities and provides source MAC addresses
Worms: detects suspicious worm activities and provides details including source IP addresses
Dos Attacks: detects devices joining in a DoS attack to attack a remote site, and provides details on the devices
Dos Attacked: detects the devices under a DoS attack and provides details on targeted devices to cut off the attack
TCP Port Scan: detects suspicious TCP port scanning activities and details including attacker addresses
Suspicious Conversation: detects suspicious conversations of HTTP, FTP, SMTP and POP3, and provides details to figure out the problem

Capsa 7.3.1 runs under Windows XP/2003/Vista/7. A trial version is available for download at the company’s website: http://www.colasoft.com/
Finding out who is downloading in the Network

2010年7月30日 1 条评论

There comes the moment when the local network becomes very slow and they are suspicious of downloading in their network. To ensure the normal use of bandwidth, they need to find out who’s downloading in the network quickly and stop them to make sure everyone can work with efficiency. But many just don’t know how where to get started.

With Capsa Network Analyzer, you can find out the downloading computers within five minutes. Capsa captures all the traffics in the network, going-in and coming-out, and analyzes them to provide you enough statistics of the traffic. To find out who is downloading, we always start from looking into traffic volume of each machine.
Why should we start from traffic volume? That’s because when the downloading is digesting your bandwidth greedily, they will always generate greater traffic volume, not packets but bytes number.

Step1. Run Capsa, using Full Analysis with no filter, and capture traffic for three minutes.
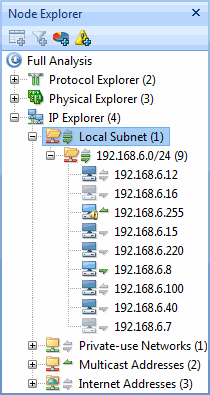
Step2. Highlight IP Explorer -> Local Subnet in Node Explorer window.
node-explorer

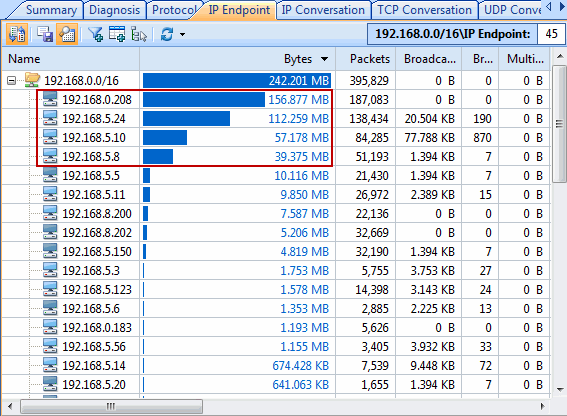
Step3. Open the IP Endpoint tab in the Main View.Click Bytes column header to rearrange the list in DESC order.
ip-endpoint
The IP addresses with the longest bars on the top of the list are the suspects. But we need to eliminate the ones we trust. Then, we locate the machines with their IP addresses and warn them to stop downloading right away. It takes no more than five minutes and really it’s simple, right?

This article focuses on normal downloading, while there is another kind of downloading, Bit Torrent, out there. If you are interested about finding out Bit Torrent downloading in your network, please refer to here.

ITWire: Review – Colasoft Capsa network analyser

2010年7月25日 没有评论

by David M Williams
July 26, 2010

If you run any type of network infrastructure there will come a time you need a low-level packet sniffer to work out just what is going on. Colasoft’s Capsa product challenges the myth these tools must be hard to use.
start_page
Have you ever had users ask why is the network so slow? Chances are high any IT professional will have looked into network related faults but found it difficult to get a handle on just what is going on because Ethernet is so, well, ethereal.

Here is where a network analyzer comes in handy. It will sniff the raw packets of data flying about as they happen and give you meaningful information to make intelligent determinations.

Previously I have talked about the tremendous open source product WireShark but WireShark isn’t for everyone. For one, the Windows port requires GTK+ and Glib to be installed which some Windows administrators aren’t keen to do. For another, although it is less arcane and cryptic than a command-line tool like tcpdump it’s still not user-friendly enough for many.

Here is where Colasoft’s Capsa product comes in. As you might guess, it is a deep low-level network protocol analyzer and its purpose is to give you the low-down on just what is happening on your network.

Where it stands out from the competition is its brilliant ease of use. Capsa adopts the same ribbon style interface as seen in Microsoft Office 2007 and it is a snap to navigate between tabs and check out the options and power available.

When it comes to network analysis so much is going on that it’s a must to separate out the chatter from the data that matters. Capsa makes it a cinch to hone in on what you want with easy to use filters and rules.

Capsa also has a concept of projects, meaning you can set global filters and rules to always apply but also make specific filters and rules for individual projects, letting you switch between these as needed.

Capsa displays intuitive options and is a genuine pleasure to use. I do not believe I’ve seen a more straightforward or elegant network analysis tool with the majority requiring expert knowledge to get any meaningful results.

Capsa is a commercial product so it does carry a price tag beginning at $US 549 for one license without maintenance but if your job requires you to troubleshoot network faults then the software will pay for itself.
As well as the commercial support Colasoft provide an extensive and helpful FAQ. A free trail of Capsa is avaliable here.

How to detect an email worm with Capsa network analyzer 7?

2010年7月22日 没有评论

In networking, an email worm is a computer worm which can copy itself to the shared folder in system. And it will keep sending infected emails to stochastic email addresses. In this way, it spreads fast via SMTP mail servers. An email worm can send lots of infected emails in a very short time and it will never stop unless it’s removed. It will cause a large traffic and make the system go slowly. Sometimes it even makes the mail server crash. This article aims to teach you how to detect an email worm with Capsa network analyzer 7.

About Capsa 7

Capsa 7 is the flagship product of Colasoft. It is based on the second-generation Colasoft Packet Analysis Engine (CSPAE), which substantially improved the data processing speed and guaranteed the analysis performance in large traffic networks. Some unique features and ideas are introduced to Capsa 7, like Network Profile, this function allows user to set and save network profiles for different environments (departments, clients), making their analysis more customized, accurate and efficient. Another prominent feature is Analysis Profile which provides flexible, extensible and effective analysis performance based on user’s analysis objectives.

Step 1 of detecting an email worm with Capsa network analyzer 7: Diagnosis tab

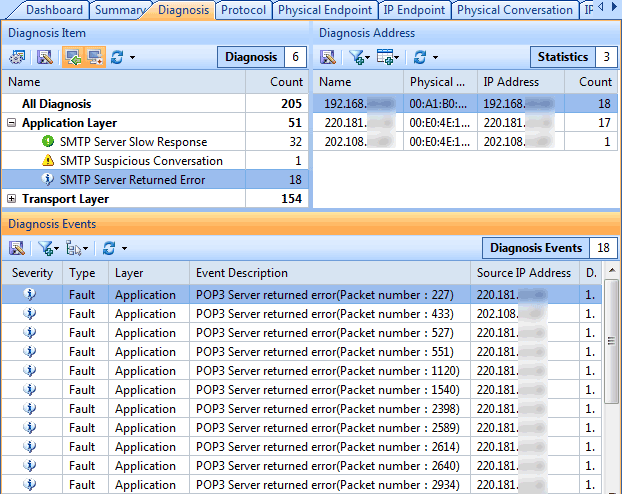
In the Diagnosis tab we can see all the network issues automatically detected by Capsa network analyzer 7 , also some causes and solutions are suggested.
diagnosis-tab

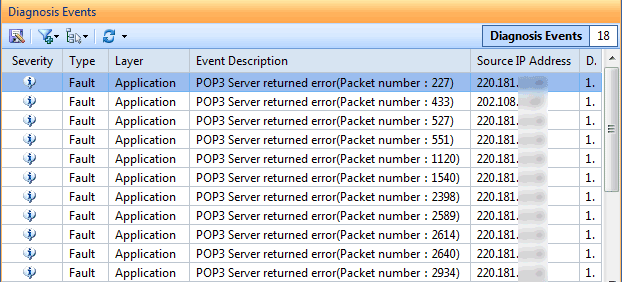
If there is a host infected with an email worm, we should be able to see SMTP events in the application layer like this:
diagnosis-events

Step 2 of detecting an email worm with Capsa network analyzer 7: Locate the source IP

Possibly the source IP is the host infected with an email worm as it is sending too many emails in a short period of time with SMTP. So let’s locate the source IP in the Node Explorer window with the Locate shortcut in the right-click menu.

Step 3 of detecting an email worm with Capsa network analyzer 7: Log tab

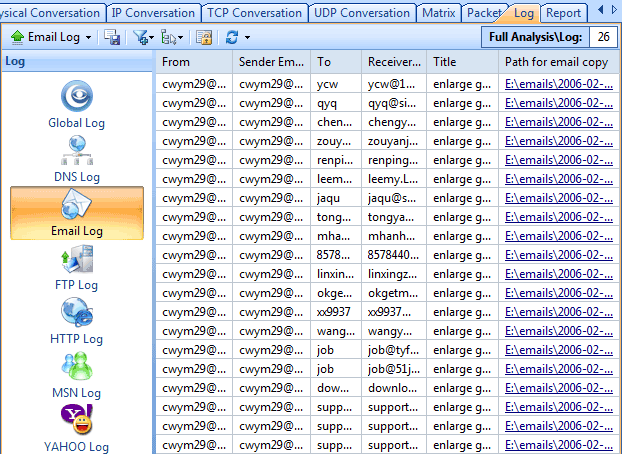
Check if the host is sending emails to a large number of recipients in a very short period of time. If so, we can determine the host is infected with an email worm and should be handled immediately. We should be able to see logs in the tab like this:
log-tab

No doubt the final step is to isolate the host and kill the email worm with some AV software.So, I’m sure you already got how to detect an email worm with Capsa network analyzer 7. A free trail of Capsa network analyzer 7 is avaliable at http://www.colasoft.com/.

How to detect ARP attacks in windows 7 with Capsa network analyzer?

2010年7月19日 没有评论

ARP attacks also known as ARP spoofing is a technique used to attack an Ethernet wired or wireless network. It is becoming increasingly popular among internet raggers because of its simpleness, fastness, and effectiveness, thus causing severe influence to the internet environment. As more and more people trust windows 7, it is very important to find a network analyzer that supports windows 7. Capsa network analyzer is such a great software that supports windows 7. The purpose of this article is to teach you how to detect ARP attacks in windows 7 with Capsa network analyzer.

The main point of ARP attacks detection is to locate the source of the attack when there is any ARP attack happens to our network. Capsa network analyzer can do it quickly and accurately. First of all, you need to download Capsa network analyzer at its official site and install it correctly. Now let’s see how we can achieve that.

Solution 1 to detect ARP attacks: Diagnosis Tab

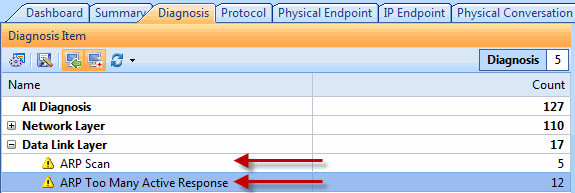
The Diagnosis tab is the most direct and effective place we check the location of ARP attack, and should be our first choice.
diagnosis-tab

Solution 2 to detect ARP attacks: Protocol Tab

As shown in the following figure, the status of ARP packets are displayed in the Protocol tab, Here we must pay special attention to the value of ARP Request and ARP Response. The ratio of ARP Request and ARP Request should be approximately 1:1 under general condition. If there is a great difference between these two values, there may be ARP attacks in the network.
protocol-tab

Solution 3 to detect ARP attacks: Packet Tab

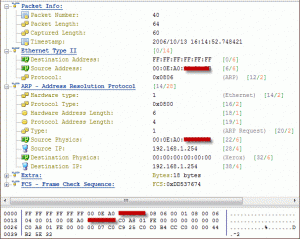
Packet decoding information in the Packet tab can tell us the original information of ARP packets, by decoding ARP packets, we can find out the source and destination of the ARP packets, the function and the reality of these ARP packets.
packet-tab

Solution 4 to detect ARP attacks: Physical Endpoint Tab

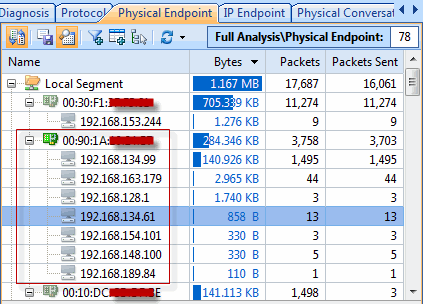
In the Physical Endpoints tab we can view the correlation of MAC address and IP address. Generally speaking, one MAC address shall have only one IP address corresponding to it. If one MAC address has multiple IP addresses to it, the condition may be:

1.the host with the MAC address is the gateway;
2.these IP addresses are bound to the MAC address manually;
3.ARP attack
physical-endpoint-tab

Soluton 5 to detect ARP attacks: Matrix Tab

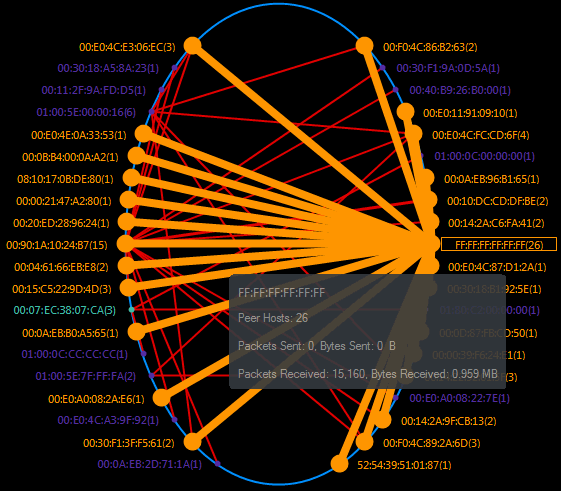
The Matrix tab allows us to see communication information between those hosts in the network, which helps us to fast identify abnormal conditions and locate the attack source.
matrix-tab

From the above 5 solutions on how to detect ARP attack in windows 7 with Capsa network analyzer, it will greatly enhance network administrators’ capability to identify ARP attacks and protect the network from ARP attacks, so as to ensure normal network operation.

How to monitor network traffic in windows 7 with Capsa network analyzer?

2010年7月13日 1 条评论

Network traffic is data in a network. In computer networks, the data is encapsulated in packets. So network traffic monitoring is to capture all the packets going down the network. Sometimes, it will be very useful to check your network activity. When Windows 7 network is very slow, internet browsing is very slow, connection problems and high network activity occurs when you do nothing, you will find this really helpful. The purpose of this article is to help you understand how to monitor network traffic in windows 7 with Capsa network analyzer.

About Capsa Network Analyzer

Capsa is an easy-to-use Ethernet packet sniffer (network analyzer or network sniffer) for network traffic monitoring and troubleshooting purposes. It performs real-time packet capturing, 24/7 network monitoring, reliable network forensics, advanced protocol analyzing, in-depth packet decoding, and automatic expert diagnosing. By giving you insights into all of your network’s operations, Capsa makes it easy to isolate and solve network problems, identify network bottleneck and bandwidth use, and detect network vulnerabilities.

Solution 1. Monitor network traffic in the Dashboard tab of Capsa network analyzer

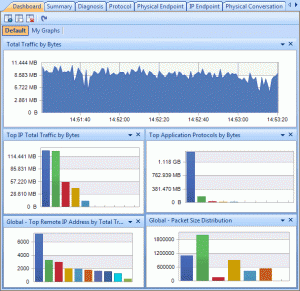
If we want to have a graphical view of the statistics or get a trend chart of the network traffic, then we can use the graphs in the Dashboard tab. It provides a great many of statistic graphs from global network to a specific node. You are able to as well create almost any kind of graph based on any MAC address, IP address and protocol, etc. With these graphs, you can easily find out anomalies of the network and get useful statistics.
dashboard-tab

Solution 2. Monitor network traffic in the Summary tab of Capsa network analyzer

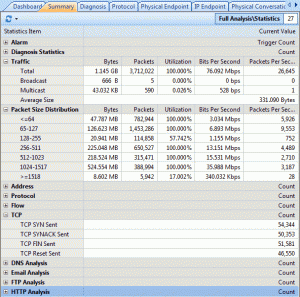
The Summary tab provides general information of the entire network or the selected node in the Node Explorer window. In the Summary tab we can get a quick view of the total traffic, real-time traffic, broadcast traffic, multicast traffic and so on. When we switch among the node in the Node Explorer window, corresponding traffic information will be provided.
summary-tab

Solution 3. Monitor network traffic in the Physical Endpoint and IP Endpoint tabs of Capsa network analyzer

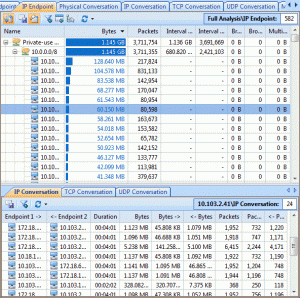
In these two endpoint tabs (Physical Endpoint and IP Endpoint), we can monitor network traffic information of each physical address node and IP address node, both local and remote. With their easy sorting feature we can easily find out the nodes with abnormal traffic, such as which hosts are generating or have generated the largest traffic.
ip-endpoint-tab

Solution 4. Monitor network traffic in the Protocol tab of Capsa network analyzer

The Protocol tab lists all protocols applied in your network transmission. In the Protocol tab we can monitor network traffic by each protocol. By analyzing the protocols in the network traffic, we can easily understand what applications are consuming the network bandwidth, for example, the HTTP stands for website browsing, and the POP3 stands for email, etc.
protocol-tab

Solution 5. Monitor network traffic in the Matrix tab of Capsa network analyzer

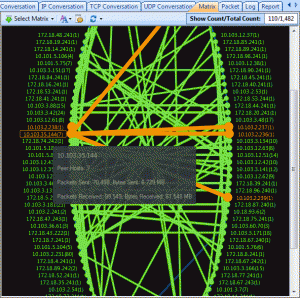
The Matrix tab visualizes all network connections and traffic details in one single graph. The weight of the lines between the nodes indicates the traffic volume and the color indicates the status. As we move the cursor on a specific node, network traffic details of the node will be provided.
matrix-tab

These are the very basic methods of monitoring network traffic in windows 7 with Capsa network analyzer, there are lot of advanced functions available on Capsa Network Analyzer 7 .

Share your experience with this tool and any new findings on this is welcomed.

Capsa network analyzer 7.2.1 reviewed by Firewall.cx

2010年7月5日 1 条评论

Author: Chris Partsenidis
July 3, 2010

Introduction

A Network Analyser is without doubt an Engineer’s best friend.
Using network analysing software, we are able to monitor our network and dig into the various protocols to see what’s happening in real time. This can help us understand much better the theoretical knowledge we’ve obtained throughout the years but, most importantly, help us identify, troubleshoot and fix network issues that we wouldn’t be able to do otherwise.
A quick search on the Internet will surely reveal many network analysers available making it very confusing to select one. Some network analysers provide basic functions, such as packet sniffing, making them ideal for simple tasks while others give you all the necessary tools and functions to ensure your job is done the best possible way.
Colasoft’s network analyser is a product that falls in the second category. We had the chance to test drive the Colasoft Network Analyser v7.2.1 which is the latest available version at the time of writing.
Having used previous versions of Colasoft’s network analyser, this latest version we tested left us impressed and does, in fact, promise a lot no matter what the environment demands.

Colasoft’s Capsa network analyser is available as a demo version directly from their website www.colasoft.com. We quickly downloaded the 21.8mb file and began the installation which was a breeze. Being small and compact meant the whole process didn’t take more than 30-40 seconds.
We fired up the software, entered our registration details, activated our software and up came the first screen which shows a completely different philosophy to what we have been used to:
reviews-colasoft-1
The Software
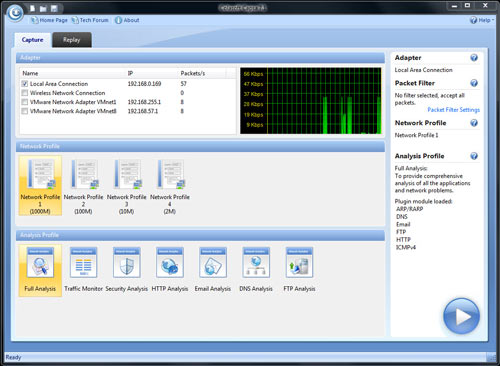
Before you even start capturing packets and analysing your network, you’re greeted with a first screen that allows you to select the network adaptor to be used for the session, while allowing you to choose from a number of preset profiles regarding your network bandwidth (1000, 100, 10 or 2 Mbps).
Next, you can select the type of analysis you need to run for this session ranging from Full analysis, Traffic Monitoring, Security analysis to HTTP, Email, DNS and FTP analysis. The concept of pre-configuring your packet capturing session is revolutionary and very impressive. Once the analysis profile is selected, the appropriate plug-in modules are automatically loaded to provide all necessary information.
For our review, we selected the ‘100Mb Network’ profile and ‘Full Analysis’ profile, providing access to all plug-in modules, which include ARP/RARP, DNS, Email, FTP, HTTP and ICMPv4 – more than enough to get any job done!
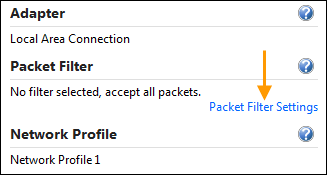
Optionally, you can use the ‘Packet Filter Settings’ section to apply filters to the packets that will be captured:
reviews-colasoft-2

The full review at http://www.firewall.cx/reviews-colasoft-v721.php

How to monitor instant message activity with Capsa?

2010年6月29日 没有评论

The latest released Capsa Network Analyzer 7.2 supports monitoring instant message activity, which not only gives us real time monitoring, but also auto-saving instant messages details to local disk. Whether a parent who has teenager kid, monitoring his teenager kids’ online activities like whom are they chatting with, what they are talking about are of great importance to make sure the kids are safe and will not be misled. Or a company policy requires taking some measures to guarantee the employees’ working efficiency, one of the measures is to find out who is chatting on MSN or Yahoo Messenger about some non-working stuffs. This article is to talk about how to monitor instant message activities with Capsa 7.2 as well as save the messages to local disk.

To monitor instant messages, we need first to enable the IM analysis modules in the analysis profiles, because none of them are enabled by double-clicking an analysis profile to change the profile settings.
analysis_profiles

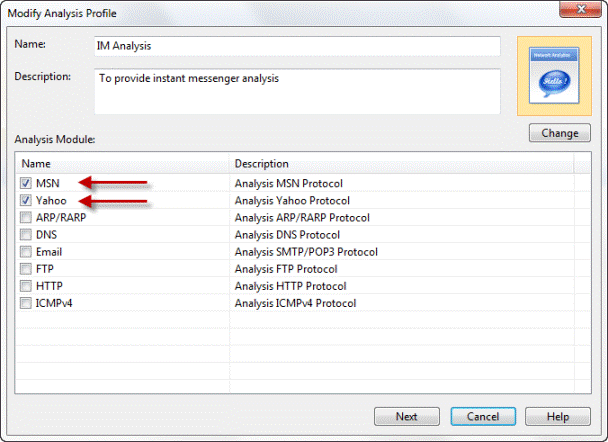
If we’d like to create a new analysis profile only used to monitor IM messages. Right-click anywhere in this section, and choose New from the context menu and only enable the MSN and Yahoo analysis modules.
im_analysis_modules

Then click Next and then OK to finish the settings. Now click the big run button to start a capture.

When the main program is initiated and we go to the Log tab which holds the IM monitor results. In this tab, we’ll see two IM logs, MSN log and Yahoo log, including the time, sender’s account and the receiver’s account.

Not only can Capsa monitor all IM activities in our network segment, but also save these records to a csv file. Click the Export icon, and give the file a name. We can open the csv file with Excel to make a deeper analysis.
im_monitor_log

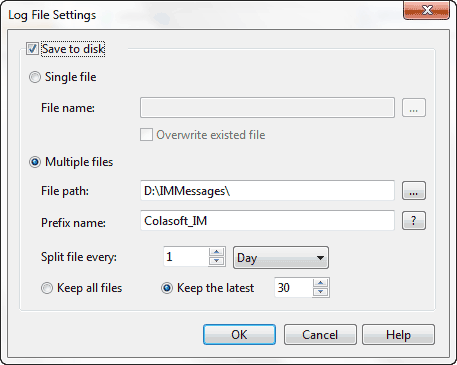
Someone may ask what if we are not around, is Capsa able to auto save the messages down to a file? Sure it is. Click the Log Settings icon, and click the Save Log File button. A new dialog box appears. Check Save to disk. There are two ways to save logs: save to a Single File and save to Multiple Files. For example, we enter the prefix for their name. And then decide how to split logs, say we split by everyone day. If we just want to save the latest files, we should check this and enter a number, say 30. We can read that we save everyday’s messages into a file, and just keep the latest 30. We’ll get the messages of the past 30 days. Now, any message goes from or to your network will be logged into a log file.
save_logs_to_disk

This is how Capsa monitors instant message activity and auto-saving the content to local disk. Hope it helps. And we have a video tuterial at our official site.

Capsa Network Analyzer 7.2.1’s Coming with IM & Email Monitor

2010年6月21日 1 条评论

June 22, 2010 – Colasoft, an innovative provider of all-in-one and easy-to-use network analyzer software, today announced the newest version 7.2.1 of its flagship product-Capsa network analyzer, which is the combination of powerful monitoring, alerting, and reporting capabilities. In this version, two long-awaited monitors are added in: IM monitor and Email monitor.

Emails are provided to employees as an efficient means of communication, along with this technological advancement are many collateral problems concerning enterprise information security, such as email worm thread, disclosure of trade secrets or other enterprises’ confidential information, etc. Capsa 7.2.1 provides you with powerful email monitoring. With the captured email file, you are accessible not only to basic email information such as client, server, sender name, time, etc, but also to the original content of the email. Capsa 7.2.1 supports auto-saving email content. All of the email information is captured and saved, which will serve as valuable electronic evidence when needed.

MSN (aka Live Messenger) and Yahoo Messenger are two of the most popular chat tools on internet, IM monitoring is a necessary and effective method for enterprises to ensure employees’ work efficiency. Capsa 7.2.1 gives a real-time instant message monitoring and recording. Capsa 7.2.1 is able to deliver the most accurate MSN and Yahoo messenger monitoring statistics which can be exported and saved for further analysis. To some extent, IM monitor helps enterprise achieve effective management as well as improve network and economic performance.

Besides IM and Email monitors, considering our users may have useful project files saved by version 6.9, Capsa 7.2.1 supports opening project file from Capsa 6.9.

Capsa 7.2.1 runs under Windows XP/2003/Vista/7. A trial version is available for download at the company’s website: http://www.colasoft.com/
About Capsa

Capsa is an easy-to-use Ethernet packet sniffer (network analyzer or network sniffer) for network monitoring and troubleshooting purposes. It performs real-time packet capturing, 24/7 network monitoring, reliable network forensics, advanced protocol analyzing, in-depth packet decoding, and automatic expert diagnosing. By giving you insights into all of your network’s operations, Capsa makes it easy to isolate and solve network problems, identify network bottleneck and bandwidth use, and detect network vulnerabilities.

About Colasoft

Ever since 2001, Colasoft has been an innovative provider of all-in-one and easy-to-use software solutions for users to monitor network activities, analyze network performance, enhance network security, and troubleshoot network problems. Currently, more than 5000 customers in over 80 countries trust the company’s flagship product, Capsa Packet Sniffer, as their network monitoring and troubleshooting solution. Featured customers include Alcatel, Airbus, Dell, Ericsson, IBM, Intel, and Pepsi. Learn more about Colasoft and its solutions, please visit http://www.colasoft.com/
How to monitor FBHOLE worm with Capsa network analyzer

2010年6月9日 1 条评论

We provide some tips on monitorring FBHOLE worm. In this article, we specificlly provide a step by step guide on how to build a fileter and monitor FBHOLE worm with Capsa network analyzer.

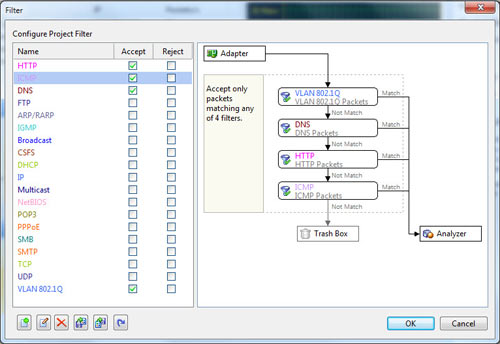
1. On the Start Page, click Packet Filter Settings link to open the Filter dialog box, which organizes all the filters.

packet_filter_settings_link

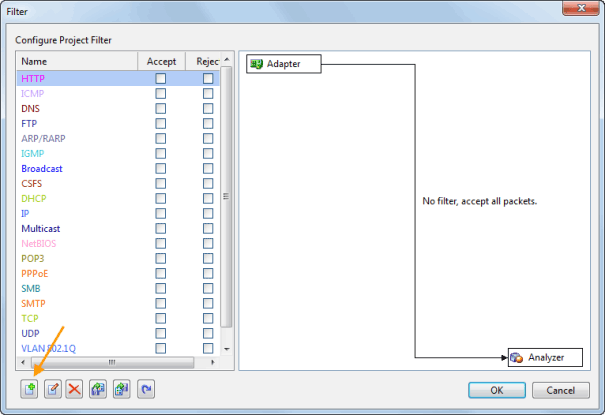
2. Click the Add button (on the bottom-left corner of the dialog box) to build a new filter.

new_filter

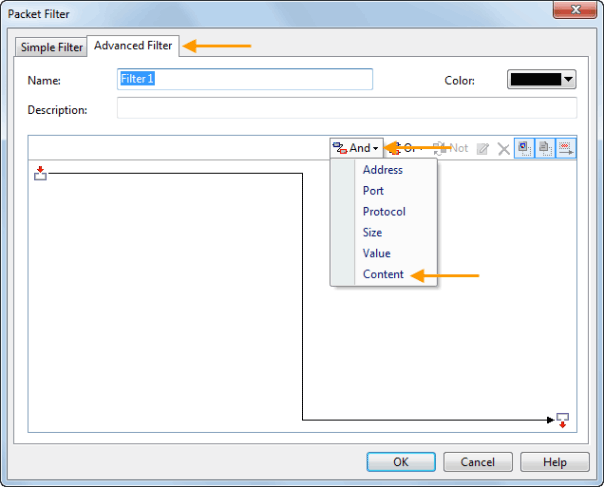
3.In the new window, choose Advanced Filter tab. And click the And icon. Choose Content from the context menu.

advanced_filter

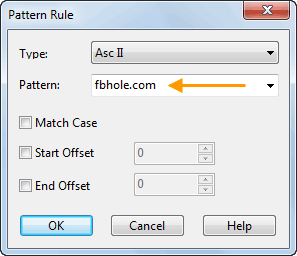
4. In the Pattern Rule window, just enter keyword: fbhole.com in the Pattern text box. Then click OK to close the window.

pattern

5. Click OK again to close the Packet Filter window.

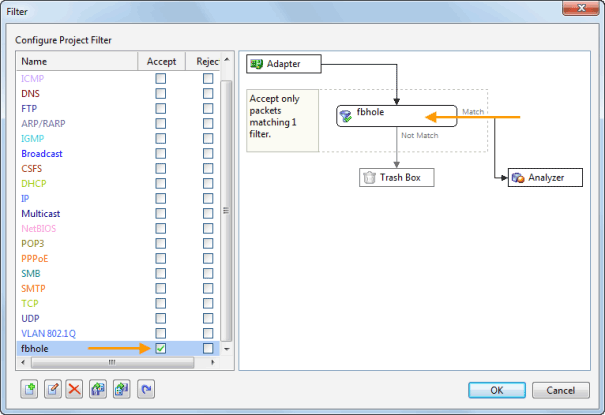
6. Check the Accept checkbox of the filter just built which enables the program only capture the packets containing keyword “fbhole.com”.

accept

7. Click OK and then start a capture.

8. If there is already a project running, you’d better stop it to build the filter and restart the capture. To build a filter in a running project: click the Filter button on the Ribbon. You will also see the Filter dialog box as well.

filter_ribbon