HOW TO CAPTURE PACKETS ON YOUR CISCO ROUTER WITH EMBEDDED PACKET CAPTURE – CONFIGURATION, TROUBLESHOOTING & DATA EXPORT
If you’re tired of setting up SPAN sessions to capture network traffic transiting your network and Cisco router, it’s time to start usingCisco’s Embedded Packet Capture (EPC), available from IOS 12.4.20T and above. We will show you how to configure Cisco’s Embedded Packet Capture, to capture packets transiting a Cisco router, save them to its flash disk or export them directly to anftp/tftp server for further analysis with the help of a packet analyzer such as Colasoft Capsa or Wireshark.
We’ve selected to Colasoft Capsa as our packet analyzer because of its amazing breakdown and presentation of captured packets.
Finally, we’ve also included a number of useful Embedded Packet Capture troubleshooting commands to monitor the status of thecapture points and memory buffer.
Let’s take a look at some of the basic features offered by Embedded Packet Capture:
- Capture IPv4 and IPv6 packets in the Cisco Express Forwarding path
- Ability to specify various capture buffer parameters
- Export packet captures in PCAP format, enabling analysis with external tools such as Colasoft Capsa, Wireshark.
- Display content of the capture buffer
- Granularity of captured packets via Standard or Extended Access Control Lists (ACLs)
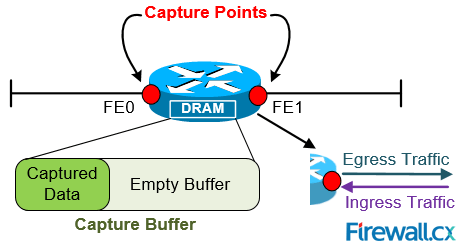
 Figure 1. Understanding Basic Embedded Packet Capture Terminology
Before we dive into the configuration of Cisco EPC, let’s explain the two terms used during the EPC configuration: Capture Buffer &Capture Point. We’ll use figure 1 to help illustrate the terms.
CAPTURE BUFFER
Capture buffer is an area in memory for holding packet data. There are two types of Capture Buffers: Linear and Circular.
Linear Capture Buffer: When the capture buffer is full, it stops capturing data.
Circular Capture Buffer: When the capture buffer is full, it continues capturing data by overwriting older data.
CAPTURE POINT
Capture point is a traffic transit point where a packet is captured. Capture points need to define the following:
- IPv4 or IPv6
- CEF (Cisco Express Forwarding or Process-Switched
- Interface e.g Fast Ethernet0, Dialer0 etc.
- Direction of traffic to the interface: in (ingress), out (engress) or both
CONFIGURING CISCO EMBEDDED PACKET CAPTURE
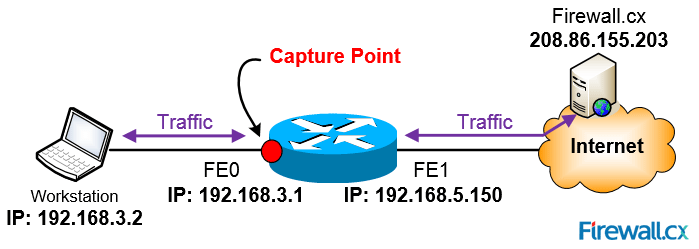
EPC configuration is an easy 5 step configuration process. Examining the diagram below, our goal is to capture ingress & egress packets on interface FastEthernet0 from workstation 192.168.3.2 to and from Firewall.cx:
 Figure 2. Capturing packets betwen host 192.168.3.2 and Firewall.cx
Note: None of the below configuration commands, except the optional access lists (filters), will be stored in the router’s running-configuration or startup-configuration. ‘Monitor’ commands are only stored in the router’s RAM and are lost after a router reboot.
STEP 1 – DEFINE A CAPTURE BUFFER
The capture buffer will store the packets to be captured. Our capture buffer will be named firewallcx_cap and will have size of 1024KB (1 Mb), which is the default size and will be set to linear type buffer:
STEP 2 – DEFINE THE TRAFFIC TO BE CAPTURED (OPTIONAL)
We can optionally configure to capture specific traffic. In our case, we need to capture traffic between hosts 192.168.3.2 and 208.86.155.203 (Firewall.cx). This is accomplished with the use of access control lists. We can make use of standard or extended access lists depending on the granularity required. If no access list is configured, all traffic will be captured.
R1(config-ext-nacl)# permit ip host 192.168.3.2 host 208.86.155.203
R1(config-ext-nacl)# permit ip host 208.86.155.203 host 192.168.3.2
R1(config-ext-nacl)# end
R1# monitor capture buffer firewallcx_cap filter access-list selected-traffic
Filter Association succeeded
Note: Our access list includes traffic originating from both hosts because we want to capture bidirectional traffic. If we included only one ACL statement, then only one-way traffic would be captured.
Our filter is now in place and we are ready for the next step.
STEP 3 – DEFINE CAPTURE POINT AND PARAMETERS
Here we define which interface will be the capture point. In our case, this is Fast Ethernet0 and we’ll capture both ingress and egress packets. During this configuration phase, we need to provide a name for the capture point, we selected CPpoint-FE0 to make it easy to distinguish.
Note: It is highly advisable to ensure ip cef is enabled to ensure minimum impact on the router’s CPU. If ip cef is not enabled, a message like the one below will appear, in which case you need to enable ip cef and re-enter the command.
IPv4 CEF is not enabled
R1# config t
Enter configuration commands, one per line. End with CNTL/Z.
R1(config)# ip cef
R1(config)# exit
R1# monitor capture point ip cef CPoint-FE0 FastEthernet 0 both
*May 25 14:54:40.383: %BUFCAP-6-CREATE: Capture Point CPoint-FE0 created.
STEP 4 – ASSOCIATE THE CAPTURE POINT WITH THE CAPTURE BUFFER
Here we associate the configured capture point with the capture buffer:
At this point, we are ready to start capturing packets!
STEP 5 – START, STOP CAPTURING PACKETS
It’s now time to start capturing those packets using the monitor capture point start command:
*May 25 14:57:02.091: %BUFCAP-6-ENABLE: Capture Point CPoint-FE0 enabled.
At this point, the router is capturing all traffic between our two hosts.
To stop the capturing process, use the monitor capture point stop command:
*May 25 15:00:51.419: %BUFCAP-6-DISABLE: Capture Point CPoint-FE0 disabled.
USEFUL VERIFICATION COMMANDS
1. To monitor the status of our buffer, we can use the show monitor capture buffer command:
Capture buffer firewallcx_cap (linear buffer)
Buffer Size : 1048576 bytes, Max Element Size : 68 bytes, Packets : 263
Allow-nth-pak : 0, Duration : 0 (seconds), Max packets : 0, pps : 0
Associated Capture Points:
Name : CPoint-FE0, Status : Active
Configuration:
monitor capture buffer firewallcx_cap size 1024 linear
monitor capture point associate CPoint-FE0 firewallcx_cap
monitor capture buffer firewallcx_cap filter access-list selected-traffic
R1#
2. To view Capture Point details, use the show monitor capture point all command:
Status Information for Capture Point CPoint-FE0
IPv4 CEF
Switch Path: IPv4 CEF , Capture Buffer: firewallcx_cap
Status : Active
Configuration:
monitor capture point ip cef CPoint-FE0 FastEthernet0 both
3. To see all information about the captured packets, use the ‘show monitor capture buffer’ command:
15:04:50.835 UTC May 25 2015 : IPv4 LES CEF : Fa0 None
15:04:51.015 UTC May 25 2015 : IPv4 LES CEF : Fa1 Fa0
15:04:51.015 UTC May 25 2015 : IPv4 LES CEF : Fa0 None
15:04:51.015 UTC May 25 2015 : IPv4 LES CEF : Fa0 None
15:04:51.195 UTC May 25 2015 : IPv4 LES CEF : Fa1 Fa0
15:04:51.443 UTC May 25 2015 : IPv4 LES CEF : Fa1 Fa0
15:04:51.443 UTC May 25 2015 : IPv4 LES CEF : Fa1 Fa0
15:04:51.443 UTC May 25 2015 : IPv4 LES CEF : Fa1 Fa0
4. To examine the buffer’s contents, use the ‘show monitor capture buffer dump’ command:
15:04:50.835 UTC May 25 2015 : IPv4 LES CEF : Fa0 None86621680: 5475D061 2856F4CE 469A161C TuPa(VtNF…
86621690: 08004500 00347440 40007F06 57B7C0A8 ..E..4t@@…W7@(
866216A0: 0302D056 9BCBC6BC 00506100 C18E0000 ..PV.KF<.Pa.A…
866216B0: 00008002 20003676 00000204 04EC0103 …. .6v…..l..
866216C0: 03020101 040200 …….
15:04:51.015 UTC May 25 2015 : IPv4 LES CEF : Fa1 Fa0
86621680: F4CE469A 161C5475 D0612856 tNF…TuPa(V
86621690: 08004500 00340000 40003406 16F8D056 ..E..4..w.4..xPV
866216A0: 9BCBC0A8 03020050 C6BC8F58 11D26100 .K@(…PF<.X.Ra.
866216B0: C18F8012 39087B6D 00000204 05AC0101 A…9.{m…..,..
866216C0: 04020103 030700 …….
15:04:51.015 UTC May 25 2015 : IPv4 LES CEF : Fa0 None
86621680: 5475D061 2856F4CE 469A161C TuPa(VtNF…
86621690: 08004500 00287443 40007F06 57C0C0A8 ..E..(tC@…W@@(
866216A0: 0302D056 9BCBC6BC 00506100 C18F8F58 ..PV.KF<.Pa.A..X
866216B0: 11D35010 4137B408 00000000 00000000 .SP.A74………
866216C0: 04
EXPORT CAPTURED DATA
In most cases, the data captured will need to be exported to a network analyzer for additional analysis within a user friendly interface.
Note: Captured buffer can be exported to a number of locations including: flash: (on router), ftp, tftp, http, https, scp (secure copy) and more.
Export the captured buffer using the monitor capture buffer export command. Keep in mind that we must stop the capturing process before exporting the data, and also have our tftp server ready to accept the captured data:
R1#
*May 25 15:35:31.975: %BUFCAP-6-DISABLE: Capture Point CPoint-FE0 disabled.
R1#
R1# monitor capture buffer firewallcx_cap export tftp://192.168.5.53/capture.pcap
!!!!!!!
R1#
At this point, the capture.pcap file should be located on our workstation.
We are now ready to import the data into our network analyzer Capsa for further analysis:
 Figure 3. Importing packets into Colasoft Network Analyzer
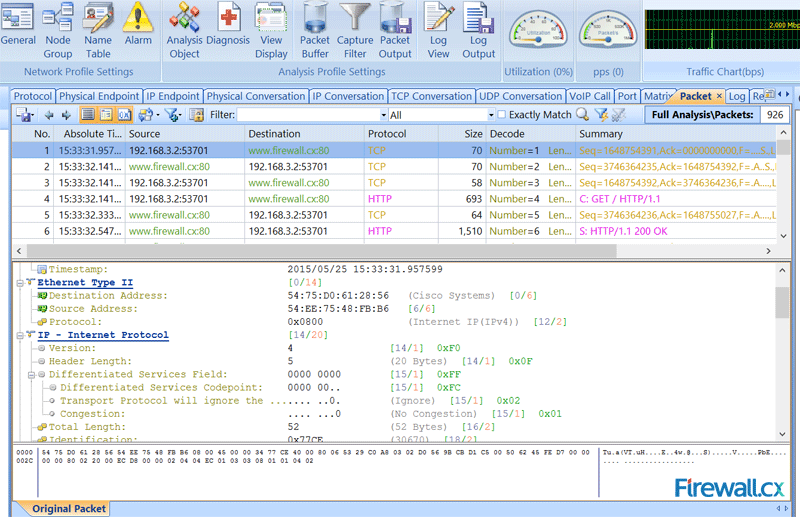
Once the import process is complete, our captured packets are displayed and we can analyse them in a more user-friendly environment:
 Figure 4. Packets displayed inside Colasoft Capsa network analyzer
This article introduced the Cisco Embedded Packet Capture feature offered on all Cisco router IOS platforms from version 12.4.20T and above. We explained terms used by the Embedded Packet Capture feature (Capture Buffer, Capture Point) and showed how toconfigured Embedded Packet Capture using 5 simple steps, but also how to export captured data from the Cisco router so that it can be imported into a network analyzer.


